Author: bloomingglenfarm

The farm has been bursting with peppers- hot peppers, bell peppers, sweet peppers, and cubanelles.  This recipe came as an idea from my brother and is perfect for your Labor Day barbecue. The hot peppers are used in a marinade for the chicken, while the other peppers are chopped up with onions to add to the kabob. Cooked on your grill, these kabobs are simple to assemble, beautiful and delicious!

Sweet and Spicy Chicken Kabobs

Ingredients:
½ pound boneless chicken breasts, cut into 1-inch cubes
½ fresh pineapple, peeled and sliced into cubes
2 sweet onions, peeled and cut into chunks
3 peppers (sweet, bell, or cubanelle), cut into 1-inch pieces

Marinade Ingredients:
½ cup pineapple juice
1 hot pepper, stem removed*
½ tsp sea salt
1/8 tsp black pepper

*You can use any hot pepper.  The one you choose will dictate the level of “heat” in the marinade.

**If you really enjoy spice, you can even add some chunks of hot peppers to the kabobs.

  • Prepare all kabob ingredients as listed above.
  • In a blender, combine marinade ingredients. Blend until fully combined.
  • Place chicken cubes in glass dish or bowl. Pour marinade over top and toss to coat.  Cover and refrigerate for at least two hours.  You can even marinate overnight.
  • You will need skewers. If using metal skewers, you don’t need to do anything extra.  If you are using wooden skewers, be sure to soak them in water for at least an hour before cooking kabobs.
  • After chicken is done marinating, assemble kabobs. Place a few pieces of chicken, some pineapple cubes, pepper pieces, and onion chunks on each kabob.
  • Preheat grill.
  • Once grill is hot, turn it down to low. It should be about 300-350°F.
  • Oil grill grates and then place kabobs in a single layer. Cook for about 20-25 minutes, rotating about every 5 minutes.

  • After about 20 minutes, test a piece of chicken to make sure it is cooked through. Once chicken is done, remove kabobs from grill.
  • You can serve the kabobs as is or with a side of rice.
  • Enjoy!

Recipe and photos by Stephanie Borzio.  Stephanie is a mom of three active boys and is an autoimmune warrior.  After battling her own health for several years, Stephanie found healing through food and lifestyle changes, including joining Blooming Glen Farm CSA of which she is a long time member.  She is a Board Certified Integrative Nutrition Health Coach who is passionate about sharing healthy living tips and real food recipes.  Instagram and Facebook: Tru You Essentials; Website: www.truyouessentials.com

It’s tomato season and these tasty fruits are abundant, whether it’s heirlooms, beefsteaks, plum tomatoes or the sweetest little cherry tomatoes!  For this dish, cherry tomatoes are the star.  Roasting and then adding them to the top of a sourdough toast with some basil-flavored whipped ricotta creates an amazing dish that is full of flavor.

Roasted Cherry Tomatoes and Whipped Ricotta Toast

Ingredients:
1 quart cherry tomatoes
½ medium onion (sweet, red, or yellow), chopped
2 Tbsp olive oil
½ tsp sea salt
¼ tsp black pepper
1 batch whipped ricotta (Whipped Ricotta with Grilled Vegetables – Blooming Glen Farm)
1 batch balsamic glaze (Grilled Eggplant with Balsamic Glaze – Blooming Glen Farm)
A few slices of NORD bread, toasted

  • Preheat oven to 400°F.
  • Place tomatoes and onion in baking dish.
  • Drizzle on oil and add salt and pepper. Toss to combine.
  • Bake for 35-40 minutes.
  • While the tomatoes are roasting, make a batch of whipped ricotta using basil as the fresh herb. You can also make a batch of balsamic glaze or use your favorite store-bought brand.
  • Assemble the toasts. Top each slice of toast with a layer of whipped ricotta.  Then scoop on some of the roasted tomato mixture.  Drizzle on the balsamic glaze.
  • Enjoy!

*You can also use the roasted tomato mixture on top of spiralized summer squash or your favorite protein.

Recipe and photos by Stephanie Borzio.  Stephanie is a mom of three active boys and is an autoimmune warrior.  After battling her own health for several years, Stephanie found healing through food and lifestyle changes, including joining Blooming Glen Farm CSA of which she is a long time member.  She is a Board Certified Integrative Nutrition Health Coach who is passionate about sharing healthy living tips and real food recipes.  Instagram and Facebook: Tru You Essentials; Website: www.truyouessentials.com

Husk cherries, also commonly referred to as ground cherries or husk tomatoes, are small golden orange fruits wrapped in a crinkly, paper-like husk. They look a little bit like small tomatillos. Ground cherries (Physalis pruinosa) belong to the family of nightshade plants that includes eggplants and tomatoes. Their flavor is mild yet sweet- with hints of ripe tomatoes, pineapple, and butterscotch, which means they work as well in sweet dishes as they do savory.

You can eat them raw just as a snack, cook them down to make a tasty jam, or add them to your favorite dessert.  This recipe combines the ground cherries with delicious local peaches in a wonderful crisp.  Add a scoop of ice cream from oWowCow and you have a sweet treat that will please everyone.

Peach and Ground Cherry Crisp

Ingredients:
6 cups peaches, peeled and sliced (about 6 peaches total)
2 cups ground cherries, husked (about 1 quart before husking)
1 Tbsp lemon juice
½ cup sugar
2 Tbsp cornstarch, tapioca flour, or arrowroot starch
1 ½ tsp cinnamon
2 cups rolled oats
1/3 cup flour (you can use a gluten free flour blend if you prefer)
½ cup brown sugar or coconut sugar
1 stick salted butter, room temperature (plus a little bit extra to grease baking dish with)
1 tsp vanilla

  • Coat an 8 x 8 inch baking dish with butter. Set aside.
  • Preheat oven to 375°F.
  • Mix fruit in a large bowl.
  • Pour on lemon juice and toss to coat the fruit.
  • In a small bowl, combine the sugar, cornstarch, and cinnamon. Add to fruit and mix well.
  • Add fruit mixture to baking dish.
  • In a medium bowl, combine oats, flour, and brown sugar.
  • Add butter and mix well.
  • Add vanilla and make sure everything is well combined.
  • Using your hands, crumble the oat mixture on top of the fruit.
  • Bake for 30-35 minutes. Remove from oven and let stand for 10 minutes.
  • Serve warm with a scoop of ice cream.
  • Enjoy!

Recipe and photos by Stephanie Borzio.  Stephanie is a mom of three active boys and is an autoimmune warrior.  After battling her own health for several years, Stephanie found healing through food and lifestyle changes, including joining Blooming Glen Farm CSA of which she is a long time member.  She is a Board Certified Integrative Nutrition Health Coach who is passionate about sharing healthy living tips and real food recipes.  Instagram and Facebook: Tru You Essentials; Website: www.truyouessentials.com

My family loves wedge salads but we have only ever had them when eating out.  I have been dreaming of creating a farm version of this traditional restaurant favorite.  This recipe showcases garlic as the key ingredient in the dressing, but also uses the sweet onions and cherry tomatoes from this week’s farm bounty.

Wedge Salad with Roasted Garlic Dressing

Ingredients:
1 head iceberg lettuce
2 sweet onions, thinly sliced
2-3 Tbsp olive oil or avocado oil
1 ½ cups cherry tomatoes, quartered
Optional add ons- hard boiled eggs, bacon, cheese

Dressing Ingredients:
1 head garlic
1 tsp olive oil (for roasting the garlic)
½ cup olive oil or avocado oil
¼ cup white wine vinegar
1 tsp sea salt
¼ tsp black pepper
1 Tbsp honey

  • Slice lettuce into fourths and place on individual plates or on a larger serving dish.
  • Caramelize onions.
    • Heat 2-3 Tbsp oil in pan on stovetop.
    • Add onions and stir. Cook for 15-18 minutes on low heat.
    • Stir occasionally to evenly caramelize the onions. Onions should be nice and golden when done.

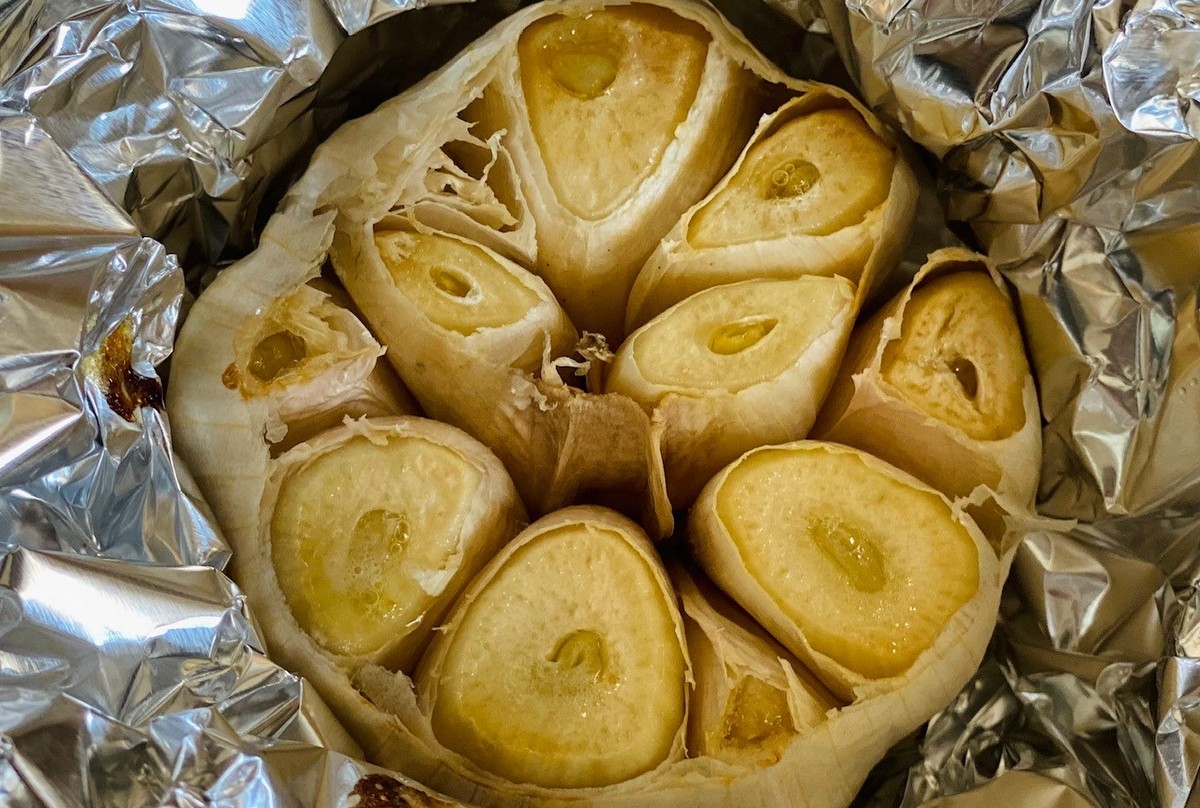
  • Roast garlic.
    • Preheat oven to 400°F.
    • Remove a couple of the outer layers of garlic bulb to clean it up.
    • Slice off the top of the bulb of garlic to expose the cloves.
    • Place the garlic in an oven safe dish. Drizzle with 1 tsp olive oil and cover in foil.
      • Roast in oven for 45 minutes.
      • Remove and let cool for a few minutes until safe to handle.
      • Squeeze out the roasted garlic cloves and place in a small bowl. Discard the garlic skins.

  • Prepare dressing by combining the roasted garlic cloves, oil, vinegar, salt, pepper, and honey in a blender. Mix until creamy and smooth.
  • Top lettuce wedges with tomatoes, caramelized onions, and any additional toppings you wish to add.
  • Drizzle with the roasted garlic dressing and serve immediately.
  • Enjoy!

*The dressing can be used on other green salads, pasta salads, as a marinade, on top of roasted veggies, or as a dipping sauce for bread.  Store the dressing in an airtight container in the fridge for up to a week.


Recipe and photos by Stephanie Borzio.  Stephanie is a mom of three active boys and is an autoimmune warrior.  After battling her own health for several years, Stephanie found healing through food and lifestyle changes, including joining Blooming Glen Farm CSA of which she is a long time member.  She is a Board Certified Integrative Nutrition Health Coach who is passionate about sharing healthy living tips and real food recipes.  Instagram and Facebook: Tru You Essentials; Website: www.truyouessentials.com

Summer squash is abundant this time of year. There are so many amazing ways to enjoy squash- raw, roasted, grilled, pickled, or even baked into some incredible desserts.  This recipe showcases the summer squash as a “fry”- a great way to serve these vegetables in a way that pleases even the youngest crowd.

Summer Squash Fries

Ingredients:
2 medium sized summer squash, any variety (around 2 pounds)
1 egg
¾ cup bread crumbs
¼ cup flour
½ tsp sea salt
¼ tsp black pepper
¾ tsp garlic powder
¾ tsp onion powder
½ tsp paprika

  • Cut ends off of summer squash. Cut in half lengthwise and then in half again.  Cut into strips about 3 inches long and ½ inch wide.  Pat dry.
  • Whisk egg in one bowl. In another bowl, combine bread crumbs, flour, and seasonings.
  • Dip each summer squash strip into the egg and then into the bread crumb mixture.
  • Follow instructions for cooking based on the options below.
  • Serve with your favorite dipping sauce. Blooming Glen Farm ketchup or a homemade marinara using fresh tomatoes, onion, garlic, and herbs would make great options.

OVEN METHOD-

  • Spray baking sheet with oil and place strips in single layer on the sheet. Leave space between each strip.
  • Bake at 425°F for 20 minutes. Flip halfway through baking time.


AIR FRYER METHOD-

  • Place in air fryer in single layer. Spray with oil.
  • Cook for 6-8 minutes at 380°F.


Recipe and photos by Stephanie Borzio.  Stephanie is a mom of three active boys and is an autoimmune warrior.  After battling her own health for several years, Stephanie found healing through food and lifestyle changes, including joining Blooming Glen Farm CSA of which she is a long time member.  She is a Board Certified Integrative Nutrition Health Coach who is passionate about sharing healthy living tips and real food recipes.  Instagram and Facebook: Tru You Essentials; Website: www.truyouessentials.com

Veggie cream cheese is a simple and versatile recipe. It is a fun and tasty way to use whatever the harvest is that week, and the flavors can easily change with the seasons and be customized to your preference. It can be spread on your favorite bagel or slice of bread (top with a slice of fresh tomato!), used on crackers, or even paired with fresh vegetables as a dip.

Veggie Cream Cheese

Ingredients:
8 oz cream cheese, softened*
1 large clove garlic, minced
½ torpedo onion bulb, finely chopped
1 Tbsp fresh herbs, finely chopped (chives, basil, parsley, cilantro, dill, etc.)
1 cucumber
A few slices of NORD bread
Optional add ins- carrots, radishes, scallions, celery, peppers, garlic scapes, etc., finely chopped

  • Mix cream cheese in stand mixer or in medium bowl with a hand mixer.
  • Add garlic, onion, and herbs. Mix well.
  • Scrape the sides and mix again until well combined.
  • If adding additional ingredients, do that now, mixing until everything is evenly distributed.
  • Store in the fridge until ready to use. Best used within a week.
  • Serve with sliced cucumbers or on top of a few slices of NORD bread. Enjoy!

*You can substitute with a dairy free option.


Recipe and photos by Stephanie Borzio.  Stephanie is a mom of three active boys and is an autoimmune warrior.  After battling her own health for several years, Stephanie found healing through food and lifestyle changes, including joining Blooming Glen Farm CSA of which she is a long time member.  She is a Board Certified Integrative Nutrition Health Coach who is passionate about sharing healthy living tips and real food recipes.  Instagram and Facebook: Tru You Essentials; Website: www.truyouessentials.com
Romano beans are a type of wide and flat snap bean that originated in Italy. They are intended to be eaten whole and are typically cooked before eating- a slow-braise is the perfect method so they can soak up the flavors you pair them with. Combined with juicy fresh tomatoes, fresh garlic, and torpedo onion, this side dish is simple but full of flavor.

Braised Romano Beans

Ingredients:
1 Quart Romano beans*
2-3 Tbsp olive oil
1 torpedo onion, chopped (use entire onion- stem and bulb)
2-3 cloves fresh garlic, crushed
2 medium tomatoes, diced
1 tsp sea salt
½ tsp black pepper
½ tsp smoked paprika
2 Tbsp water

  • Clean Romano beans and trim ends. Cut into 1 ½- 2 inch pieces and place in a medium bowl (or leave whole if that is your preference).
  • On stovetop, heat olive oil in sauté pan over medium heat.
  • Add onion and cook for 3 minutes, stirring frequently.
  • Add garlic and cook for another minute.
  • Reduce heat to low and add in tomatoes. Stir to combine and cook for about 5 minutes.
  • Add beans, spices, and water. Mix all ingredients together.  Cover and cook for 15 minutes.  You may cook longer if you want a more tender bean.  We like the beans to still be a little crunchy.
  • If the sauce becomes dry at all, just add another tablespoon or two of water. Keep an eye on this as the beans cook.
  • Remove from heat and serve immediately. Enjoy!

*You can substitute string beans for the Romano beans in this recipe.  I would recommend leaving them whole instead of cutting them.  The recommended cook time may vary, so check more often.


Recipe and photos by Stephanie Borzio.  Stephanie is a mom of three active boys and is an autoimmune warrior.  After battling her own health for several years, Stephanie found healing through food and lifestyle changes, including joining Blooming Glen Farm CSA of which she is a long time member.  She is a Board Certified Integrative Nutrition Health Coach who is passionate about sharing healthy living tips and real food recipes.  Instagram and Facebook: Tru You Essentials; Website: www.truyouessentials.com
This week’s recipe is a great way to use a lot of different produce- summer squash, onions, potatoes, fennel, and more.  As the harvest changes through the weeks ahead, change up what vegetables you use and what herbs you include in the whipped ricotta.  This will be a huge hit at any dinner party or just served to your own family.

Whipped Ricotta with Grilled Vegetables

Whipped Ricotta Ingredients:
15 ounces whole milk ricotta
½ tsp sea salt
¼ tsp black pepper
1 clove garlic, crushed
1 tsp honey
1 tsp lemon juice
½ tsp lemon zest
2-3 tsp fresh herbs, finely chopped (basil, thyme, parsley, chives, etc.)

Grilled Vegetable Ingredients:
1 bulb fennel, sliced in half
1 large summer squash, sliced into ½ inch thick rounds
4-5 new potatoes (larger ones work better), sliced into 1/8 inch thick rounds
1 large onion, peeled and sliced into ¼ inch rounds
½ lemon
3-4 Tbsp olive oil
2 tsp sea salt
¾ tsp black pepper

  • Beat ricotta in stand mixer or in food processor until creamy. This should take about 4-5 minutes.
  • Add remaining ingredients and mix on high for another 2 minutes.
  • Move to a serving bowl and garnish with a little lemon zest and fresh herbs.
  • You can also store whipped ricotta in the fridge in an airtight container for 3-4 days.
  • Preheat grill. Turn heat to low.  The grill should be about 375-400°F.
  • Prepare all vegetables and lemon as described above. Brush with olive oil on both sides.
  • Place vegetables and lemon in single layer on the grill. Grill for 4-6 minutes per side.  The fennel may take a little bit longer but other vegetables should be done in that timeframe.

  • Flip vegetables (except for the lemon) and grill for another 4-6 minutes. Place on serving platter.
  • Sprinkle vegetables with salt and pepper. Squeeze the grilled lemon half on the vegetables.
  • Serve grilled vegetables with the whipped ricotta.
  • Enjoy!

**Another great addition to this dish is NORD bread.  Slice a few pieces of bread, brush on oil, and grill a few minutes on each side just like you do for the vegetables.


Recipe and photos by Stephanie Borzio.  Stephanie is a mom of three active boys and is an autoimmune warrior.  After battling her own health for several years, Stephanie found healing through food and lifestyle changes, including joining Blooming Glen Farm CSA of which she is a long time member.  She is a Board Certified Integrative Nutrition Health Coach who is passionate about sharing healthy living tips and real food recipes.  Instagram and Facebook: Tru You Essentials; Website: www.truyouessentials.com
Fresh herbs are abundant in the herb boxes right now and we also typically receive an herb in our shares each week.  This week’s herb is dill and it is the perfect addition to this versatile recipe that will help you preserve fresh herbs.  You can make these butter coins with any fresh herb you have on hand and freeze them for use all year long!

Herb Butter Coins

Ingredients:
1 stick salted butter, room temperature (8 Tbsp)
2-3 cloves fresh garlic, crushed (or sub in garlic scapes)
2-3 Tbsp fresh herbs, finely chopped*

*You can use just one herb or a combination of a few.  I used dill since that is what we got in our shares this week.

  • Place butter in a stand mixer and mix. You can also do this by hand in a medium bowl.
  • Add garlic and herbs. Mix well.  Everything should be well incorporated and evenly distributed throughout the butter.
  • Scoop mixture into silicone molds- like an ice cube tray. Ideally you want each individual mold to hold 1-2 Tbsp of the mixture. Don’t have silicone mods? You could also reshape into a log on parchment paper, and wrap, slicing off frozen rounds as needed as demonstrated in this recipe for Herb Butter.

  • Freeze for 30-45 minutes.
  • Once frozen, butter coins can be popped out and stored in freezer bags.

**These are great to use on roasted potatoes, grilled vegetables, your favorite protein, or simply on a slice of bread.  You can also use as a base for cooking fish and in grill packets.


Recipe and photos by Stephanie Borzio.  Stephanie is a mom of three active boys and is an autoimmune warrior.  After battling her own health for several years, Stephanie found healing through food and lifestyle changes, including joining Blooming Glen Farm CSA of which she is a long time member.  She is a Board Certified Integrative Nutrition Health Coach who is passionate about sharing healthy living tips and real food recipes.  Instagram and Facebook: Tru You Essentials; Website: www.truyouessentials.com
Fresh basil is such a wonderful addition to our CSA shares.  I wanted to use this fresh aromatic herb to create a flavorful dressing that could be used on salad, but also in a variety of other ways.  This dressing can be used as a sandwich spread, as a topping on baked potatoes, on top of your favorite protein, drizzled on roasted vegetables, or even used to dip bread or raw veggies into.

Creamy Basil Dressing

Ingredients:
1 cup basil leaves, loosely packed
1 large scallion
2 garlic scapes
5 oz plain yogurt
½ tsp lemon zest
2 tsp lemon juice
¾ tsp sea salt
¼ tsp black pepper
2 Tbsp olive oil
1 tsp honey (optional)

  • Place basil leaves, scallion, and garlic scapes in food processor. Pulse until finely chopped.  Scrape sides and pulse again.
  • Add remaining ingredients to food processor. Mix for at least two minutes or until all ingredients are chopped and well combined.
  • Remove and place in glass container.
  • Store in refrigerator for up to a week. Shake well before using.
  • Enjoy!

Recipe and photos by Stephanie Borzio.  Stephanie is a mom of three active boys and is an autoimmune warrior.  After battling her own health for several years, Stephanie found healing through food and lifestyle changes, including joining Blooming Glen Farm CSA of which she is a long time member.  She is a Board Certified Integrative Nutrition Health Coach who is passionate about sharing healthy living tips and real food recipes.  Instagram and Facebook: Tru You Essentials; Website: www.truyouessentials.com