cucumbers Tag

With the heat and humidity we are experiencing this week, I wanted to create an easy recipe that did not require cooking.  Farm fresh cucumbers and tomatoes combined with a few other ingredients create this fresh versatile salsa.  It is a beautiful array of colors and the flavors burst with each bite.  Serve it as a snack or make it part of your main meal.  Regardless of how you choose to showcase this dish, it is sure to please everyone.


Cucumber Salsa

Ingredients:
2 Kirby cucumbers, diced
1 jalapeno, seeded and finely chopped (*adjust to your heat tolerance, any variety hot peppers can be used)
1 cup cherry tomatoes, quartered
Juice and zest from 1 lime
2 Tbsp fresh cilantro, finely chopped
1 medium sweet pepper, seeded and diced
½ sweet onion, finely diced
2 cloves garlic, minced
1 tsp sea salt
¼ tsp black pepper

  • Combine all ingredients in a large bowl.
  • Mix to combine.
  • Best if allowed to marinate for at least 30 minutes before serving.
  • Serve with chips, as a topping for grilled fish, with tacos, etc.

Recipe and photos by Stephanie Borzio.  Stephanie is a mom of three active boys and is an autoimmune warrior.  After battling her own health for several years, Stephanie found healing through food and lifestyle changes, including joining Blooming Glen Farm CSA of which she is a long time member.  She is a Board Certified Integrative Nutrition Health Coach who is passionate about sharing healthy living tips and real food recipes.  Instagram and Facebook: Tru You Essentials; Website: www.truyouessentials.com

Charcuterie Board, Snack Board, Food Board, Grazing Board…. whatever you want to call it! … a board or platter filled with delicious food is great for breakfast, lunch, dinner or even just a snack or appetizer.  It works for a small family, a couple, or even a big party.  Snack boards are adjustable, easy to throw together, and appeal to all ages.  With all of the beautiful food we have available at the CSA this season, I thought it would be fun to dedicate a post to the presentation of these foods in the style of boards or platters.

Creating a board is a very easy way to showcase the fruits and vegetables we receive each week.   Do you get the cheese share?  If so, what a perfect addition that would be.  How about the mushrooms?  Marinate or roast them and add to the platter.  What about the egg share?  Hard boil a few and slice them up to add to a board.

Here are a few ideas of ways to incorporate grazing boards…

  • Create a board for an at home date night. Pair with your favorite cocktail or glass of wine.
  • Make a snack board to serve to your children during virtual schooling.
  • Are you celebrating something special- perhaps a birthday, anniversary, award, or work achievement? Do it with a snack board.
  • Watching a sporting event on television- create a board to graze on while enjoying the game with your family.
  • Are you having a family movie night or game night? Create a board that can be snacked on throughout the evening.
  • Make a food board to celebrate a milestone in your children’s lives and pair with fresh lemonade or sun tea.


Why should you make a snack board or food platter?

  • It’s a way to share, connect, and enjoy spectacular food together.
  • It’s a fun way to liven up our pandemic era eating experience with our family!
  • Boards are fun to create and look at.
  • They can totally be a work of art, a creative way to serve food- providing different colors, textures, shapes, and flavors.
  • Boards provide lots of different choices.
  • Generally they don’t require cooking or very minimal cooking.
  • It’s a different way to serve food. Experiment and see what happens when you display food on a board instead of the usual serving dishes.
  • They can be made in advance so that you can enjoy the snack or meal together.
  • Boards offer lots of variety so that it is appealing to everyone- no matter what their choice of diet is and no matter what their age is.


Steps to creating a great board:

1. SELECT BOARD

Select your board or platter.  Think about how many people you will be serving.  This will help determine the size of your board.   You can use all sorts of materials- wood, marble, slate, stone, etc.  You can use an old cutting board, a large serving dish, or an antique tray.  You don’t need anything special.  Just a flat surface that will hold everything and display it all.

2. GATHER INGREDIENTS

The great thing about this is you can use what you have on hand- in your pantry, refrigerator, or freezer- or you can shop for specific items.

  • Vegetables- fresh vegetables, marinated vegetables, fermented or pickled vegetables, roasted vegetables
  • Fruit- fresh fruit, dried fruits
  • Nuts and Seeds
  • Breads, Crackers, Pretzels, Chips
  • Cheeses- hard cheeses, soft cheeses, cheese spreads, vegan cheeses
  • Spreads, Dips, Jams/Chutneys, Honey, Nut Butters, Mustards
  • Meats- thinly sliced
  • Other options- olives, chocolate

3. ASSEMBLE BOARD

You can keep it simple or get fancy and creative. If you are using any spreads or items that need to go in a bowl, do that first.  Place those on the board and then slowly add other items.  It’s a good idea to start with your largest items first so that you can work through the space you have.  Generally try to keep items on the platter bite size.

4. ADD UTENSILS

If you are keeping cheeses whole, you will want a small knife.  For dips and jams, you will want a small spoon.  Provide a small knife/spreader for spreads.  Make sure you have a utensil for each item that will need it.  You don’t want to put out one spoon and use it for all the spreads and jams.  Provide one knife for each cheese and one spoon for each jam.

5. GARNISH

Add fresh herbs or edible flowers if you want, but this is totally optional.

6. RELAX AND ENJOY

Think of a board as a blank canvas for you to display a snack or even a meal.  Take the beautiful produce we receive from Blooming Glen Farm, the fruit from North Star Orchard, the cheese from Valley Milkhouse or Birchrun Hills Farm, the eggs from Deep Roots Valley Farm, the mushrooms from Primordia Mushroom Farm, the honey from Heirloom Acres Honey and combine it all on a platter that showcases the amazing food we receive each week.  Create a grazing board, take a photo, post, and tag us (@bloomingglenfarm and @truyouessentials).  We cannot wait to see all of the platters you make!

The following past recipe posts would make a great addition to any board:

Tomato Jam- https://www.bloomingglenfarm.com/tomato-jam/

Ground Cherry Jalapeno Jam- https://www.bloomingglenfarm.com/ground-cherries-3-ways-jam-marinade-chocolate-covered/

Fresh Dill Vegetable Dip- https://www.bloomingglenfarm.com/vegetable-crudite-with-fresh-dill-dip/

Roasted Eggplant Dip- https://www.bloomingglenfarm.com/roasted-eggplant-dip/

Refrigerator Pickles- https://www.bloomingglenfarm.com/cucumber-salad-refrigerator-pickles/

Veggie Chips- https://www.bloomingglenfarm.com/veggie-chips/

Roasted Vegetable Chutney- https://www.bloomingglenfarm.com/grilled-tomatillo-salsa-and-roasted-vegetable-chutney/

Lemon Dill Hummus- https://www.bloomingglenfarm.com/fresh-herb-ideas-lemon-dill-hummus-or-basil-salt/

Butternut Squash Hummus- https://www.bloomingglenfarm.com/butternut-squash-hummus/

Fresh Chopped Salsa- https://www.bloomingglenfarm.com/fresh-chopped-salsa/

Recipe and photos by Stephanie Borzio.  Stephanie is a mom of three active boys and is an autoimmune warrior.  After battling her own health for several years, Stephanie found healing through food and lifestyle changes, including joining Blooming Glen Farm CSA of which she is a long time member.  She is a Board Certified Integrative Nutrition Health Coach who is passionate about sharing healthy living tips and real food recipes.  Instagram and Facebook: Tru You Essentials

With the weather getting warmer it seemed the perfect time to cook some simple food that can be good on its own, be packed for a veg heavy picnic, or work as the anchor for food off the grill.

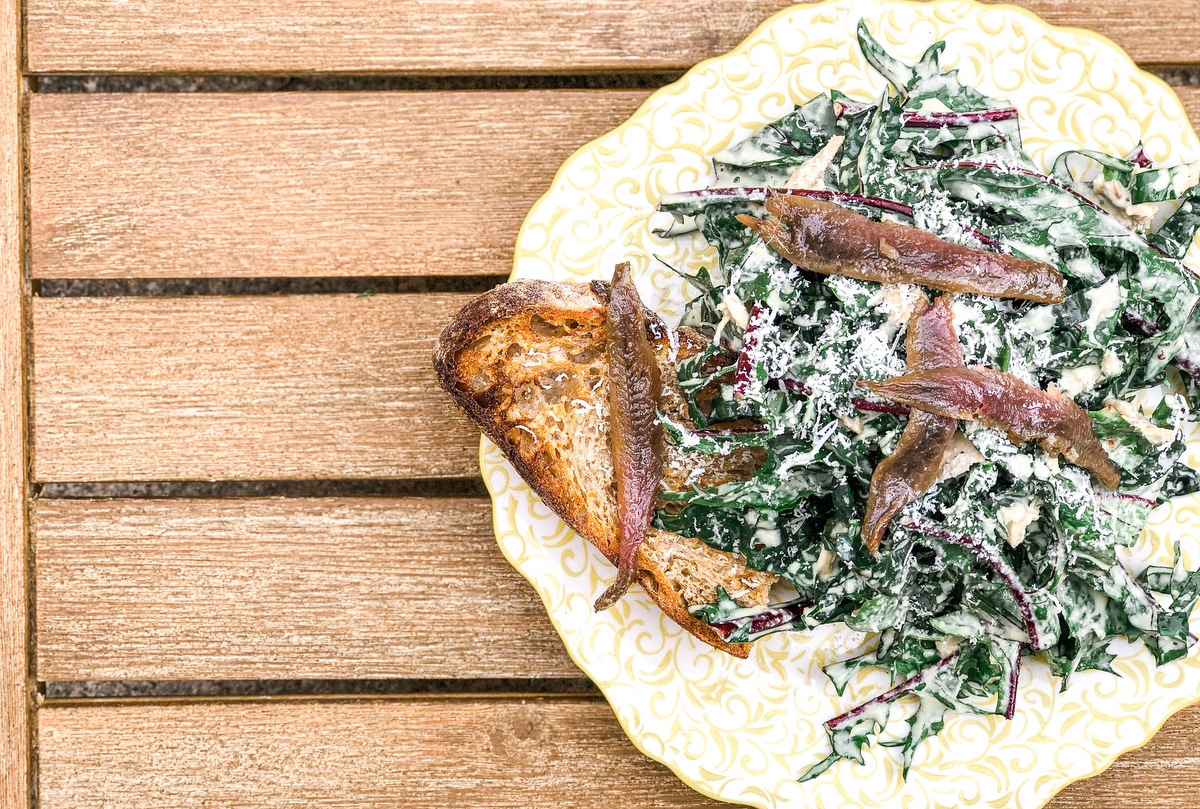
Dandelion & Kale Caesar
This salad is perfect for packing because the hearty greens actually improve after being dressed, becoming more supple and absorbing the dressing. For this reason we make the tonnato creamier than regular caesar dressing. (*Tonnato is an Italian condiment often made with tuna, anchovies, olive oil, and mayonnaise or egg.)

Ingredients
1/2 bunch kale, cut into quarter inch ribbons, bottom stems removed
1 bunch dandelion, cut every two inches, bottom stems removed
1 6oz can of tuna, drained
1 yolk
1 oz white wine vinegar
.5 oz grated pecorino cheese, with more to garnish
1 tablespoon water
1 garlic clove
3 oz olive oil
salt and pepper
anchovy filets
crusty bread to serve

Place the yolk, grated cheese, vinegar, water, garlic, and half the tuna in a blender. Blend on medium speed until smooth, then stream the oil in. Season with salt and pepper. Place the greens and remaining tuna in a bowl, and dress well, seasoning aggressively with black pepper and salt. Place a piece of well toasted crusty bread on each plate or container you are using and place the dressed salad on top of it. Sprinkle some extra cheese and place over a few anchovy filets.

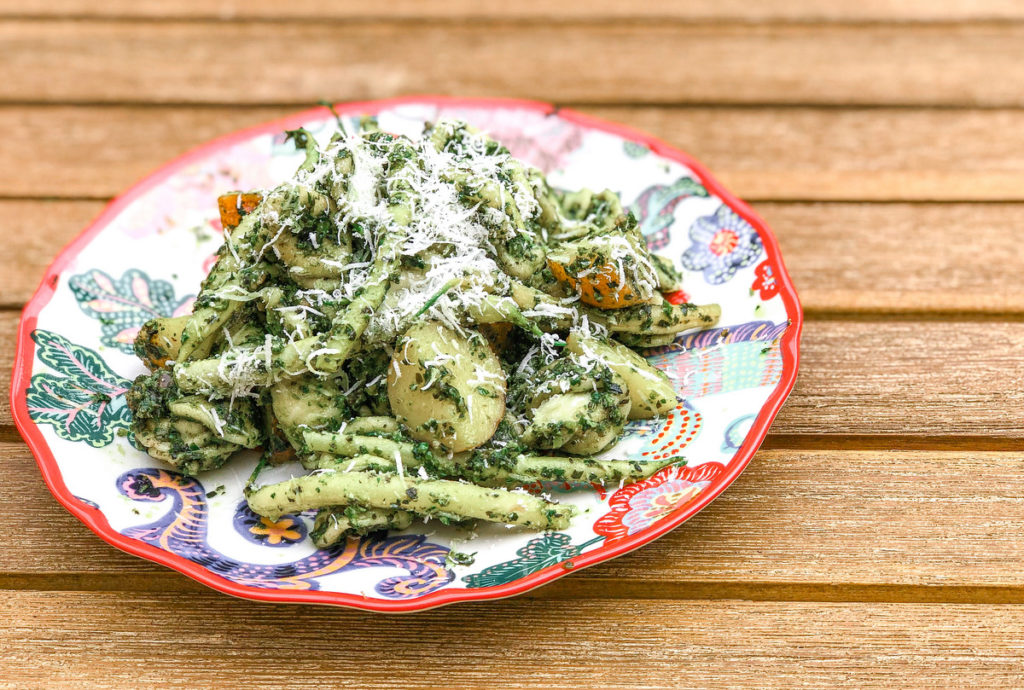
Genovese Pasta Salad

In Genoa, where basil pesto comes from, they enjoy their pasta with beans and potato. It’s delicious, but rather than hot, it makes a great salad (even better when the first cherry tomatoes come). Just like the Genovese, you can cook everything in one pot.

Ingredients
8 oz Orecchiette, or your favorite short pasta
1 bunch basil
1/4 bunch parsley
1 bunch garlic scapes, ends and flower heads trimmed
1 oz grated pecorino
1 clove garlic, crushed
1.5 oz sunflower seeds
4 oz olive oil
4 small potatoes, quartered
1/2 quart green or wax beans, trimmed
1/2 lemon

Bring a medium pot of water to a boil and salt aggressively. Add the pasta and cook according to the directions on the label. With 8 minutes to go, add the potato. With 1 minute to go, add the beans. Drain well and dress the pasta and vegetables in a little olive oil to prevent sticking. Heat a cast iron pan to smoking and place the scapes in. Add a shot of oil and let them char one minute, resist the temptation to move them, then turn, and let char another minute. Remove to a board, and let cool, then chop finely. Add the scapes, herbs, garlic, cheese, and seeds to a food processor. Blend thoroughly, then stream in the oil. Season with salt and dress the pasta and vegetables with it. Squeeze the lemon through and dress as soon as possible to eating.

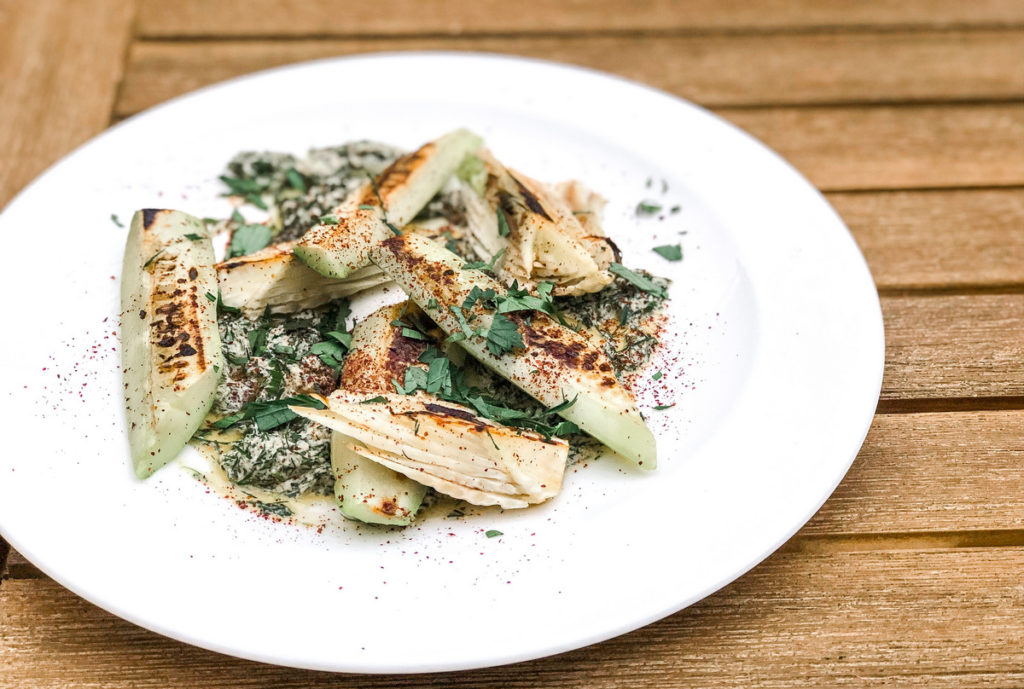
Grilled Cucumber and Fennel, tahini dressing

Grilling cucumber brings out the vegetale notes, and makes it more nuanced, and somehow juicy, and the fennel adds good sweetness. Keeping the vegetables in large pieces helps them hold up.

Ingredients
1 cucumber, peeled
2 fennel bulbs
1 clove garlic, grated
2 Tbs. tahini
juice of 1/2 lemon
1/4 bunch of dill, chopped fine
2 Tbs. water
1 teaspoon smoked paprika, preferably from Coddiwomple Canning
2 oz olive oil
Sumac to garnish

In a bowl place the tahini and stream the olive oil in while continuously whisking. Next, add the lemon juice, and then the water until you reach the desired consistency. Add the grated garlic, paprika, and dill and season with salt. Cut off the fennel stalks and reserve for future use. Cut ends off the bulbs, then in half, and remove the out leaves. Cut the core out of the bulb in a ‘V’, leaving enough that the bulb stays intact. Cut the cucumber into quarters lengthwise, then slice away some of the seedy core to make a flat surface. Cut those pieces in half horizontally. Rub the vegetables with olive oil and season with salt. On a very hot grill, place the cucumber seed side down for one or two minutes until charred but still mostly raw. Remove and cool. Place the fennel cut side down on a less hot section, and cook until well grilled, and about half cooked. Remove and cool. Dress a plate with the tahini and place the vegetables over top. Give a liberal sprinkle of sumac and serve.

Minestrone

The first time my aunt went to visit our family in Italy each of our great aunts served her minestrone. More than 40 years later she refuses to eat it. I don’t suffer from the same affliction. Soup like this is restorative, and a great way to use the odds and ends left over from your CSA, plus the trimmings in broth, extra which can always be stored in the fridge for up to one week and frozen for no more than three months. We would serve it with a side of crusty bread or focaccia and a ball of mozzarella or burrata for a perfect lunch.
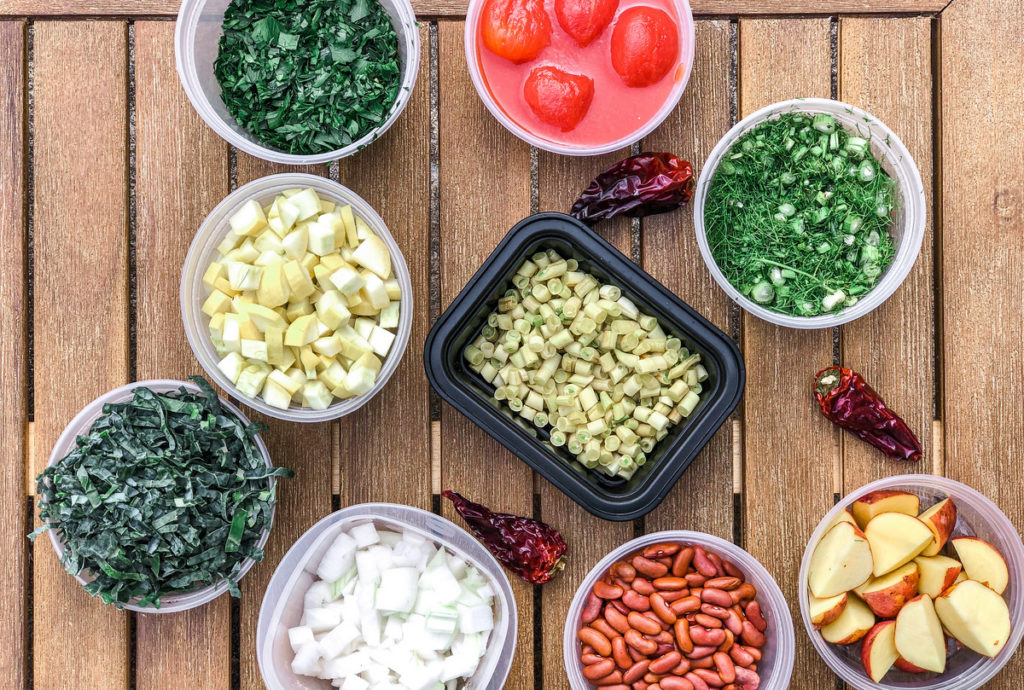
Ingredients
2 quarts vegetable broth (recipe below)
1 onion, small diced
3 cloves garlic, sliced
2 fennel stalks, sliced
1 squash, diced
1 cup peeled tomato and their juice, lightly crushed
1 cup dried beans, cooked ahead
1 cup kale, finely sliced
6 small potatoes, cut in half
1/4 bunch parsley, chopped
ground chili or chili sauce

In an instant pot, place all the trims from the vegetables for the week. Add a touch of oil and salt and turn on sauté . When you smell a bit of burning, and this is good!, add two quarts of water, seal, and pressure cook for 30 minutes. If you don’t have a pressure cooker, cook the vegetable bits in a heavy bottom pot until fragrant, then add the water and simmer for 70 minutes. Then strain the broth through a fine mesh sieve.

Sweat the onion and garlic on medium heat in some olive oil until translucent. Add a pinch of salt now, and every time you add an ingredient, to build the layers. Next add the fennel, and cook for one minute. Then the squash, potato, and kale, cooking until the kale starts to wilt. Then add the rest of the ingredients, bring to a boil, then cover and simmer on low for 20 minutes. Adjust the seasoning to your liking, and garnish with a splash of oil and some chili.

Palmer Marinelli is the Executive Director of Roughwood Table, an organization that uses heirlooms seed saving to shine a light on local foodways. Originally from Washington Crossing, he has been cooking locally for almost 20 years. 

Fresh organic produce is a staple in our home.  We are so grateful during CSA season because Blooming Glen Farm provides us with an amazing array of vegetables.  I really love creating colorful dishes that are full of flavor and this salad is one of my personal favorites.  Just be sure to carve out a little time for all of the chopping that this salad requires!

Zoodle Salad

Salad Ingredients:
2 zucchini- spiralized *
2 carrots- peeled and julienned
2 sweet peppers- julienned
3/4 cup cabbage- finely chopped
1-2 green onions- chopped
1 cucumber- peeled, seeds removed and julienned
1-2 Tbsp sesame seeds

Dressing Ingredients:
6 Tbsp avocado oil
3 Tbsp apple cider vinegar
1-2 tsp raw honey
4 Tbsp coconut aminos (can sub soy sauce if you want)
1 clove garlic, minced
1 tsp freshly grated ginger

Combine all salad ingredients in large bowl.  Combine dressing ingredients in small bowl and mix well.  Pour dressing over salad and toss to coat.  Allow 15-20 minutes for veggies to marinate before serving.  This salad is best eaten the day it is made, so I recommend only dressing what you will eat.

*I love spiralizing my zucchini and making “zoodles” out of them.  But if you do not own a spiralizer, you can use a mandolin or a vegetable peeler to create more of a linguini “zoodle”.

**I added chicken to this salad.  I made an extra batch of dressing and marinated a few pastured chicken breasts in it.  After cooking the chicken, I thinly sliced them and added to the salad.

Recipe and photos by Stephanie Borzio.  Stephanie is a mom of three active boys and is an autoimmune warrior.  After battling her own health for several years, Stephanie found healing through food and lifestyle changes, including joining Blooming Glen Farm CSA of which she is a long time member.  She is a Board Certified Integrative Nutrition Health Coach who is passionate about sharing healthy living tips and real food recipes. Instagram and Facebook: Tru You EssentialsWebsite: www.truyouessentials.com

Tabbouleh Salad ingredientsTabbouleh (also tabouli) is a classic Middle Eastern salad made from whole grains and highlighted by the fresh herbs, cucumbers, and tomatoes that are in season right now. The whole grains in tabbouleh come from bulgur, which is made from whole hard wheat (wheat berries) that’s been parboiled, dried, and then cracked.

This whole wheat is very different than the wheat-based products we often buy at the grocery store:  When wheat is refined and processed — primarily into wheat flour — nearly all of its nutritional value is stripped away.  In fact, “more than half of wheat’s B vitamins, 90 percent of the vitamin E, and virtually all of the fiber” are lost.  When wheat is refined, its nutritious bran and germ are removed and we’re left only with a starch that’s digested as a simple sugar, causing our blood sugar levels to spike as if we’d eaten candy!

Healthy whole wheat like bulgur, on the other hand, is a complex carbohydrate that offers a unique combination of minerals, antioxidants, and fiber, all of which work in concert together to protect our cardiovascular health, prevent Type 2 Diabetes, promote digestive health, and help fight off cancer.  Once cooked, bulgur has a mild, nutty flavor that adds a fantastic chewy, meaty texture to foods. Mix it into a salad, stirfry, chili, spaghetti sauce, taco filling, or use it as a base for a grain salad (such as this Asian Bulgur and Edamame Salad), stuffed peppers, breakfast porridge, or savory side dish.

In addition to whole wheat, tabbouleh takes advantage of the cucumber bounty we’ve been enjoying with our share.  Cucumbers aren’t commonly thought of for their nutrition, but they actually are a good source of vitamin A, magnesium, phosphorus, and manganese, and a very good source of potassium and vitamins C and K.  Thanks to the phytonutrients in cucumbers, they also bring our bodies anti-inflammatory, antioxident, and anti-cancer benefits, too.

The important key to accessing all this great stuff, however, is consuming the skin. (Some might remember that this is true for many of the vegetables we eat — we’ve talked about potatoes, sweet potatoes, squash, and eggplant here before 🙂 )  If you’re just getting used to eating the skin on cucumbers, try peeling only half of the skin off at first, then move up to keeping it all intact.

Tabbouleh a naturally versatile and adaptable dish, so feel free to play around with the grain-herb-veggie ratio.  You might prefer an herb-based salad, or you might choose to go heavy on the cucumbers, since they’re so abundant right now (as I did in the salad pictured). You could even make this recipe gluten-free by substituting bulgur for another healthy whole grain, such as quinoa. Tabbouleh pairs great with hummus, baba ganoush, and pita.

Tabbouleh

Tabbouleh

Ingredients
2 cups boiling water
1-1/4 cup bulgur wheat (use quinoa for a gluten-free version)
1 cup parsley, chopped
1/2 cup mint, chopped
1/4 cup minced onion
1+ cup cherry tomatoes, quartered or chopped
1+ cup cucumbers, diced

Dressing
1/4 cup olive oil
juice from 1/2 lemon, more to taste
1 tsp salt, more to taste
pinch of pepper
pinch allspice

Method
Place bulgur in a bowl and pour boiling water over top. Let stand for 20-30 minutes, until softened, but still chewy.  Drain off any excess liquid, and fluff. If using quinoa, prepare per package instructions. Add herbs and veggies to bulgur and gently stir. Combine dressing ingredients in a small bowl and mix well. Add dressing to bulgur, gently stirring until dressing coats salad well. Adjust seasonings to taste.  Serve chilled.

Post Sources
Harvard School of Public Health
Nutrition Data (Bulgur)
Nutrition Data (Cucumber)
WH Foods (Cucumber)

Post and photos by Mikaela D. Martin: Blooming Glen CSA member since 2005, board-certified health counselor, and co-founder of Guidance for Growing, an integrative wellness practice in Souderton. Read more about healthy eating and living on her site, http://guidanceforgrowing.com!

Just as food effects our nutrition, it also effects our energy.  A classic example of this is how we feel after eating a fast food meal of a burger and fries, versus how we feel after eating a home-cooked meal of, say, baked fish and steamed veggies. Processed foods, high in unhealthy fats and carbs and low in nutrients, not only overwork our bodies, but also provide very little value, leaving us feeling heavy and tired.  They’re like the mooch of the food world — taking a lot of our bodies resources and giving nothing in return.

We can think also apply this food-mood connection to individual foods. Some foods warm us up; onion, ginger, oats.  Some foods ground us; carrots, meats, beets.  And, some foods are cooling, including several of the items in our Blooming Glen share over the past couple weeks.  Funny how mother nature makes available cooling foods right when we need them, right? 🙂

The recipe below uses two cooling ingredients, watermelon and cucumber.  We’ve talked about the nutrition of watermelon in the blog before. Both watermelon and cucumber have been shown to have antioxidant and anti-inflammatory properties, making them a great addition to our bodies’ toolbox for fighting illness and disease.  Plus, as we all know, they taste great! Note, you can also easily substitute cantaloupe, another cooling and refreshing melon, for the watermelon in the recipe.

watermelon cucumber salad

Cooling Watermelon & Cucumber Salad

Ingredients

4 cups cubed watermelon (or cantaloupe)
1 cucumber, cut in half and sliced thin (leave skin on)
1/4 cup shallots or  sweet onion, minced
2 tbs fresh mint, minced (plus extra for garnish, if desired)
1 tbs olive oil
2 tbs balsamic vinegar (or, try 2 tbs lime juice for a gluten-free version)
salt and pepper to taste
Optional: feta cheese

Method
Combine watermelon, cucumber and onion in a bowl. Combine mint, oil, vinegar, and a dash of salt and pepper in a small bowl, stirring with a whisk. Add dressing to the watermelon mixture and toss gently to coat. Garnish with mint and/or feta cheese, if desired. Serve atop raw greens for extra nutrition and substance.

Post and photos by Mikaela D. Martin: Blooming Glen CSA member since 2005, board-certified health counselor, and co-founder of Guidance for Growing, an integrative wellness practice in Souderton. Read more about healthy eating and living on her site, http://guidanceforgrowing.com!

Don’t get me wrong, home-canning is probably one of the best ways to preserve excess fruits and veggies (not to mention rather necessary when you are trying to keep something in your cupboard through winter). However when it comes to pickles, it seems I always gobble them up within about a week of making them–rendering all that tedious canning effort a bit of a waste. I was simply amazed to discover a few years ago that you could make pickles in just a few hours with minimal effort and be eating them the next day. I actually prefer fermenting my pickles without vinegar…but sometimes your pickle craving just can’t wait! I wrestled up some recipes from Sherri Brooks Vinton’s book Put ’em Up! for two types of fridge pickles: bread-and-butter and classic dill.  They are prepared the same way except for the spices used at the end. The end product is very crunchy and both are just perfect for burgers or to eat right out of the jar!

Just start with some salt, 3 cucumbers, and a bunch of sweet onions from your share.

-Cut your cucumbers into 1/4 inch slices and your onions into rings. Place in large bowl.

-Prepare brine by dissolving 1 1/2 teaspoons of kosher salt into two cups of water.

-Pour brine over cucumbers and onions. Add a few cups of ice cubes and more water to cover the veggies. Let the bowl sit in your fridge for 2 hours to get crunchy and absorb some of the brine.

-Drain veggies in colander and rinse.

For Bread-and-Butter Pickles, combine in a non-reactive saucepan:

2 cups distilled white vinegar
1 cup water
1/2 cup sugar
1 tablespoon mustard seed
1 1/2 teaspoon black peppercorn
1 1/2 teaspoon celery seed
1 1/2 teaspoon turmeric
1 1/2 teaspoon kosher salt

For Classic Dill Pickles, combine in a non-reactive saucepan:

2 cups distilled white vinegar
1 cup water
1 tablespoon sugar
4 green garlic cloves, minced
1 teaspoon black peppercorn
1/2 teaspoon celery seed
1 tablespoon dill seed
1 1/2 teaspoon kosher salt
1 teaspoon red pepper flakes (optional)

-Bring to a boil. Add the drained vegetables and return to a boil, stirring to ensure that all of the veggies are heated through. Remove from heat. Ladle into bowls or jars (this recipe makes a quart and a pints worth). Cool, cover and refrigerate for up to three weeks.

Recipe and photos by Jana Smart- Blooming Glen Farm employee and frequent creator of creative recipes using farm fresh seasonal ingredients. Check out more of her recipes on her food blog http://www.agrarianeats.blogspot.com/