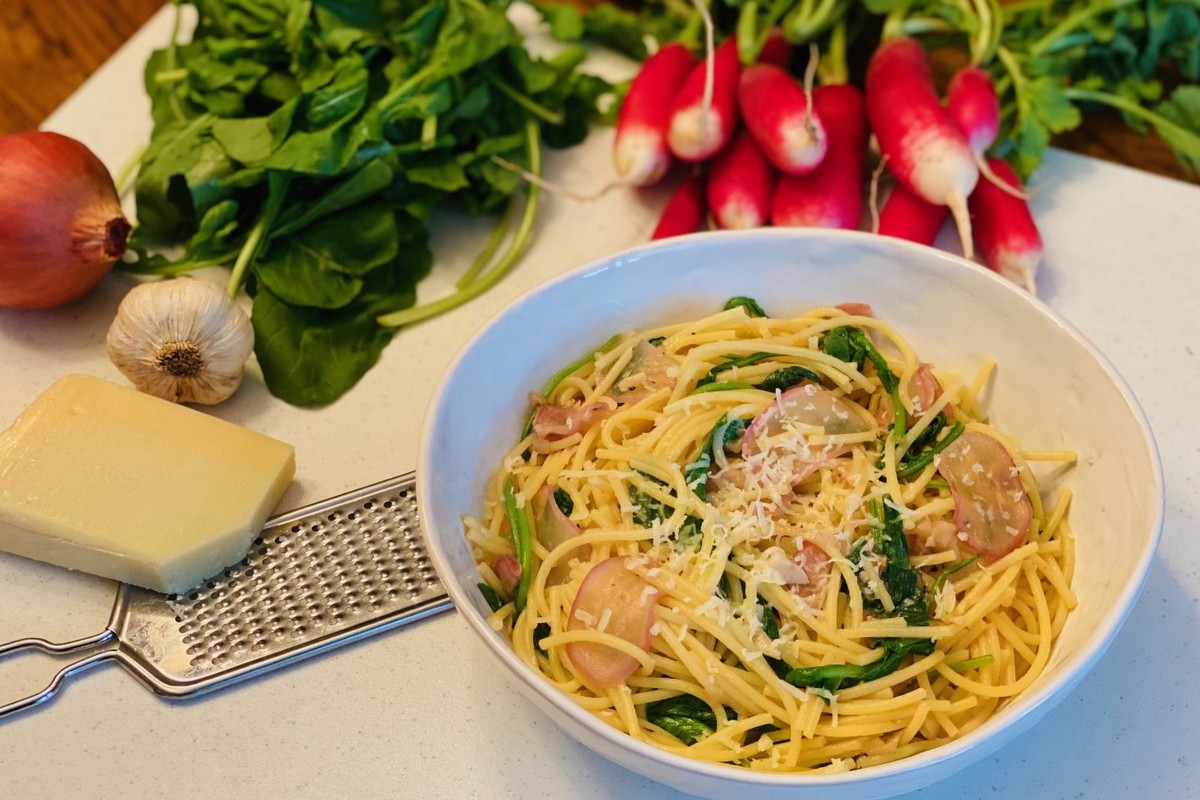
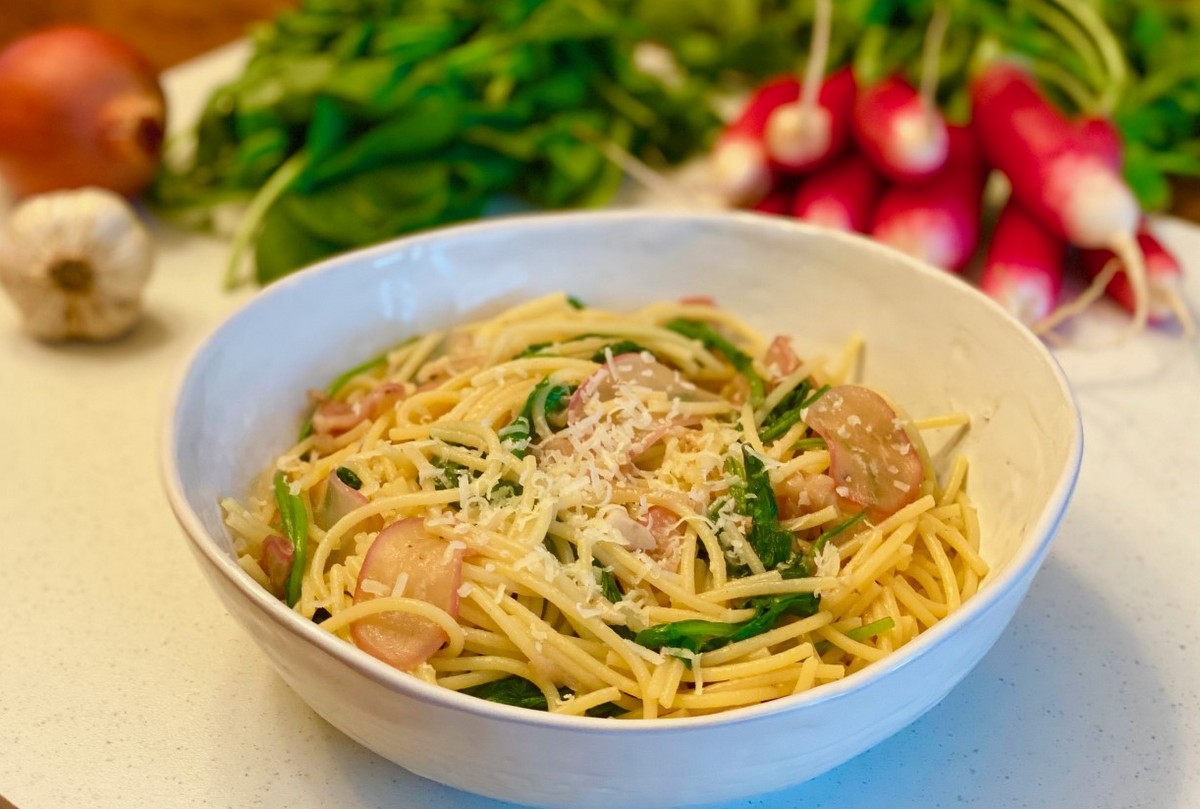
vegetarian Tag

The arugula from the farm is one of my favorites!  Its mild peppery flavor is divine and I wanted to showcase it in this week’s recipe.  Combining the arugula, red onion, and the French breakfast radishes in a simple, but unbelievably tasty pasta dish was what I dreamed of.  This recipe came together just as I imagined and really showcases the radishes and arugula in a unique way.  Enjoy this flavorful dish alone or with a grilled or roasted protein.

Pasta with Arugula and Radishes
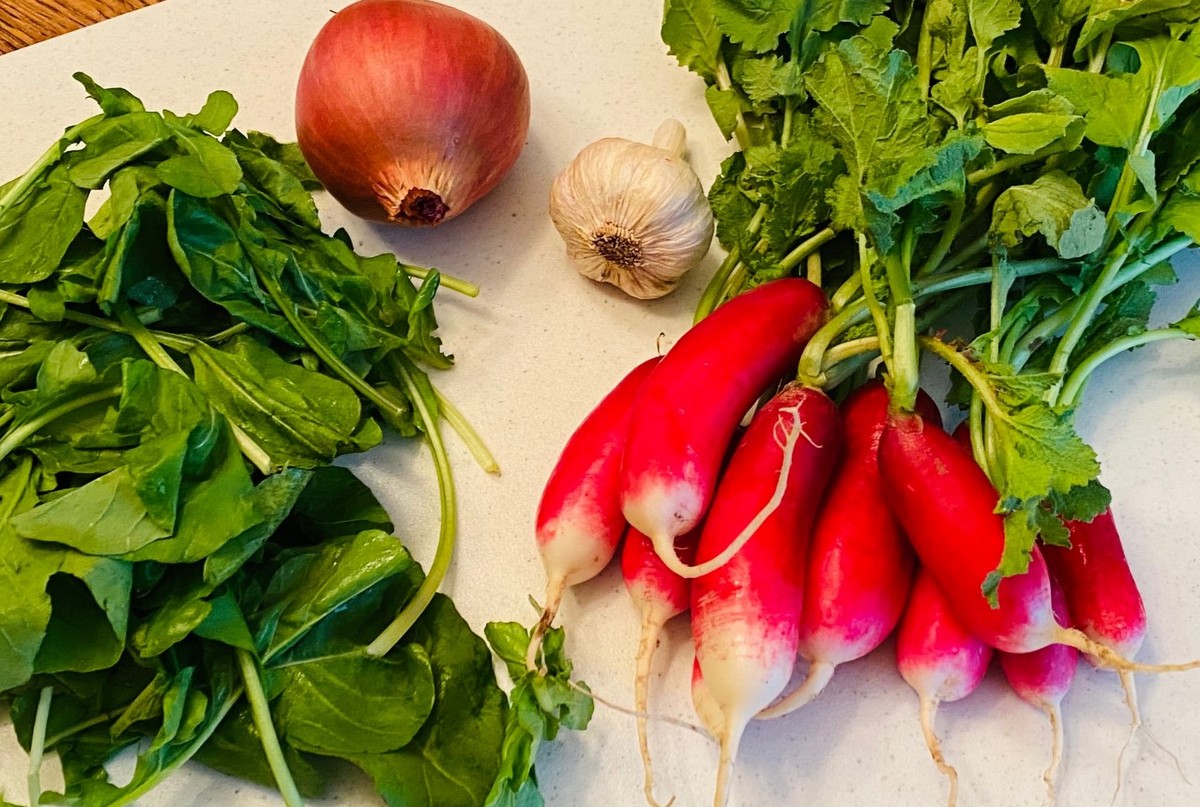
Ingredients:
1 lb pasta *
2 tsp sea salt, divided
3 Tbsp olive or avocado oil
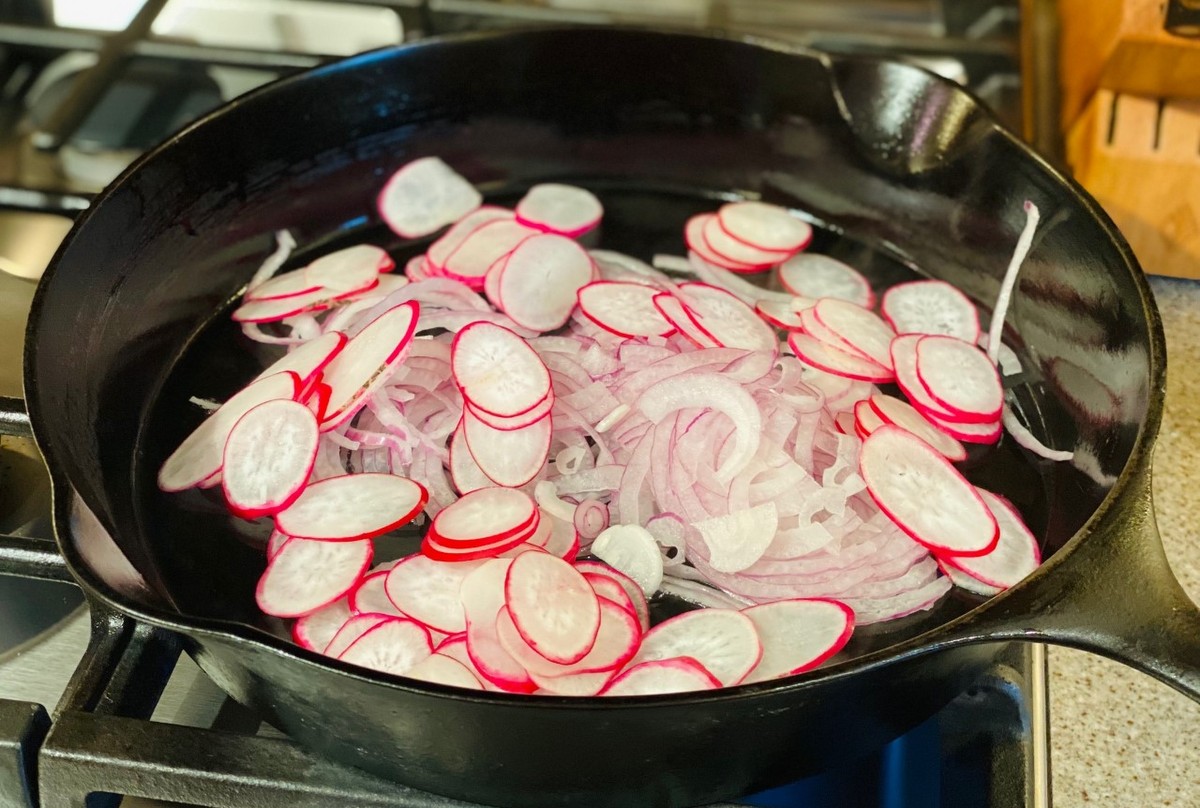
½ large red onion, thinly sliced **
6-8 French breakfast radishes, thinly sliced **
3 large cloves garlic, finely chopped
½ tsp black pepper
½ lb arugula
5 Tbsp parmesan cheese (plus more for garnish)

*I used spaghetti, but you can use whatever pasta you choose.
**I used a mandolin set on the lowest setting to get thin, even slices.

  • Prep all ingredients before starting to cook anything. Wash, slice, and chop all produce.
  • Bring a large pot of water to a boil. Add 1 tsp salt.
  • Once water has come to a rolling boil, add pasta and cook according to package instructions.
  • While pasta is cooking, begin cooking the produce.
  • In a large sauté pan, heat oil. Add onions and radishes.  Cook on medium heat for 3-4 minutes.

  • Add garlic and cook for an additional 2-3 minutes. Stir constantly.
  • Remove ½ cup pasta water from large pot. Pour into sauté pan and mix well.
  • Add 1 tsp salt and ½ tsp pepper to the sauté pan. Cook for 1 more minute.
  • Place arugula in colander in sink. Drain pasta, pouring hot pasta water over the arugula to quickly wilt it.
  • Add drained pasta and wilted arugula to sauté pan. Mix well to combine.
  • Add parmesan cheese and toss to coat.
  • Garnish with freshly grated parmesan and serve immediately.

Recipe and photos by Stephanie Borzio.  Stephanie is a mom of three active boys and is an autoimmune warrior.  After battling her own health for several years, Stephanie found healing through food and lifestyle changes, including joining Blooming Glen Farm CSA of which she is a long time member.  She is a Board Certified Integrative Nutrition Health Coach who is passionate about sharing healthy living tips and real food recipes.  Instagram and Facebook: Tru You Essentials; Website: www.truyouessentials.com

One of my favorite ways to serve turnips is to roast them, but I wanted to create a recipe that used them in a different way.  This dish features turnips that have been cooked and then pureed.  Top with some mushrooms and broccoli and this dish becomes a delicious blend of flavors and textures.

Pureed Turnips with Riced Broccoli and Sauteed Mushrooms

Ingredients:
2 lbs purple top turnips
2 Tbsp butter (or non-dairy substitute)
½ tsp garlic powder
1/8 tsp black pepper
¼ tsp sea salt

  • Wash turnips and cut into 1- inch cubes.
  • Fill large pot halfway with water. Bring to a boil.
  • Place cubed turnip pieces in water. Bring to a boil again and then reduce to a simmer.  Cook for 30 minutes or until turnips are fork tender.
  • Drain turnips. Place in blender or food processor with butter and seasonings.  Blend until smooth.
  • Place turnip puree in serving bowl. Top with riced broccoli and sauteed mushrooms or simply serve as a side.

Riced Broccoli

Ingredients:
2 Tbsp olive or avocado oil
½ medium onion, finely chopped*
2 cloves garlic, minced
3 Tbsp water
1 cup broccoli crowns, finely chopped*

Heat oil in pan on stovetop.  Reduce heat to low.  Add onions and garlic.  Cook for 2 minutes.  Add water to deglaze the pan.  Add broccoli and cover.  Cook for 10 minutes.  Remove from heat and set aside.

*You can also put the onion and broccoli in a food processor and finely chop.

Sauteed Mushrooms

Ingredients:
2 Tbsp olive or avocado oil
½ medium onion, finely chopped
1 cup Maitake mushrooms, finely chopped
Pinch sea salt

Heat oil in pan on stovetop.  Reduce heat to low.  Add onions and cook for 2 minutes.  Add mushrooms and salt.  Mix and allow to cook for 5 minutes.  Remove from heat and set aside.

Recipe and photos by Stephanie Borzio.  Stephanie is a mom of three active boys and is an autoimmune warrior.  After battling her own health for several years, Stephanie found healing through food and lifestyle changes, including joining Blooming Glen Farm CSA of which she is a long time member.  She is a Board Certified Integrative Nutrition Health Coach who is passionate about sharing healthy living tips and real food recipes.  Instagram and Facebook: Tru You Essentials; Website: www.truyouessentials.com

I’ve been making a beet burger recipe that was given to me by a farmer friend from Wisconsin for a few years now.  At first, I was pretty excited about it and looked forward to beet season just so that I could make the recipe again. But, after making it so many times it needed some new life. A kitchen experiment was in order. So, I decided to use the same general recipe for the burgers and pair them with some new flavors. I exchanged the bun and cheddar cheese for pita and feta crumbles.  The result was just was I was looking for: something refreshingly tasty, yet wholesome at the same time! If you like falafel as much as I do, this recipe is worth a try. It’s just a twist on more traditional Mediterranean meal.

Falafel Style Beet patties

4 medium size beets, peeled and quartered
3-4 medium carrots, chunked
1 large sweet spring onion, sliced
¼ cup sunflower seeds
2 Tablespoons all-purpose flour
2 medium eggs
1 Tablespoon olive oil
1 teaspoon salt
½ teaspoon black pepper

Preheat oven to 350 degrees. Combine the beets, carrots, onion, sunflower seeds and flour in a food processor and chop until a finely diced mixture is created. (If you don’t have a food processor you can finely grate the vegetable components straight into a bowl.)  Transfer mixture to a medium sized bowl and add eggs and salt and pepper. Mix thoroughly in order to coat vegetables in egg.

Next, use your hands to create golf ball sized rounds of the mixture, making sure to squeeze out the extra moisture as you go. You can squeeze it over the bowl or directly into the sink. (Be aware: your hands will take on a bright magenta color during this process, but it does eventually wash off!) Place the rounds on an ungreased baking sheet and bake for about 20 minutes or until tops become deep red in color.

For extra crispy beet patties, transfer the rounds into a warm skillet with 2 Tablespoons of olive oil for about 5 minutes, flipping once. You can skip this step if you prefer to just bake them. Serve patties with pita, swiss chard or lettuce, and feta. For more flavor you can add a sauce of ½ a diced cucumber, 3 sprigs of finely chopped dill, and 2 Tablespoons of yogurt. This recipe serves 4-5 people.

If you’re completely new to beet burgers, feel free to use the recipe for its original purpose by making the mixture into patties instead of balls. And, you can add shredded cheddar cheese (about ½ cup) right into the mixture to give it an even richer burger flavor. I would serve them on wheat buns with your favorite burger toppings.

Photos and recipe by Blooming Glen Farm apprentice Rebecca Metcalf.

Cabbage and apples are a classic combination–and it’s no coincidence since they are both staples of the fall and winter diet. This week, the Blooming Glen Farm cabbage of choice is the crinkly-leafed savoy. Savoy cabbage comes from Northern Italy, where it is known as cavolo verza.

The inspiration for this recipe came from one of my favorite food blogs, Nourished Kitchen. I took some liberties, though, replacing onions with leeks and green cabbage with savoy. Because savoy is sweeter and more tender than other cabbages, I eliminated one apple and some cooking time from the original recipe.

Cider-Braised Cabbage and Apples

Cut the roots and most of the greens off 3 leeks, slice lengthwise, and rinse any grit from between the layers. Slice crosswise thinly and fry in a hot skillet with 2 tablespoons of butter. When the leeks begin to brown, add 1 medium apple, cored and thinly sliced. Cook for another 5 minutes until apples start to soften.

Reduce heat to medium. To the skillet, add 1 savoy cabbage, cored and thickly sliced and 1 bay leaf. Stir to bring apples and leeks to the top. As the cabbage begins to wilt down, pour 1-1/2 cups apple cider into the skillet. Simmer for about 15 minutes until apples and cabbage are soft and most of the liquid is evaporated. Sprinkle on 2 tablespoons apple cider vinegar and 1/2 teaspoon sea salt, toss to combine, and remove from heat.

Pair this dish with pork, and you’ve got yourself a time-honored flavor combination that can’t be beat (I chose a juicy bratwurst). If pork isn’t your style, it would also go very nicely with a roast chicken and/or savory white cannellini beans.

Text and photography by Kate Darlington – Blooming Glen Farm second year intern, fresh food enthusiast, and budding food blogger. She also writes for the Digging Deep Campaign as well as for her personal blog, Growing Things.

You might have seen them at the market or in your CSA share, and wondered what are those flying-saucer shaped squashes? Depending on where you’re from, they go by any number of different names. When we farmed in Oregon it was called sunburst squash, here we call it pattypan squash, but it also goes by scallop squash, white squash, button squash, granny squash or custard squash. Their light green or bright gold rinds remain thin and edible. Their insides are white, with a mild, buttery flavor. It’s shape is whimsical and versatile- you can chop it up and use it like regular zucchini, or if you want to preserve its character, stuff it whole.

Stuffed Pattypan Squash

I used three pounds of pattypan squash, 8 squash, each about the size of my fist, or smaller. You could do less, larger squash, and just adjust the cooking time accordingly.

Cook 1/2 cup quinoa in 1 cup water, or for more flavor I used homemade chicken broth. Feel free to substitute your grain of choice.

Meanwhile pre-boil the whole patty pan squash for about 5 min, just to soften them a bit and make cutting them easier.

To cut, just imagine you are carving the top off a pumpkin. Insert your knife at an angle and remove the cap. Scoop out the insides with a spoon, being careful not to pierce the wall. (Though have no fear, I did, and things still turned out just fine). Put prepared pattypans in a baking dish. I oiled the inside of each and salt and peppered them.

Add a tablespoon or two of olive oil to a pan, heat up and saute 1/2 of a large sweet onion, diced, 4 cloves fresh garlic, diced, and cook until the onions begin to sweat. Add 1 asian eggplant, diced, and one chopped tomato. Cook for a few minutes then add 1 1/2 cups Swiss Chard, cut into thin strips. You can also add any fresh herbs you like- I used a few sprigs of basil and thyme. Salt and pepper to taste.

The great thing about making a stuffing for a squash, or even stuffed peppers, you can pretty much use whatever you have on hand. If you prefer to go the meat route, I think sausage or ground beef would work well also.

After sauteing the vegetables, stir in the quinoa, taste and adjust seasoning to your preference. Fill the squash to the brim with the quinoa mixture. To top it off, I combined a cup of bread crumbs with some melted butter and parmesan cheese. Then after oiling and seasoning the lids, I re-capped the cuties, added a bit of water to the bottom of the baking dish, and covered with foil. Bake at 375 for 35 minutes or so, until squash is soft, but not mushy. I removed the foil for the last 10 minuted to get a bit of browning.

Enjoy!

Photos and text by Tricia Borneman, Blooming Glen farmer and co-owner.

Lemon & Leek Kale SaladKale shares similar health benefits with its friend, Swiss chard. In addition to being a cancer-fighting and heart health-promoting superhero (thanks to all those antioxidants), kale’s omega-3 and enormous vitamin K content make it a great tool to fight against the inflammation that’s linked to so many chronic health conditions.

My favorite benefit of kale though, is its detoxification abilities. Kale’s glucosinolates make isothiscyanates, which studies have shown assist our cell’s detox activities. The nutrition and compounds in kale assist in eliminating the toxic molecules in our body caused simply from the hazards of daily living; pollution, medication, processed food chemicals, etc.  We all could benefit from a little cleansing, right? 🙂

Kale is most often eaten cooked, but there are health benefits to eating our foods raw. The recipe below uses the acidity in fresh lemon juice to help “cook” the kale, leaving it a nice, soft and chewy texture.

Lemon & Leek Kale Salad

Lemon & Leek Kale Salad

Add dressing ingredients in a large bowl, stir until combined:
1 tablespoon olive oil
1 tablespoon tamari sauce
Juice and zest of one lemon
1/2 teaspoon of honey (use agave for vegan version)
salt and pepper to taste

Add to bowl:
1 bunch of kale (~20 leaves), stems removed, cut into bite-sized chunks or strips.
1 leek, white part sliced in half lengthwise and then into thin half-moons.

Stir into the dressing to well coat. A great method is to use your hands and “massage” the leaves with the dressing. Allow to marinate in fridge until ready to eat (ideally 4-8 hours, but it’ll be tasty after even just 30 minutes).

Stir in 1/4 cup seeds and/or chopped nuts (sesame and pumpkin seeds or slivered almonds are a great choice) right before serving.

Post and photo by Mikaela D. Martin: Blooming Glen CSA member since 2005, board-certified health counselor, and co-founder and -owner of Guidance for Growing, an integrative wellness practice in Souderton. Read more about healthy eating and living on her site, http://guidanceforgrowing.com!

Fall crops are here! Celeriac (celery root) and winter squash are making their first appearance in the share and at the markets this week, so it is the perfect time to brush up on those fall crop recipes or even try out something new.

My go-to preparation for so many fall crops like winter squash, potatoes, or celeriac is to simply toss them in olive oil and roast them. Though it’s delicious and still probably my favorite way to eat them, sometimes a more complex preparation can be a nice change. This recipe is a healthy, vegetarian curry that showcases the sunshine squash’s sweetness and the complex nutty flavor of the celery root. I serve it alongside some rice for a complete and satisfying  meal.

Lentil Curry with Celeriac and Winter Squash

-Half, seed, and peel 1 Kabocha squash–or other winter squash–with a sharp knife (the skin is actually not too hard to peel if your knife is good). Cut squash into 1/4 inch chunks. Similarly, carefully peel and chop 1 celery root into 1/4 chunks. Set aside. 

-Heat a large pot over medium heat with 4 tablespoons of olive or coconut oil (I like coconut for this recipe) and toss squash and celery root in with:

1 large white onion, chopped
3 cloves of garlic, minced
2 medium carrots
2 tablespoons of fresh, grated ginger
1 teaspoon of salt

-Saute veggies for about 15-20 minutes until tender.

-Add 1 tablespoon of curry powder and 1/4 teaspoon (or more) of red chili flakes. Mix well and cook for 2 minutes.

-Add 1 cup of lentils (any type will do), 1 cup of water or chicken stock, and 1 cup of coconut milk. **Coconut milk can be omitted…just add stock or water instead.

-Cover and simmer mixture for 25-40 minutes until lentils are tender. Adding more stock or water if the mixture is getting to thick.

-Let cool slightly and serve with brown or wild rice. Garnish with a fresh herb like chive, cilantro or parsley! ENJOY!

Serves 4 to 5 large portions.

Recipe and photos by Jana Smart- Blooming Glen Farm employee and frequent creator of creative recipes using farm fresh seasonal ingredients. Check out more of her recipes on her food blog http://www.agrarianeats.blogspot.com/

Power Breakfast: Swiss Chard, Fresh Tomato and Egg If vegetables are lacking in the standard American diet, leafy greens are the scarcest of all. Given the incredible and unique nourishment these veggies offer, learning to cook and eat greens is essential for creating lasting health. Thankfully, adding these nutritional powerhouses to our diet is easy, especially if you’re a member of a CSA — greens grow from the beginning to the end of the season, with kale and collards bracketing the more tender Swiss chard.

Swiss chard is a unique leafy green in that it contains at least 13 different polyphenol antioxidants, which have been shown to aid our circulatory and respiratory systems by protecting us from atherosclerosis (clogged arteries), high blood pressure and air pollution damage. Polyphenols also contribute to cancer prevention and longevity.  Considering all of their health benefits, making sure we include them in our diet first thing in the morning will start us all off on a day fit for a superhero!

The addition of a local, free range, organic egg will add a “complete protein” that contains an adequate proportion of all nine essential amino acids necessary for our diet, healthy fats like omega-3s, and choline, which helps regulate the brain, nervous system, and cardiovascular system. In order to reap these benefits, you must be sure your eggs are from chickens raised in a natural environment. The ones sold at various local farms and markets are a great choice, like those from Deep Springs Farm in Harleysville, Purely Farm in Pipersville, or Happy Farm in Kintnersville.

Finally, the fresh tomatoes in this recipe are shown to prevent cancer, heart disease as well as high cholesterol — not to mention the fact that they taste great!

Superhero Breakfast: Swiss chard, Fresh tomato and Egg
Note: this dish can be made ovo vegetarian (dairy-free) using options below.

Sauté 1/4 cup chopped onion with a pinch of salt in 1/4 cup of water only (water sauté) over medium heat until onions are tender, about 3 minutes. Meanwhile, preheat small skillet with butter or grapeseed oil.  Add 1 1/2 to 2 cups of Swiss chard cut into thin strips to the onions and mix well, adding more water if necessary.  Cover and cook until tender and bright green, about 2-3 minutes.  Break one nature perfect egg and fry on the oiled skillet.

Add several splashes of vinegar to chard/onion mixture and stir well. Turn off heat and stir in 1 very small chopped tomato. Flip egg, cook for one minute and turn off heat.

Using a slotted spoon (to leave any remaining liquid in the pan), place the greens-onion-tomato mixture into shallow bowl and sprinkle generously with nutritional yeast flakes, romano cheese or parmesan cheese. Top with egg and serve immediately.

Recipe and photo by Mikaela D. Martin: Blooming Glen CSA member since 2005, board-certified health counselor, and co-founder and -owner of Guidance for Growing, an integrative wellness practice in Souderton. Read more about healthy eating and living on her site, http://guidanceforgrowing.com!

With the cooler days and nights of late summer, I find that instead of craving quickly cooked meals and cold salads, I have been turning to more warm, comforting dishes. The appearance of soups and stews on the table is a delightful reminder of the fast approaching fall season!

Tomato soup is that perfect transitional late-summer meal. Alongside a good grilled cheese, you can’t match the freshness and comfort of this classic dish. My recipe uses whole milk for creaminess (not as heavy as those recipes that call for cream), roasted garlic and sweet peppers to add a depth of flavor, and a topping of balsamic vinegar and fresh corn for some sweetness.

Tomato Soup with Roasted Garlic and Sweet Peppers

-Preheat oven to 400 degrees

-Quarter approximately 3 pounds of red tomatoes and place on baking sheet with 4 or 5 (about 3/4 of a pound) of sweet peppers, seeded and diced, and 5 or 6 unpeeled garlic cloves. Roast in oven for 20 minutes or so until veggies are tender.

-Meanwhile, in a large pot, melt 4 tablespoons of butter and saute 1 white onion until translucent. Stir in 2 heaping tablespoons of tomato paste.

-Pour 4 cups of chicken or veggie stock over onions and bring to boil. Then turn down to a medium-low heat.

-Dump roasted veggies into pot with stock and onions, making sure to remove garlic skins beforehand. Puree with an immersion blender. **If you don’t have one of these you can simply put the mixture into a blender, food processor or food mill.

-Add in 1 cup of whole milk (or half a cup of heavy cream if you prefer) and 2 tablespoons of balsamic vinegar

-Let cook on medium-low heat for 20 minutes to let flavors meld. Stirring occasionally.

-Top with a splash more of balsamic and some fresh, sweet corn. Serve along side your favorite version of grilled cheese. ENJOY!

Recipe and photos by Jana Smart- Blooming Glen Farm employee and frequent creator of creative recipes using farm fresh seasonal ingredients. Check out more of her recipes on her food blog http://www.agrarianeats.blogspot.com/