Posted at 12:09h
in
Recipes
by bloomingglenfarm
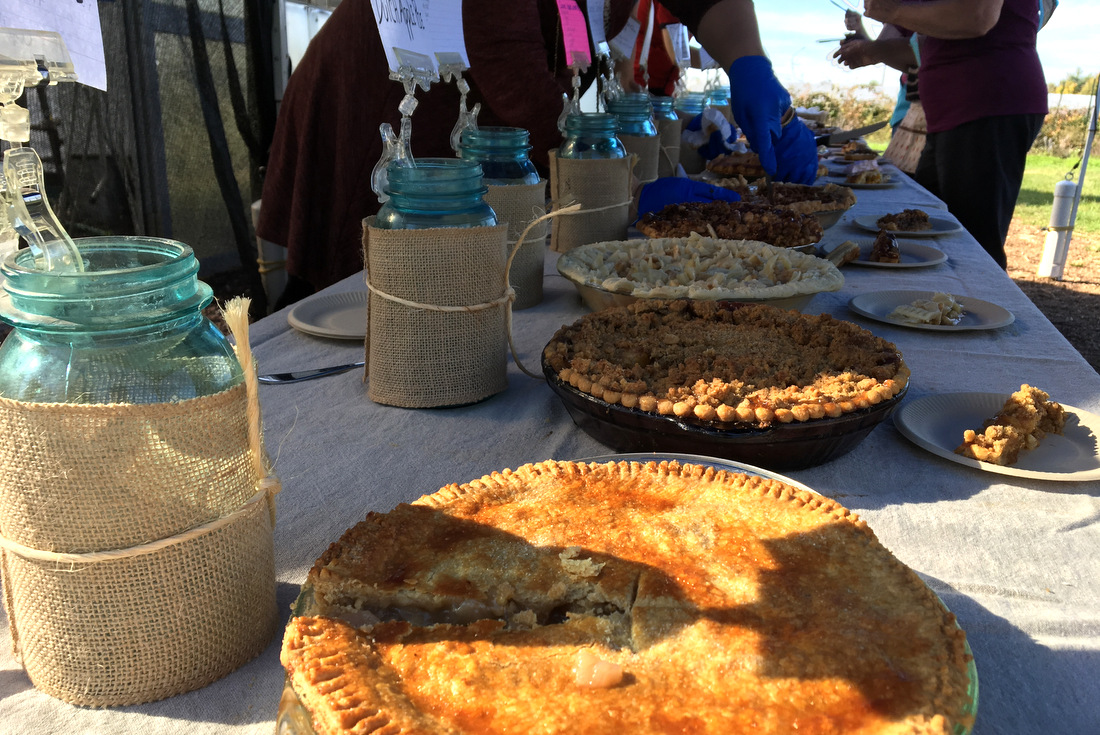
Looking for that perfect pie for Thanksgiving, then look no further! With Thanksgiving rapidly approaching, it’s a perfect time to share some award winning pie recipes with you! Fifteen pies were entered in this years seventh (almost) annual pie bake-off contest at the Blooming Glen Farm Harvest Festival. Apples, pears, plums and pumpkins featured prominently, along with caramel and chocolate- but the people’s choice winner was the unusual ground cherry pie. Two pies tied for the people’s choice second slot, and both were original creations by the bakers- pumpkin spice latte and turtle pumpkin pie.
The judges leaned toward the more traditional, choosing for first place a chocolate toffee almond pie, along with dutch apple crumb pie in second place and salted vanilla pear in third. Our esteemed judging panel was led by, left to right, pictured below: Kelly Madey, Susan Kahn and Allison Seelaus.
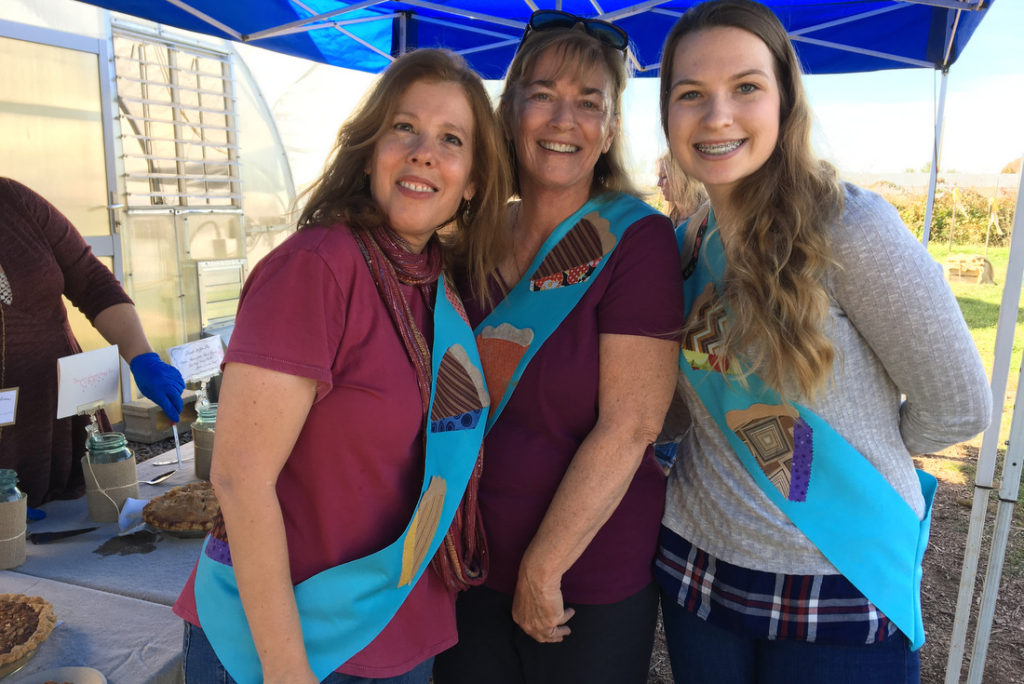
Susan Kahn, a longtime self taught baker, founded Bucks County Cookie Co. in 2008. Selling her cookies and scones only at local farmers markets in the first few years, Susan began expanding her cookie repertoire to include shortbread cookies using unique flavor combinations and locally sourced ingredients. Today her shortbread cookies are the most popular. In 2014, Susan moved her business out of her house and opened the bakery in Doylestown, PA, behind Cross Keys Diner. She still sells at Wrightstown Farmers Market and at craft fairs during holiday seasons.
Kelly Madey is an award winning baker and recipe developer. She is committed to using simple, natural ingredients with a focus on local, seasonal agriculture. She is the two-time state champ of the best chocolate cake in Pa. Her recipes appear in local/national media including Bucks County Taste, Food Network, Cooking Channel, Better Recipes and Good Morning America. Kelly is the baker/owner of One Sweet Baker. Look for her at Wrightstown and Doylestown Farmers Markets.
“Baking is my life,” says Allison Seelaus, a previous Blooming Glen Farm pie bake-off winner with her Maple Brown Butter Rum Peach Pie. She is a Culinary Institute of America, Hyde Park graduate, and is currently the pastry chef at the Farmers Daughter Restaurant at the Normandy Farms hotel and conference center.
Ninety-six votes were cast and though the top six pies were chosen for recognition, I think we were all winners for getting the chance to taste and enjoy so many delicious pies. Together we were able to raise $300 for the Puerto Rico middle school fundraiser at United Friends School.
Nanie’s Ground Cherry Pie
by Bruce Schaffer
People’s Choice: First Place
There is a long tradition of pie baking in Bruce Schaffer’s family. His father, Ashbee Schaffer would bake pies weekly, well into his 90’s. Pie baking genetics aside, Bruce swears the secret to a great pie is both the crust (make sure all the ingredients are cold) and the pie tin.
Cathy Walter, a friend of Bruce’s for the past 30 years, says: “Bruce’s Dad would create the most beautiful perfect pies. He was a war veteran, like Bruce, and used baking as a calming hobby. Bruce likes to make soup and pie in his dads honor. I do believe he was looking down helping, knowing the pie money was going to a great cause, to help the suffering hurricane survivors.”
Bruce’s sister, inspired by her son’s bumper crop of ground cherries, found the ground cherry pie recipe in her father’s old tattered cookbooks. “I was first served ground cherry pie by my husband’s grandmother in 1969. Nanie Keyser was a Schwenkfelder raised on a farm in Kulpsville. She went up to the 8th grade in school. The pie tin was hers. Back in the day one could purchase a ready-to-bake pie in such a tin. But, you had to leave a 10 cent deposit on the tin. Apparently Nanie did not get her 10 cents back.”
Despite this being the first ground cherry pie made by Bruce, you can tell the baking talent has been passed on thought the generations.
Ingredients
6 cups husked ground cherries
3/4 cup raisins
grated rind and juice of 1 lemon
1 tablespoon cider vinegar
1 1/2 cups sugar
4 tablespoons flour
1/2 teaspoon each- cinnamon, nutmeg and ginger
3 tablespoons butter (cold, cut into small pieces)
Pastry for a 2 crust pie (9 inches) – recipe that follows is for one crust
1 cup sifted all purpose flour
1/2 teaspoon salt
1/3 cup plus 1 tablespoon shortening
2 to 2 1/2 tablespoons ice water
Bruce- “The trick is to have everything cold, the flour and shortening before mixing. Also you need to work quickly and light handedly, slow and rough handling will cause tough and hard crust.”
Instructions
Line pan with pastry. Mix all filling ingredients well and pour into crust. Dot with butter. Cover with top crust and crimp edges. Cut a few vents for steam. Optional- mix 1 egg and 2 tablespoons cream. Brush on and sprinkle with Turbinado sugar. Place 1 1/2 inch foil around edge of crust to prevent from becoming too brown, remove in the last 15 minutes of baking. Bake 15 min at 425 degrees, reduce heat to 325 degrees and bake for 50 more min.
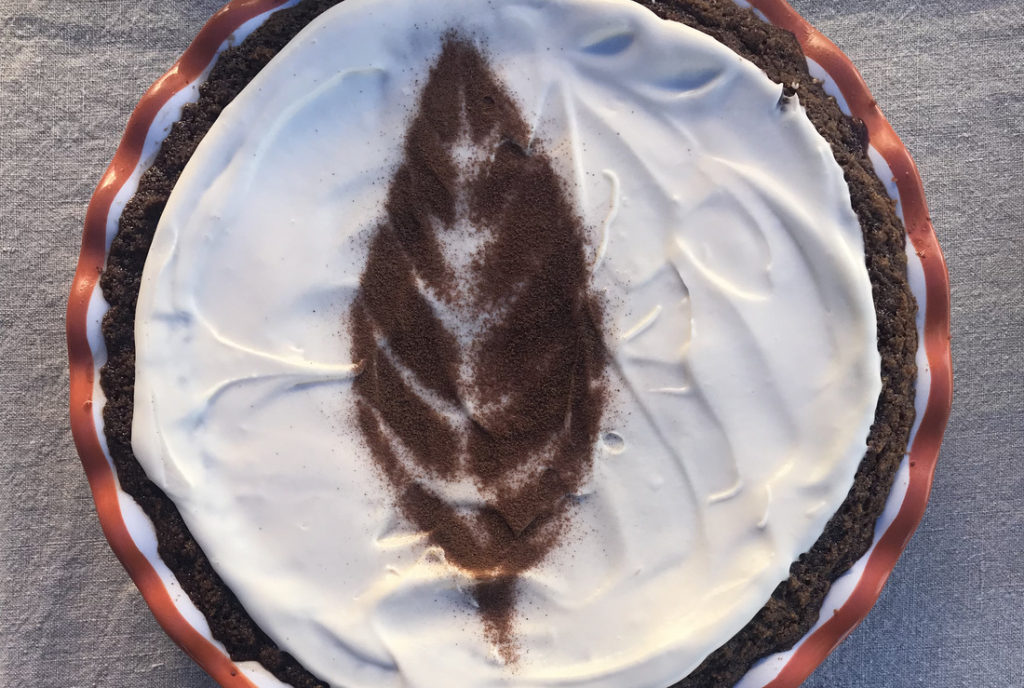
Pumpkin Spice Latte Pie
by Michelle Guerriero
People’s Choice: Tied for Second Place
Michelle’s last winning pie at the Blooming Glen Farm pie bake off was her Mexican Hot Chocolate Pie in 2014 (She also won with her Maple Custard Pie with Candied Bacon in 2012 and her Orange Mascarpone Pumpkin Pie in 2011) – “I have a little bit of a Blooming Glen Farm pie bake-off obsession (it’s the only one I have ever entered!), so I think quite a bit throughout the year about what pie I’m going to bake come Fall. This year, I was inspired by the Fall rage that happens when Starbucks announces its Pumpkin Spice Latte availability. So I did my best to imitate the pumpkin spice latte glory, in a pie form.”
Crust Ingredients
1 ½ cup gingersnap cookie crumbs (pulsed in blender until even crumb)
5 T butter, melted
Crust Instructions
Mix gingersnap crumbs and melted butter in pie dish. Press against sides and bottom until even crust is formed. Bake at 350 for 6-8 minutes.
Filling Ingredients
¾ c. espresso
¾ c. sugar
2 ¼ c. heavy cream
4 egg yolks, brought to room temperature if possible
1 whole egg, brought to room temperature if possible
1 teaspoon salt
2 teaspoon pumpkin pie spice mix (cinnamon, clove, lemon peel, nutmeg)
1 teaspoon vanilla
Filling Instructions
In a mixing bowl, combine whole egg & egg yolks, salt, pumpkin pie spices, and 1 teaspoon vanilla. Mix well, set aside.
In a saucepan, combine heavy cream, sugar and espresso. On high heat, lightly whisk cream until little bubbles form on sides, but not quite to a full rolling boil. Remove from heat, and carefully pour the heavy cream mixture into the egg mixture – but be careful – be sure to whisk the eggs while pouring slowly! If you pour too quickly and/or don’t whisk, you will end up with scrambled eggs!
Once combined, pour the mixture through a fine sieve into the pie crust. Bake at 350 for 40-45 minutes. You may need longer, depending on depth of pie. You will know it is ready when it is still “jiggly”, but has a solid film on top of pie.
Remove from oven and let cool completely. Don’t worry – it will seem like it didn’t cook because it will be quite jiggly, but as it cools, it will firm into a custard.
Top with whipped cream & sprinkle with cinnamon and nutmeg. If you’d like, cut out a stencil of a leaf, and sprinkle cinnamon/nutmeg on top in shape of stencil.
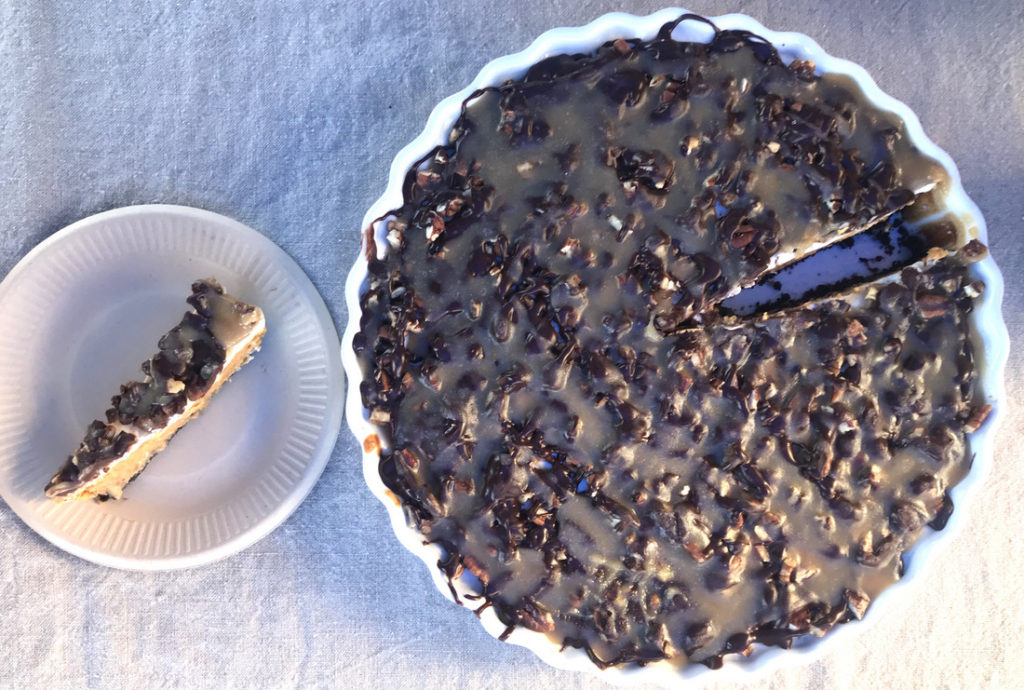
Turtle Pumpkin Pie
by Aimee Grace
People’s Choice: Tied for Second Place
Aimee Grace- “This year I entered my “Turtle Pumpkin Pie”, a recipe I thought up just for the BGF competition! And I’m so glad I did- this will surely be on my table at Thanksgiving (and maybe Christmas too!). I was inspired by my mom’s awesome pumpkin cheesecake recipe, and my current insatiable pregnancy cravings of dark pecan turtles from my favorite candy shop in Doylestown- I’m there weekly these days! I decreased the amount of cream cheese to make more of a traditional pumpkin pie layer, and changed the traditional graham cracker crust to a dark chocolate crust. Topped with a sweet cream layer and turtle drizzle, it was a really enjoyable pie! Of course the secret to this pie was the Blooming Glen Farm butterkin squash, which gave a rich color and flavor to the pumpkin layer of this pie. Roasted and frozen in 16 ounce batches, I have enough for a couple of pies this fall.”
“My husband and I have been enthusiastic members of Blooming Glen Farm CSA for 8 years. The farm food has become an important part of our diet and lifestyle, and my husband has enjoyed new knowledge, a physical workout and the camaraderie of part time summer employment there. Share pick-up day is a highlight of our toddler’s week- and it thrills me when she bites into fresh veggies as she puts them in our bag. Thanks to Tom, Tricia and the farm crew for their hard work and another great season!”
Crust Ingredients
5 tablespoons butter
1 package Oreo cookies (I used chocolate filled cookies to get a dark chocolate crust)
Filling Ingredients
8 ounce package cream cheese
2/3 cup sugar
16 ounces of pumpkin puree
1 1/4 teaspoon pumpkin pie spice
1/2 teaspoon salt
2 eggs
1 pint sour cream
1 teaspoon vanilla extract
1/4 cup sugar
Caramel Ingredients
1/2 cup brown sugar
pinch sea salt
1/4 teaspoon vanilla
4 tablespoons unsalted butter
5 tablespoons heavy cream
Crust Instructions
Combine melted butter and Oreos in a food processor to make crumbs. Press into pie pan and chill in freezer while you make rest of pie.
Filling Instructions
Combine softened cream cheese and 2/3 cup sugar in food processor. Add pumpkin puree, pumpkin spices, salt and eggs. Pulse until combined. Pour into chilled crust. Bake at 350 degrees for 45 min.
When done remove pie from oven and raise temp to 400 degrees. Mix 1 pint sour cream with 1 teaspoon vanilla extract and 1/4 cup sugar. Pour on top of pumpkin pie and put back in oven for 8 min.
Chill in fridge.
Drizzle caramel (mix all caramel ingredients above in small saucepan- heat and allow to bubble) and chocolate ganache (1/2 cup chocolate chips melted, add splash of heavy cream and mix well) and sprinkle with chopped pecans, Chill again and enjoy!
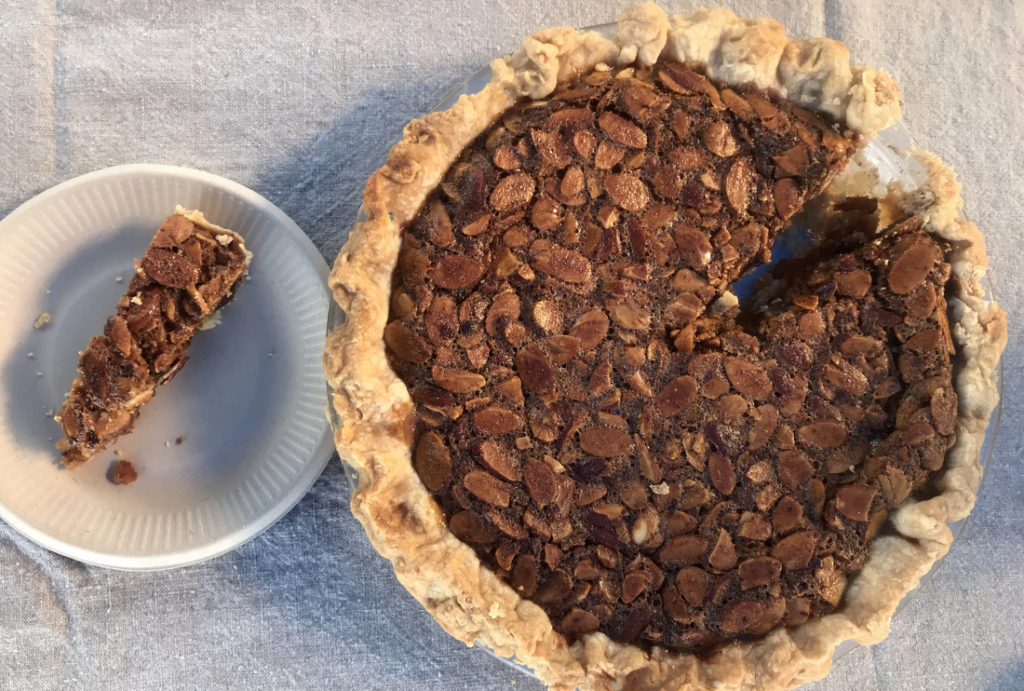
Chocolate Toffee Almond Pie
by Gail Vasquez
Judges Vote: First Place
Gail Vasquez is married and a local realtor with Keller Williams Real Estate. She’s lived in the area for 27 years and has 3 daughters. “Our oldest daughter has been a vegetarian since 4th grade so we searched out the best place to get fresh veggies and the Blooming Glen CSA was the perfect solution!!! The fact that everything is organic is icing on the cake!! The pie recipe was a fun twist on the traditional Pecan Pie. We had a bunch of almonds and I love Heath Bars so I decided to create a sort of Heath Bar Pie.”
Ingredients
1 pie crust for a 9” pie, from scratch or a refrigerated pack
3 large eggs
1/3 cup sugar
1 cup light corn syrup
1/4 cup unsalted butter, melted
1/4 teaspoon salt
2 teaspoons cornstarch
1 cup toffee bits
½ cup chocolate chips
6 ounces (about 1 2/3 cups) sliced almonds
Instructions
Preheat oven to 425 degrees. Mix eggs, sugar and corn syrup well, add melted butter salt and cornstarch and mix well. Place chocolate chips in bottom of pie crust, then place toffee bits on top and sliced almonds. Pour filling over everything and let sit about 10 min so that the sliced almonds can float to the top. Bake at 425 degrees for 10 minutes and then reduce temperature to 350 degree for 50-60 min. Let cool completely before serving.
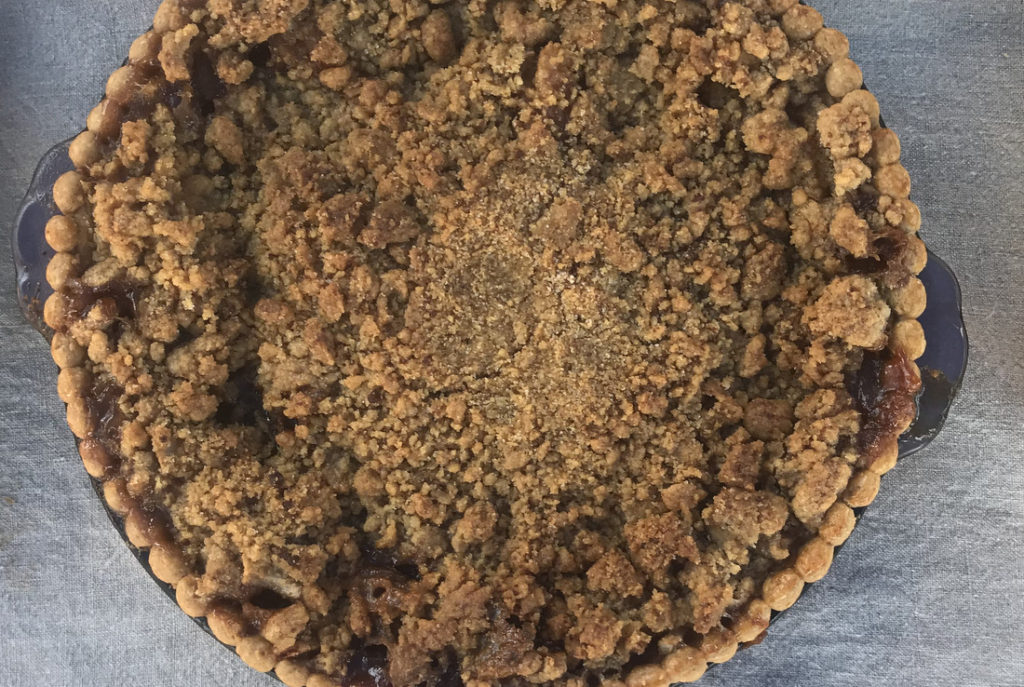
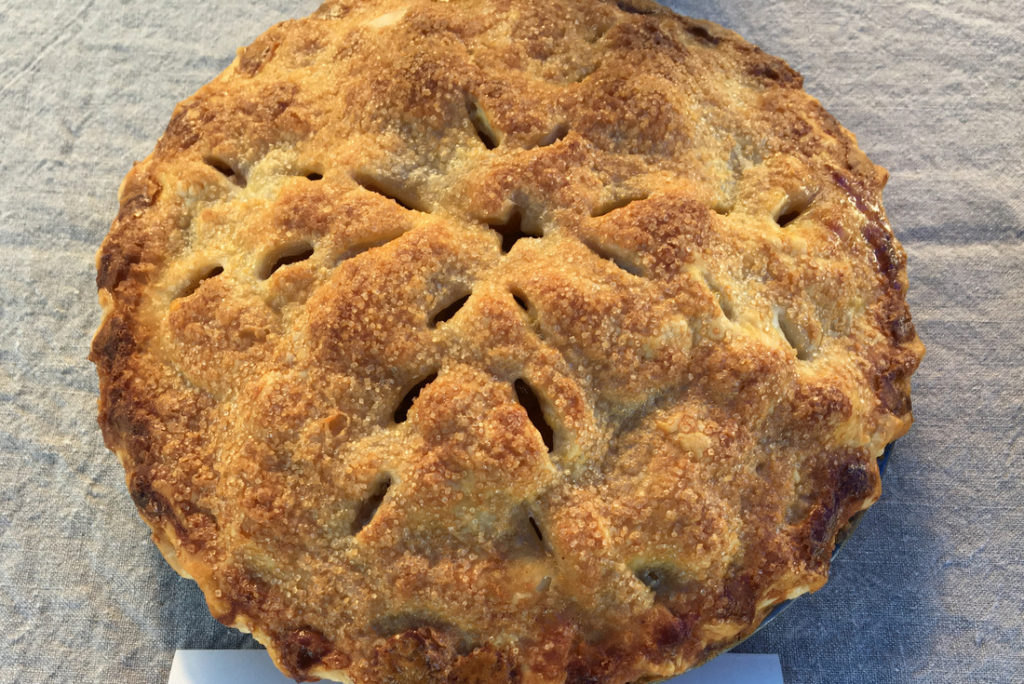
Dutch Apple Pie
by Shelah Layton
Judges Vote: Second Place
Winner of the Judges second and third place vote with her Dutch Apple Pie and Salted Vanilla Pear Pie. When Shelah Layton isn’t busy running Hershberger Heritage Farm with her husband Nate Hershberger, and homeschooling her two young sons, she loves to make delicious seasonal dinners and home baked desserts for her family.
“I really enjoy making these pies. Local apples, butter, our own grown pears and lard add so much flavor. Before I had my farm I always used butter in my pies. I started incorporating more lard into my cooking and baking from our own pastured raised pork and it’s made all the difference in my opinion! This is the first time ever participating in the Blooming Glen’s Harvest festival pie contest. I had so much fun tasting all the pies. I’m hooked! Definitely looking forward to next year.”
Crust Ingredients
2 1/2 cups Unbleached All-Purpose
1 1/4 teaspoons salt*
1/4 cup lard
10 tablespoons cold unsalted butter
6 to 10 tablespoons ice water**
*Reduce the salt to 1 teaspoon if you use salted butter.
**use a little at a time. Just until the crust holds together
Filling Ingredients
6 apples peeled and cored
1/2 cup butter
3 tablespoon flour
1/2 cup white sugar
1/2 cup brown sugar
1/4 cup water
1/2 teaspoon cinnamon
Streusel Ingredients
1 cup flour
1/2 cup brown sugar
1/2 cup butter
Instructions
Preheat oven to 350 degrees F.
Crust: In a medium bowl combine the flour, lard, salt and butter until it has a course texture. Add the water a tablespoon at a time until it holds together and forms a dough ball. Chill for about 30 min. On lightly floured surface roll pastry from center to edges to form a 12-inch circle. To transfer pastry, wrap it around the rolling pin. Unroll pastry into a 9-inch pie plate.
Filling: In a sauce pan, add the 1/2 cup of butter and melt over medium heat. Add the flour and mix until the mixture turns into a thick paste. Add water, white sugar, brown sugar and cinnamon and continue stirring. Let it simmer for a couple minutes and then pour over peeled/cut/cored apples in the prepared pastry pie plate.
Streusel: In a medium bowl combine 1 cup flour and 1/2 cup brown sugar. Cut in the butter until mixture resembles coarse crumbs. Add to the top of the apples just before placing in the oven.
Bake for 50 min. at 350 degrees.
Salted Vanilla Pear Pie
by Shelah Layton
Judges Vote: Third Place
Crust Ingredients:
2 1/2 cups Unbleached All-Purpose Flour
1 1/4 teaspoons salt*
1/4 cup lard
10 tablespoons very cold unsalted butter
6 to 10 tablespoons ice water**
*Reduce the salt to 1 teaspoon if you use salted butter.
**use a little at a time. Just until the crust holds together
Filling Ingredients:
6 tablespoons Butter
3 pounds Bosc or Anjou Pears, peeled, cored, and sliced (roughly 5-7 large pears)
¾ cup Turbinado Sugar (or 2/3 cup granulated sugar)
3 tablespoons honey
1 Vanilla Bean, sliced lengthwise, seeds scraped
¼ teaspoon Ground Cardamom
1/8 teaspoon Ground Cloves
3 tablespoon Tapioca Starch (or 2 tablespoons Cornstarch)
1 tablespoon Water
1 egg, beaten
Instructions
Crust: In a medium bowl combine the flour, lard, salt and butter until it has a course texture. Add the water a tablespoon at a time until it holds together and forms a dough ball. Chill for about 30 min.
On lightly floured surface roll pastry from center to edges to form a 12-inch circle. To transfer pastry, wrap it around the rolling pin. Unroll pastry into a 9-inch pie plate.
Filling: Place the butter in a large pan and melt over medium/high heat. Continue cooking until butter begins to foam. Watch butter carefully to ensure it does not burn. As soon as the butter is a light, even brown color, add the pears and turbinado sugar to the pan and toss ingredients together. Continue cooking on medium/high heat for 5 minutes. The pears will soften and the butter/sugar mixture will begin to caramelize.
Add the honey, vanilla beans, cardamom, and cloves to the mixture. In a small bowl, stir the tapioca starch and water together. Pour into the pear mixture and stir in quickly. Cook for 1 more minute, or until the sauce surrounding the pears has thickened.
Scoop the pear mixture into a bowl and set aside to cool for 15 minutes. Once the pears have cooled down a bit, spoon the mixture evenly into the dough lined pie plate. Place the remaining half of the pie dough in between two sheets of parchment paper and roll to a thickness of 1/16″. Cover the top of the pie with dough as desired. Seal the edges of the pie crust. Bake on the middle rack of an oven at 375 degrees for 45-50 minutes.
Post and photos by Tricia Borneman, Blooming Glen farmer and co-owner. Tricia and her husband Tom have been farming together since 2000. Blooming Glen Farm is celebrating its 12th season bringing high quality certified organic vegetables, herbs, fruits and cut flowers to our local community.