Posted at 10:12h
in
Recipes
by bloomingglenfarm
Charcuterie Board, Snack Board, Food Board, Grazing Board…. whatever you want to call it! … a board or platter filled with delicious food is great for breakfast, lunch, dinner or even just a snack or appetizer. It works for a small family, a couple, or even a big party. Snack boards are adjustable, easy to throw together, and appeal to all ages. With all of the beautiful food we have available at the CSA this season, I thought it would be fun to dedicate a post to the presentation of these foods in the style of boards or platters.
Creating a board is a very easy way to showcase the fruits and vegetables we receive each week. Do you get the cheese share? If so, what a perfect addition that would be. How about the mushrooms? Marinate or roast them and add to the platter. What about the egg share? Hard boil a few and slice them up to add to a board.
Here are a few ideas of ways to incorporate grazing boards…
- Create a board for an at home date night. Pair with your favorite cocktail or glass of wine.
- Make a snack board to serve to your children during virtual schooling.
- Are you celebrating something special- perhaps a birthday, anniversary, award, or work achievement? Do it with a snack board.
- Watching a sporting event on television- create a board to graze on while enjoying the game with your family.
- Are you having a family movie night or game night? Create a board that can be snacked on throughout the evening.
- Make a food board to celebrate a milestone in your children’s lives and pair with fresh lemonade or sun tea.
Why should you make a snack board or food platter?
- It’s a way to share, connect, and enjoy spectacular food together.
- It’s a fun way to liven up our pandemic era eating experience with our family!
- Boards are fun to create and look at.
- They can totally be a work of art, a creative way to serve food- providing different colors, textures, shapes, and flavors.
- Boards provide lots of different choices.
- Generally they don’t require cooking or very minimal cooking.
- It’s a different way to serve food. Experiment and see what happens when you display food on a board instead of the usual serving dishes.
- They can be made in advance so that you can enjoy the snack or meal together.
- Boards offer lots of variety so that it is appealing to everyone- no matter what their choice of diet is and no matter what their age is.
Steps to creating a great board:
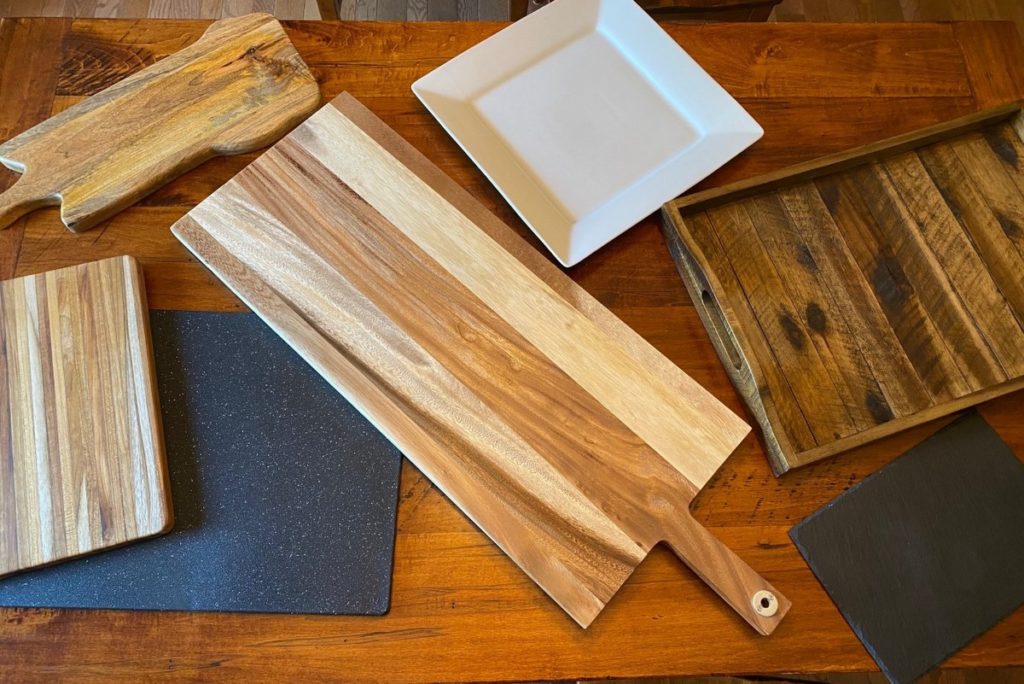
1. SELECT BOARD
Select your board or platter. Think about how many people you will be serving. This will help determine the size of your board. You can use all sorts of materials- wood, marble, slate, stone, etc. You can use an old cutting board, a large serving dish, or an antique tray. You don’t need anything special. Just a flat surface that will hold everything and display it all.
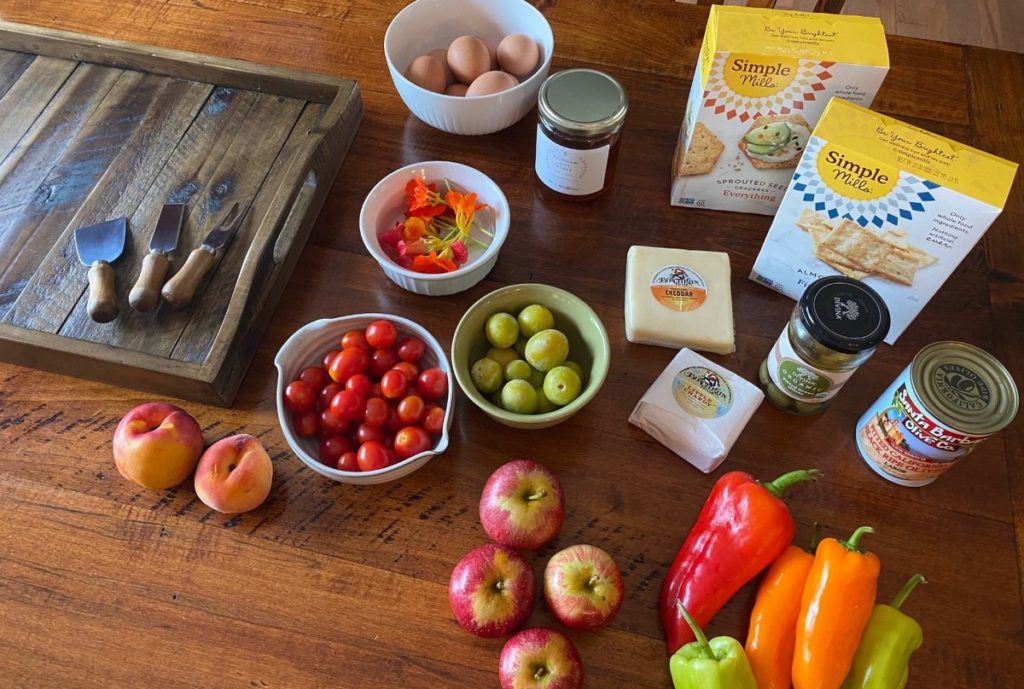
2. GATHER INGREDIENTS
The great thing about this is you can use what you have on hand- in your pantry, refrigerator, or freezer- or you can shop for specific items.
- Vegetables- fresh vegetables, marinated vegetables, fermented or pickled vegetables, roasted vegetables
- Fruit- fresh fruit, dried fruits
- Nuts and Seeds
- Breads, Crackers, Pretzels, Chips
- Cheeses- hard cheeses, soft cheeses, cheese spreads, vegan cheeses
- Spreads, Dips, Jams/Chutneys, Honey, Nut Butters, Mustards
- Meats- thinly sliced
- Other options- olives, chocolate
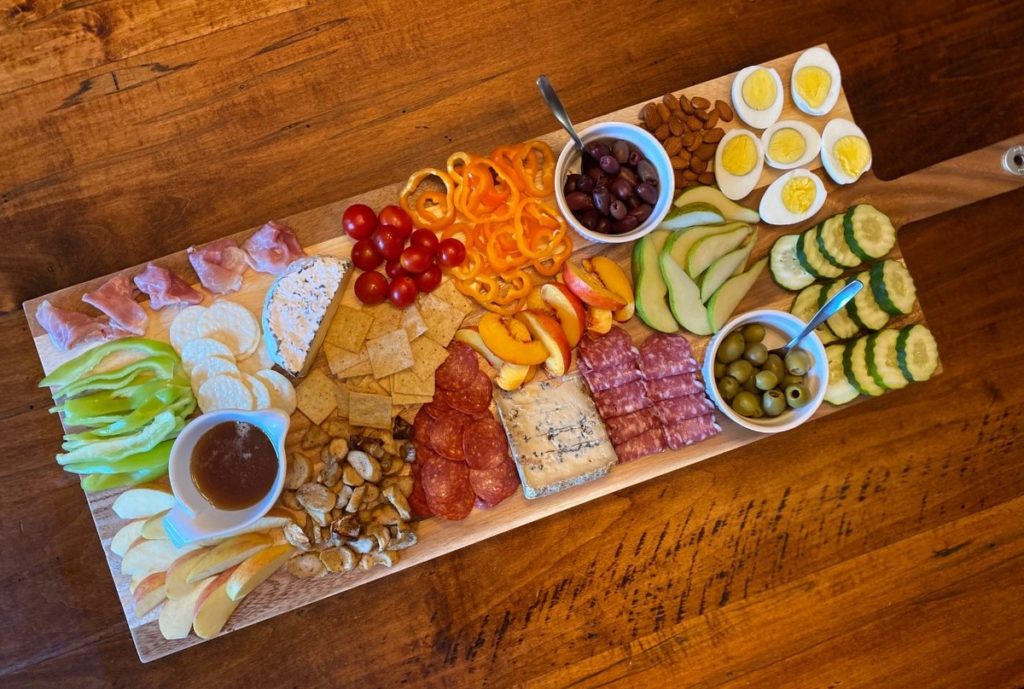
3. ASSEMBLE BOARD
You can keep it simple or get fancy and creative. If you are using any spreads or items that need to go in a bowl, do that first. Place those on the board and then slowly add other items. It’s a good idea to start with your largest items first so that you can work through the space you have. Generally try to keep items on the platter bite size.
4. ADD UTENSILS
If you are keeping cheeses whole, you will want a small knife. For dips and jams, you will want a small spoon. Provide a small knife/spreader for spreads. Make sure you have a utensil for each item that will need it. You don’t want to put out one spoon and use it for all the spreads and jams. Provide one knife for each cheese and one spoon for each jam.
5. GARNISH
Add fresh herbs or edible flowers if you want, but this is totally optional.
6. RELAX AND ENJOY
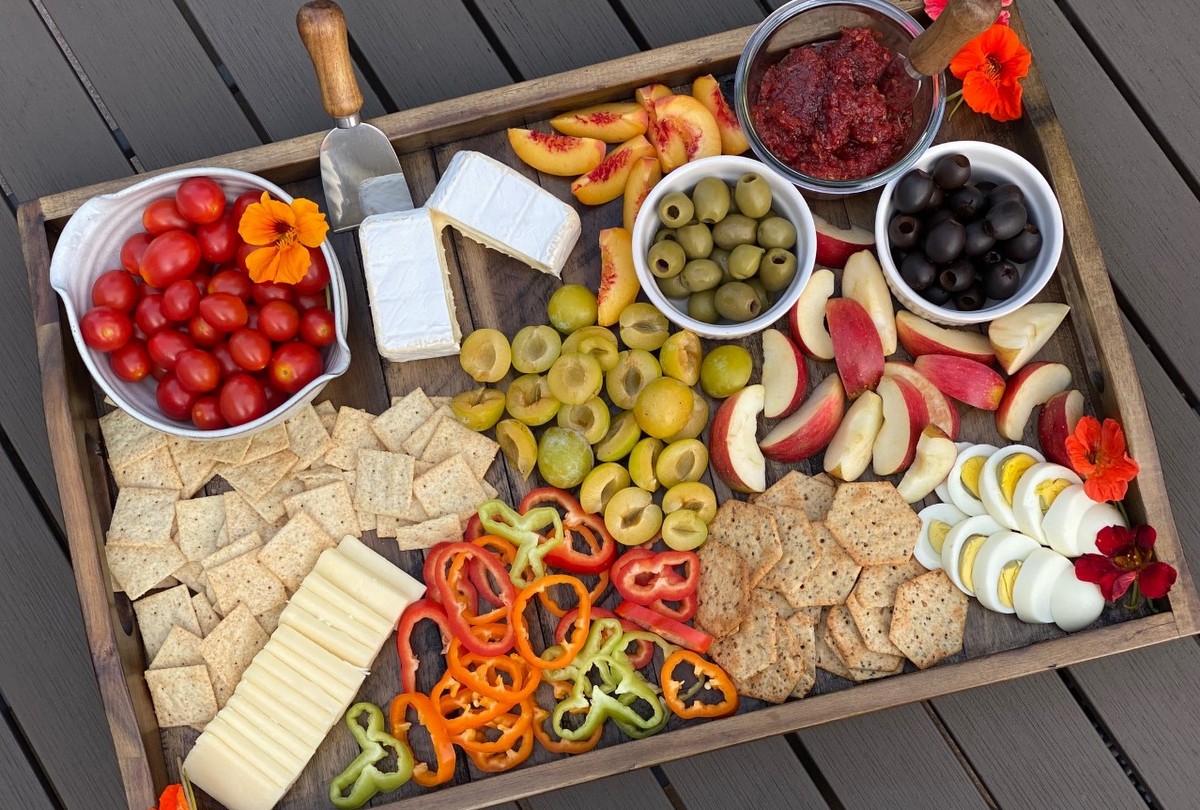
Think of a board as a blank canvas for you to display a snack or even a meal. Take the beautiful produce we receive from Blooming Glen Farm, the fruit from North Star Orchard, the cheese from Valley Milkhouse or Birchrun Hills Farm, the eggs from Deep Roots Valley Farm, the mushrooms from Primordia Mushroom Farm, the honey from Heirloom Acres Honey and combine it all on a platter that showcases the amazing food we receive each week. Create a grazing board, take a photo, post, and tag us (@bloomingglenfarm and @truyouessentials). We cannot wait to see all of the platters you make!
The following past recipe posts would make a great addition to any board:
Tomato Jam- https://www.bloomingglenfarm.com/tomato-jam/
Ground Cherry Jalapeno Jam- https://www.bloomingglenfarm.com/ground-cherries-3-ways-jam-marinade-chocolate-covered/
Fresh Dill Vegetable Dip- https://www.bloomingglenfarm.com/vegetable-crudite-with-fresh-dill-dip/
Roasted Eggplant Dip- https://www.bloomingglenfarm.com/roasted-eggplant-dip/
Refrigerator Pickles- https://www.bloomingglenfarm.com/cucumber-salad-refrigerator-pickles/
Veggie Chips- https://www.bloomingglenfarm.com/veggie-chips/
Roasted Vegetable Chutney- https://www.bloomingglenfarm.com/grilled-tomatillo-salsa-and-roasted-vegetable-chutney/
Lemon Dill Hummus- https://www.bloomingglenfarm.com/fresh-herb-ideas-lemon-dill-hummus-or-basil-salt/
Butternut Squash Hummus- https://www.bloomingglenfarm.com/butternut-squash-hummus/
Fresh Chopped Salsa- https://www.bloomingglenfarm.com/fresh-chopped-salsa/
Recipe and photos by Stephanie Borzio. Stephanie is a mom of three active boys and is an autoimmune warrior. After battling her own health for several years, Stephanie found healing through food and lifestyle changes, including joining Blooming Glen Farm CSA of which she is a long time member. She is a Board Certified Integrative Nutrition Health Coach who is passionate about sharing healthy living tips and real food recipes. Instagram and Facebook: Tru You Essentials