garlic Tag

Cherry tomatoes, plum tomatoes, heirloom tomatoes, and beefsteak tomatoes… oh my!  There are so many amazing things we can do with tomatoes.  They can be the star of a meal or a delicious side.  Eat them as is, add them to salads, can them, make sauce, or create this delicious soup.

Roasted Tomato Soup with Basil Oil and Fried Zucchini Noodles

Ingredients:
3.5- 4 lbs fresh tomatoes
2 medium onions, peeled and quartered
1 pepper (green bell or sweet cubanelle), halved and seeds removed
1 medium summer squash (zucchini or yellow squash), roughly chopped
6 cloves garlic, with skin on
3 Tbsp olive oil
1 tsp sea salt
½ tsp black pepper
6 basil leaves
Basil oil (recipe below)
Fried zucchini spirals (recipe below)

  • Preheat oven to 400°F.
  • Slice tomatoes into quarters or eighths if they are really big.
  • Place tomatoes, onions, pepper, summer squash and garlic in a large bowl. Add olive oil, salt, and pepper.  Toss to coat.
  • Place tomato mixture on baking sheet.

  • Roast for 25-30 minutes. Vegetables should be fork tender.
  • Allow to cool for a few minutes. Remove the skin from the garlic cloves.
  • Transfer mixture to blender, including juices on baking sheet. Add basil.  Process until smooth.  You may need to process in two batches.
  • Serve immediately or place in large saucepan and reheat later.
  • To serve, ladle soup into bowls. Drizzle on basil oil and top with fried zucchini spirals.
  • Soup can be stored in the refrigerator for up to a week. It also freezes well.

Basil Oil

Ingredients:
¼ cup basil leaves, packed
2 Tbsp olive oil
Pinch sea salt

  • Place boiling water in a bowl. Quickly blanch basil leaves (about 10 seconds) and then pat dry.
  • In food processor or blender, combine basil leaves, salt, and olive oil. Process well.

Fried Zucchini Spirals

Ingredients:
½ zucchini
½ cup avocado or coconut oil
Sea salt

  • Spiralize zucchini. If you don’t have a spiralizer, you can thinly slice strips of zucchini.  Place between paper towels to remove some of the water.
  • Heat oil in small saucepan.
  • When oil is hot, fry zucchini. Place one spiral in the oil to make sure it is hot enough.  Process the spirals in small batches for about 6 minutes each.  When done, the zucchini spirals should be crunchy.
  • Lay on paper towels and sprinkle with sea salt.

Recipe and photos by Stephanie Borzio.  Stephanie is a mom of three active boys and is an autoimmune warrior.  After battling her own health for several years, Stephanie found healing through food and lifestyle changes, including joining Blooming Glen Farm CSA of which she is a long time member.  She is a Board Certified Integrative Nutrition Health Coach who is passionate about sharing healthy living tips and real food recipes.  Instagram and Facebook: Tru You Essentials; Website: www.truyouessentials.com

Cucumbers are a refreshing and welcome addition to our CSA shares!  There are so many amazing things you can make with cucumbers.  Simply slice them up and enjoy or use them in various recipes.  This week I have two wonderful recipes to share with you.  The first one is a family recipe for our cucumber salad.  It is a salad that has been passed on for generations, but I’m not sure a recipe was ever written down.  The second is an easy refrigerator pickle that can be ready in as little as 24 hours!

Cucumber Salad
Ingredients
5 Kirby cucumbers or 3 regular cucumbers
2 medium sweet onions or regular onions
6 Tbsp white vinegar
¼ cup olive oil
1 tsp sea salt
1 tsp honey
¼ tsp black pepper
¾ tsp garlic powder

  • Peel cucumbers. Thinly slice to about 1/16” or 1/8” on mandolin.  Place in large bowl.
  • Use the bulbs of the onions only. Cut bulb in half and then slice on mandolin (same thickness as cucumbers).  Place in bowl with cucumbers.
  • In small bowl, combine vinegar, oil, salt, honey, pepper, and garlic powder. Whisk well.
  • Pour dressing over cucumbers and onions. Mix well to coat.
  • Refrigerate until ready to serve.

Refrigerator Pickles
Fresh cucumbers + dill + garlic = the perfect blend for crisp, delicious pickles.  This recipe is easy and does not require canning.  Feel free to cut in half if you only want to make one quart jar. 

Ingredients
6-8 Kirby cucumbers (you can use other cucumbers, these are just my favorites for this recipe)
3 cups water
1 cup white vinegar
3 Tbsp honey
3 ½ Tbsp sea salt
5 tsp dried dill or 4-6 sprigs of fresh dill (I prefer fresh dill but sometimes only have dried on hand)
4 cloves fresh garlic

  • Clean two quart jars and lids.
  • Cut cucumbers into spears or rounds. Pack into jars.  The number of cucumbers needed varies depending on their size.  Cucumbers should be tightly packed.

  • Slice garlic and add 2 cloves per jar.
  • Add 2 ½ tsp dried dill to each jar or 2-3 sprigs of fresh dill to each jar.
  • In a medium saucepan, combine water, vinegar, honey, and sea salt. Bring to a boil and mix well.  Allow to simmer until honey and salt are dissolved.  Remove from heat and allow to cool to room temperature.
  • Pour liquid into each jar. Fill to the top.  Place lid on and gently flip upside down to mix.
  • Refrigerate for at least 24 hours.
  • Keep refrigerated. Best if eaten within 1 month.

**Optional: Add ½ tsp red pepper flakes to each jar or add fresh sliced jalapenos to give your pickles some spice.

Recipe and photos by Stephanie Borzio.  Stephanie is a mom of three active boys and is an autoimmune warrior.  After battling her own health for several years, Stephanie found healing through food and lifestyle changes, including joining Blooming Glen Farm CSA of which she is a long time member.  She is a Board Certified Integrative Nutrition Health Coach who is passionate about sharing healthy living tips and real food recipes.  Instagram and Facebook: Tru You Essentials; Website: www.truyouessentials.com

Eggplants have made their way into our CSA shares!  Eggplant comes in many varieties and we received two in our shares this week- Italian and Asian.  Either of these can be used in this recipe.  Eggplant is full of amazing vitamins, minerals, and nutrients…including vitamin C, vitamin K, magnesium, fiber, and potassium.  It’s a wonderful addition to any meal and is the star of this dish!

Ingredients
1-2 eggplant (you want about 1 cup of pulp after roasting)
1 sweet onion
4 large garlic cloves
1 Tbsp fresh parsley
¼ tsp paprika
Sea salt
Black pepper
Avocado or olive oil

  • Preheat oven to 375°
  • Slice eggplant in half lengthwise. Peel outside of onion off (if there is a dry skin) and cut into fourths.  Peel garlic cloves.  Place eggplant, onion, and garlic on baking sheet.
  • Brush vegetables with either avocado or olive oil. Sprinkle with sea salt and black pepper.
  • Roast vegetables for 25 minutes or until fork tender.
  • Let eggplant cool for a few minutes. Peel away the skin from the pulp.
  • Place roasted eggplant pulp, onion, and garlic cloves in food processor. Add in fresh parsley and paprika.  Process to combine.  I like to keep it a little bit chunky, but you can certainly process it to create a smoother texture.
  • Season the dip with sea salt and black pepper to taste.
  • Place dip in small bowl. Garnish with paprika and fresh parsley.
  • Serve the dip with fresh vegetables, crackers, or fresh bread. You can even use it as a spread on a wrap or sandwich.
  • Enjoy!


Recipe and photos by Stephanie Borzio.  Stephanie is a mom of three active boys and is an autoimmune warrior.  After battling her own health for several years, Stephanie found healing through food and lifestyle changes, including joining Blooming Glen Farm CSA of which she is a long time member.  She is a Board Certified Integrative Nutrition Health Coach who is passionate about sharing healthy living tips and real food recipes. 
Instagram and Facebook: Tru You EssentialsWebsite: www.truyouessentials.com

With all the summer veggies coming in I had to make some fresh spring rolls with them! You can add in whatever else you have on hand like fresh herbs or sliced avocado.

Enjoy with my delicious tahini dipping sauce on the side:)

Ingredients for Spring rolls

1 pack rice paper
Bunch of carrots
1 cucumber
1 zucchini
1 red pepper
1 mango
Pea shoots
Scallions
Fresh mint or cilantro

Cut carrots, pepper and mango into thin strips. Slice cucumber and zucchini vertically as thin as you can (I used a mandolin). Dice scallions. Add water to a large plate to use for soaking the rice paper. When the rice paper becomes soft remove from water and add vegetables and mango to center of the paper. Tuck in sides and roll up until everything is secure inside. Continue for rest of rolls.

Ingredients for Tahini dipping sauce

1/4 cup tahini
2 Tbsp coconut aminos
2 Tbsp rice vinegar
1 clove garlic, grated
Juice of 1 lemon
Salt and pepper
Red pepper flakes(if you like spice)

Whisk all ingredients together and serve with spring rolls. Enjoy!!

Recipe and Photos by Olivia Edgar. Olivia’s passion for food and cooking finds focus on recipes using plant based, organic ingredients which make people feel their absolute best. She is a graduate of The Institute for Integrative Nutrition (IIN) and now meal preps for clients and small events. Olivia is newly married, and when she’s not cooking and sharing her recipes and holistic approaches on her Instagram account, you can find her working on their fixer-upper in Telford.

Farro is an ancient grain, similar in appearance to rice, but with a more nutty nuanced flavor and a chewy texture. To prepare whole grain farro you need to think ahead and soak the grains overnight, but you can cheat and get the semi-pearled variety, which cooks in 15-25 minutes, and is available at most grocery stores and whole foods stores. Whole farro retains all the grain’s nutrients; with semipearled part of the bran has been removed but still contains some fiber.

I fell in love with farro after making this one-pan farro with tomato dish from Smitten Kitchen. If you aren’t familiar with the blog Smitten Kitchen, you should be! Her seasonal recipes that highlight the delicious flavors of farm fresh veggies always impress me- it is super easy to search her site by ingredient, and pull up lots of ideas. You can choose a simple recipe like the one pan farro and tomatoes, or get a little more ambitious, like this delicious zucchini galette I made with our zucchini and some farmers market ricotta from Fulper Farms (they have a stand at the Wrightstown Farmers Market on Saturday’s). And don’t get me started on Smitten Kitchen’s desserts!

So when I saw the first harvest of our giant green bell peppers, I knew I wanted to stuff them with some sort of farro mixture. I brought 3 cups of water to boil and threw in a cup of farro and simmered it until the grains were the texture I wanted (chewy but not mushy), about 30 minutes. Some people say to simmer covered, I did it uncovered but had to add water periodically as it cooked off, so covered is probably a better bet (or start with more water and simmer gently).

In a large saucepan I sautéed in olive oil 4 cloves of garlic and one thinly sliced onion (you could use a sweet onion or the red torpedo’s). Then I added in a chopped tomato (or two), about a cup of leftover cooked corn kernels from our dinner the night before (cut off the cob). I also diced up a chicken breast from Hershberger Heritage, also leftover from grilling the evening before, and threw in a handful of chopped basil. Then I added most, but not all of the cooked and drained farro.  I simmered everything until the juices from the tomato were running.

Meanwhile, I cut two bell peppers in half lengthwise, seeding and coring them, being careful not to pierce the walls of the pepper. I also cut the tops off of some poblano peppers. The peppers went into a steamer basket for 15 minutes. Let cool enough to handle and carefully lay out on a cookie tray. Preheat your oven to 400 degrees. Spoon the farro mixture into the pepper halves, and stuff into the poblanos. Sprinkle with grated parmesan and mozzarella (or whatever cheese you have on hand). Bake for 20-25 minutes until cheese is melting and peppers are slightly browned. You can really improvise with the ingredients and scale depending on how many peppers you are stuffing and what you have on hand. Removing the seeds of the poblanos does reduce their heat, but I noticed that the membrane that the seeds are attached to is very hot, so as we got closer to the tip of the pepper, we were in for some delicious heat. You can either try to remove this membrane better than I did, or save the poblanos for those in your family who like that smoky heat.

Serve with a tossed salad- chopped romaine, cucumbers, grated carrots (and a glass of white wine?). Delicious!

Post and photos by Tricia Borneman, Blooming Glen farmer and co-owner.  Tricia and her husband Tom have been farming together since 2000. Blooming Glen Farm is celebrating its 11th season bringing high quality certified organic vegetables, herbs, fruits and cut flowers to our local community.

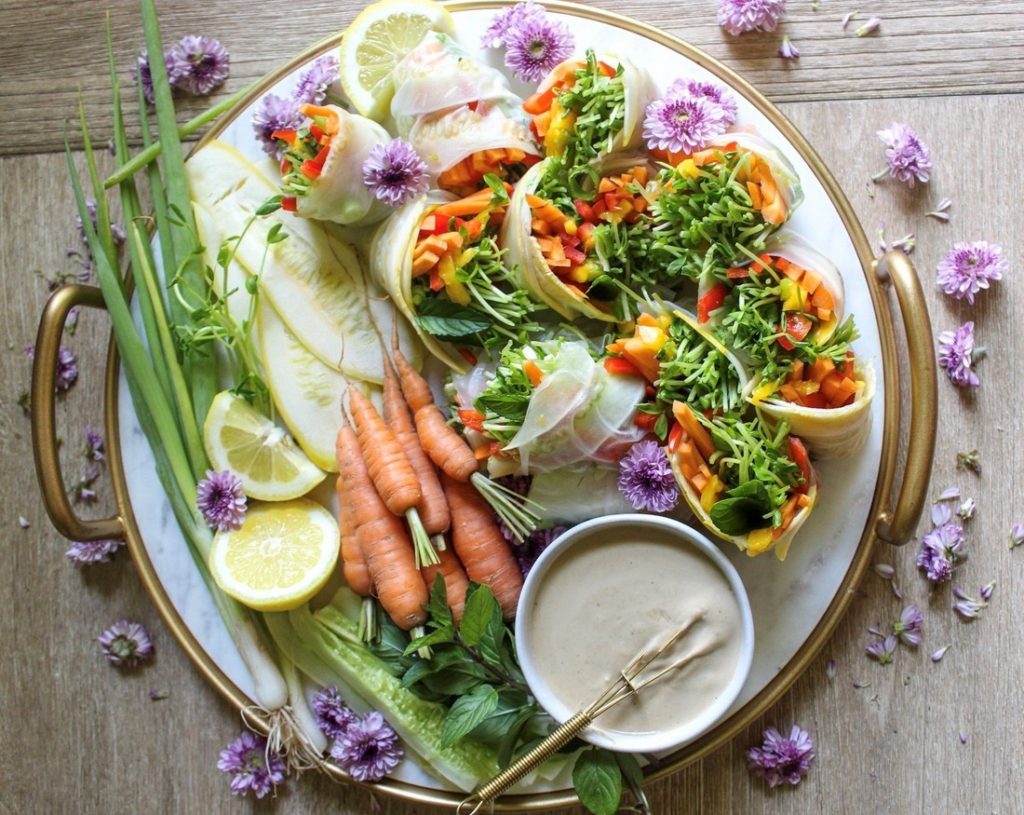
Yesterday at the farm, Chef Rich Baringer of Dinner’s Done Personal Chef Service served up some delicious samples of dishes he made using farm fresh ingredients from this week’s CSA share. He also shared tips on using some of the more unusual greens like dandelion and agretti. (Though agretti was not in the share this week, we figured you might still have some in your fridge from the past 2 weeks). The recipes are below for your enjoyment. Be sure to check out Chef Rich’s website and sign up for his newsletter for more recipes and tips, or check him out on Facebook.

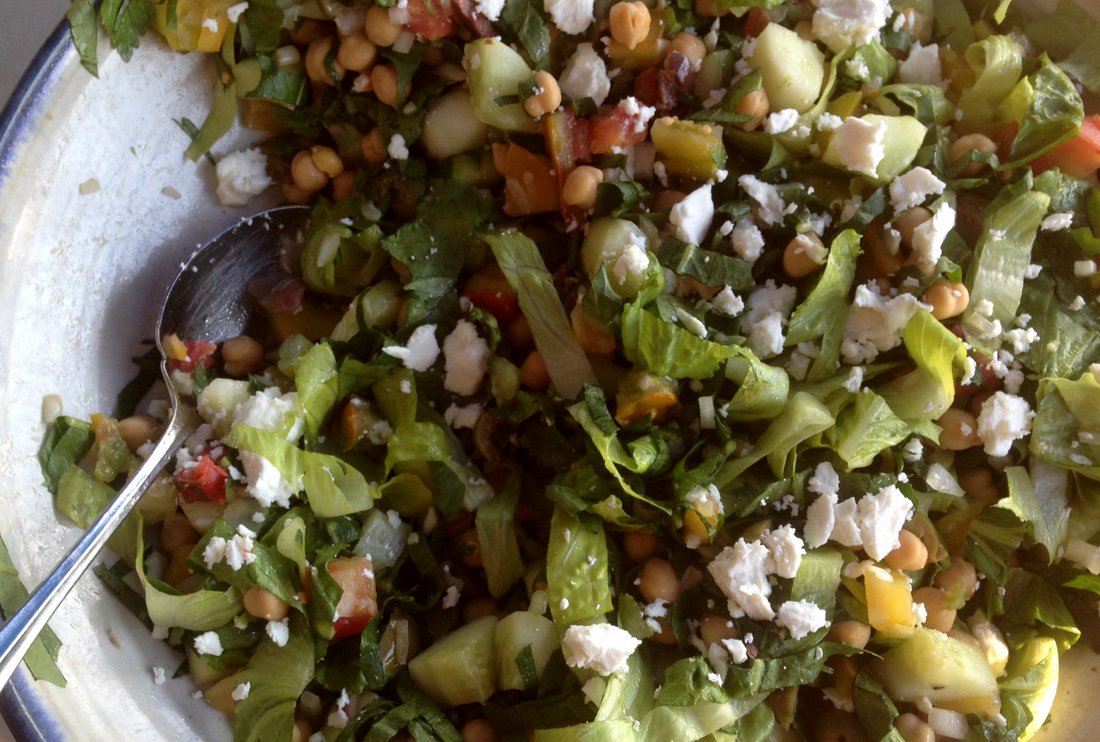
Mediterranean Chopped Salad (adapted from Cook’s Country)

Serves 6. Chef’s Note: I used heirloom tomatoes in place of cherry and added dandelion greens for half of the romaine.

Ingredients
12 oz cherry tomatoes, quartered
1 cucumber, peeled, seeded and cut into ½” pieces
Salt and pepper
3 Tbsp extra-virgin olive oil
3 Tbsp red wine vinegar
1 garlic clove, minced
15 oz can chickpeas, rinsed
1/3 cup Kalamata olives, chopped
¼ cup red onion, minced
1 Romaine lettuce heart, cut into ½” pieces
3 oz feta cheese, crumbled
½ cup parsley, chopped

  • Toss tomatoes, cucumber and ½ tsp salt in colander and let drain for 15-30 min.
  • Whisk oil, vinegar and garlic in a large bowl. Add tomato, cucumber, chickpeas, olives and onion. Toss to combine. Let sit at room temp for 5 min.
  • Before serving, add lettuce, feta and parsley. Toss to combine. Season with salt and pepper
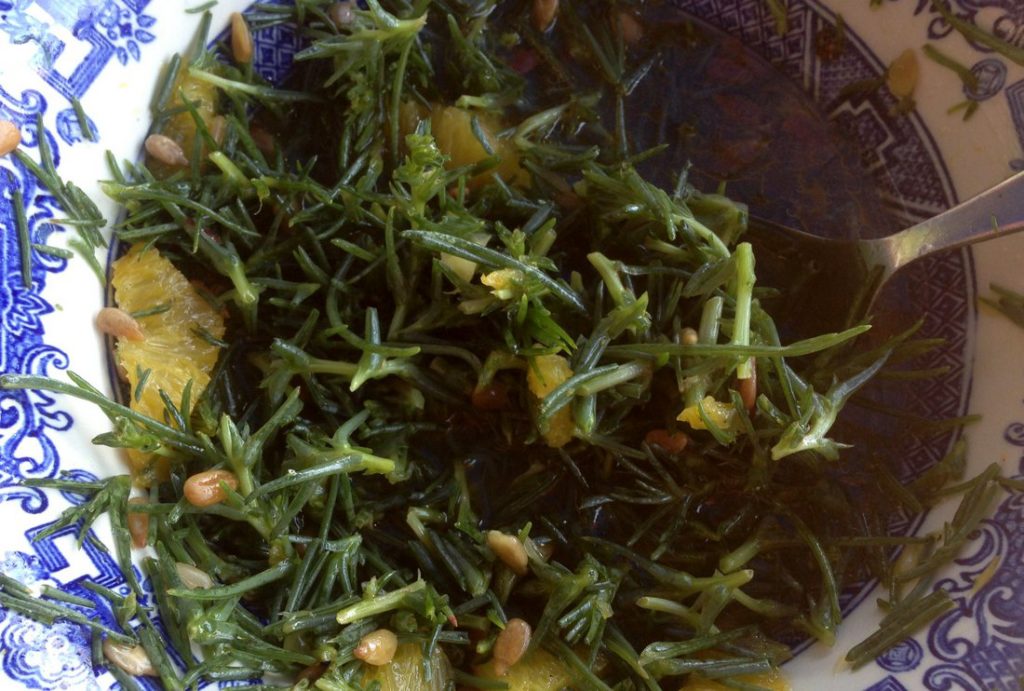
 

IMG_4711Agretti Salad

Serves 4. Chef’s note: You can blanch the agretti in boiling, salted water for a minute or two if you want it less raw.

Ingredients
1 bunch agretti
4 Tbsp extra-virgin olive oil
2 large oranges, 1 sectioned and 1 juiced
¼ cup sunflower seeds, toasted
Red pepper flakes, to taste
Salt
Parmesan cheese, shaved (optional)

  • Trim agretti from woody stem (thinner, more tender stems can be used) and roughly chop.
  • In a bowl, whisk the oil with the juice of one orange. Add salt and pepper flakes to taste and set aside.
  • Dry the agretti (if damp) and place in serving bowl. Toss with dressing. Add orange sections and toss. Garnish with seeds and cheese (if desired).


IMG_4710 (2)
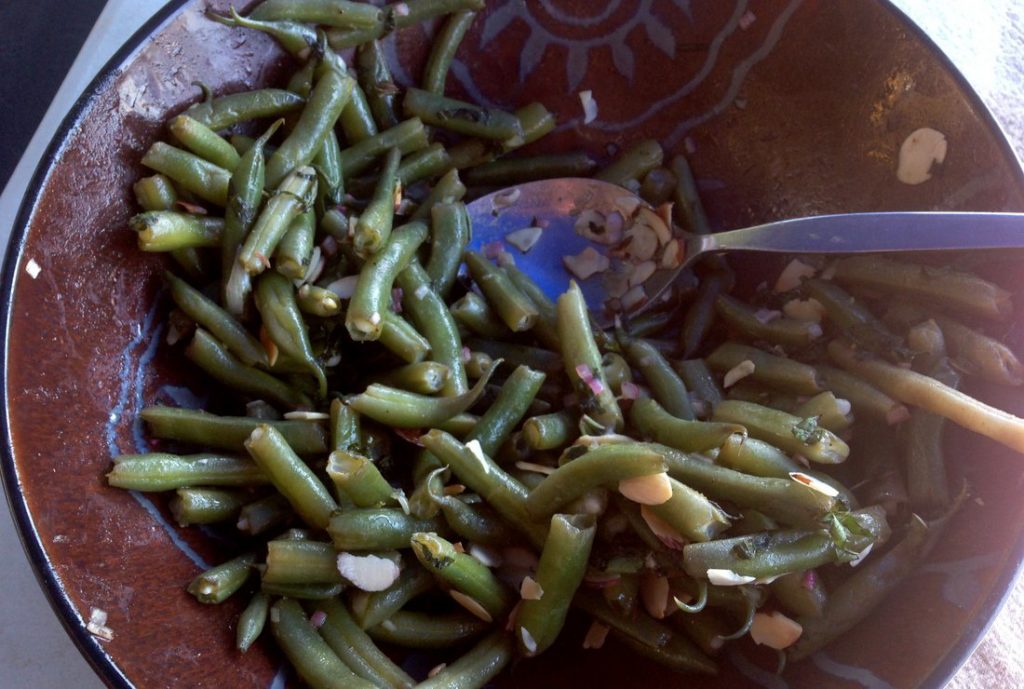
Green Bean Salad (adapted from Cook’s Country)

Serves 4. Chef’s note: Some thinly sliced radish is a nice garnish.

Ingredients
2 lb green beans, trimmed and cut into 1 ½” pieces
Salt and pepper
1 shallot, minced
1 Tbsp Dijon mustard
1 tsp lemon zest
3 Tbsp lemon juice
1 garlic clove, minced
¼ cup extra-virgin olive oil
3 Tbsp dill, minced (I used lemon verbena, which is available in the herb boxes a the farm.)
½ cup almonds, toasted

  • Bring 4 qt water to a boil in a large pot. Fill a large bowl halfway with ice and water. Add beans and 1 Tbsp salt to boiling water and cook until crisp-tender, about 6 min. Drain and place in ice bath. Drain again, dry in salad spinner.
  • Whisk shallot, mustard, zest, juice, garlic and 1 ½ tsp salt in a large bowl. Slowly whisk in the oil until incorporated. Toss dill and beans in dressing and let sit for 30 min (or up to 2 hrs), stirring occasionally. Stir in almonds. Season with salt and pepper.


IMG_4712
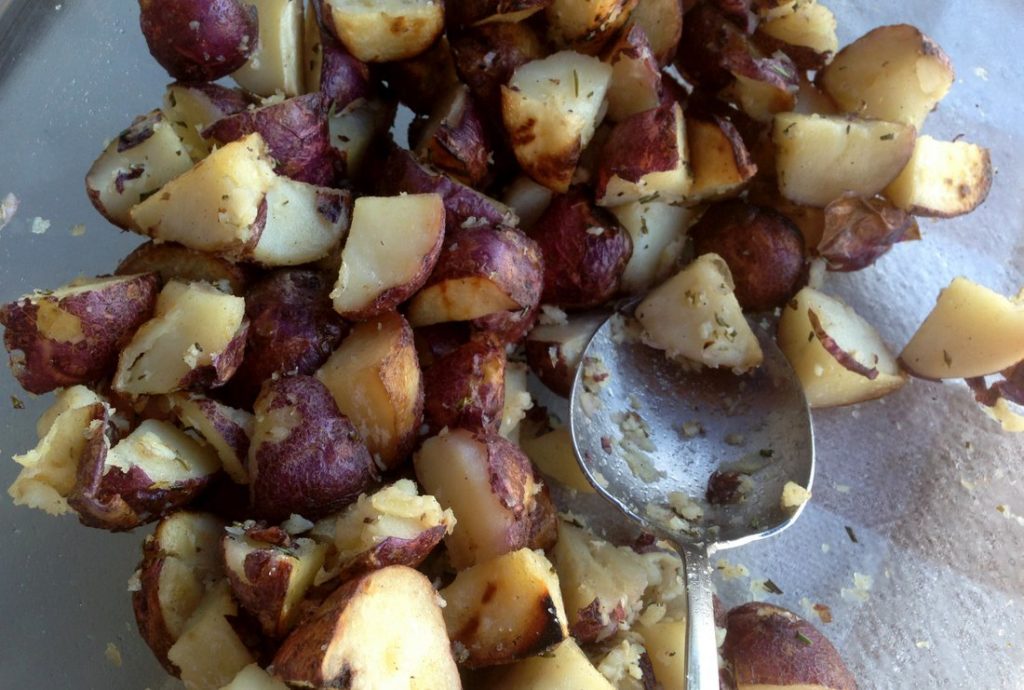
Grilled Potatoes with Garlic and Rosemary (for gas grill) (from Cook’s Illustrated)

Serves 4

Ingredients
4 Tbsp olive oil
9 garlic cloves, minced (about 3 Tbsp)
1 tsp rosemary, chopped
Salt
2 lb red potatoes, small, scrubbed, halved and skewered (so flat sides are level with each other)
Pepper
2 Tbsp chives, chopped

  • Preheat grill to high for 15 min. Clean grill grate. Leave primary burner on high, reduce others to medium.
  • Heat olive oil, garlic, rosemary and ½ tsp salt in small skillet over med heat until sizzling, about 3 min. Reduce to med-low and cook until garlic is light blond, about 3 min. Pour mixture through a fine mesh strainer into a small bowl; press on solids. Measure 1 Tbsp solids and 1 Tbsp oil into large bowl and set aside. Discard remaining solids, but reserve oil.
  • Place skewered potatoes in single layer on large microwave-safe place and poke each with a skewer. Brush with 1 Tbsp oil and season liberally with salt. Microwave on high until potatoes offer slight resistance to knife, about 8 min, turning halfway. Transfer to baking sheet coated with 1 Tbsp oil. Brush with remaining oil and season with salt and pepper.
  • Place potatoes on the hotter side of the grill. Cook, turning once, until marks appear, about 4 mi. Move to cooler side and cook 5-8 min until knife slips in and out easily. Remove potatoes to bowl with reserved oil and solids. Add chives and toss.


IMG_4709
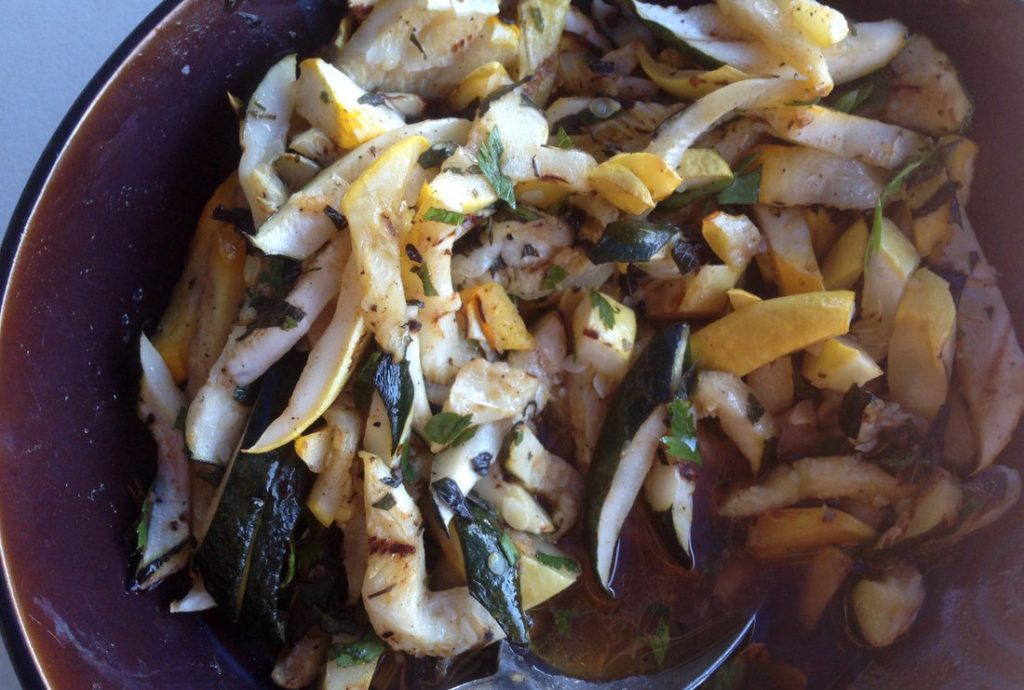
Grilled Zucchini Salad (from The Barbecue Bible)

Serves 4

Ingredients
1 lb zucchini (and/or yellow squash), scrubbed and trimmed
3 Tbsp extra-virgin olive oil
Salt and pepper
12 large mint leaves (or 1 tsp dried), minced
2 Tbsp parsley, minced
1 Tbsp lemon juice (or more to taste)
1 garlic clove, minced
½ tsp paprika
¼ tsp cumin

  • Preheat grill to high.
  • Cut zucchini into ¼” length-wise slices. Brush each with oil and season with salt and pepper.
  • Grill, turning until tender and well browned, about 8-10 min. Transfer to cutting board.
  • Cut each slice on bias into ¼” strips. Transfer to a bowl and stir in remaining 2 Tbsp and rest of ingredients. Season with salt, pepper and additional lemon juice. Should be highly seasoned.


Post and photos by Tricia Borneman, Blooming Glen farmer and co-owner. 
Tricia and her husband Tom have been farming together since 2000. Blooming Glen Farm is celebrating its 11th season bringing high quality certified organic vegetables, herbs, fruits and cut flowers to our local community.


With the cooler days and nights of late summer, I find that instead of craving quickly cooked meals and cold salads, I have been turning to more warm, comforting dishes. The appearance of soups and stews on the table is a delightful reminder of the fast approaching fall season!

Tomato soup is that perfect transitional late-summer meal. Alongside a good grilled cheese, you can’t match the freshness and comfort of this classic dish. My recipe uses whole milk for creaminess (not as heavy as those recipes that call for cream), roasted garlic and sweet peppers to add a depth of flavor, and a topping of balsamic vinegar and fresh corn for some sweetness.

Tomato Soup with Roasted Garlic and Sweet Peppers

-Preheat oven to 400 degrees

-Quarter approximately 3 pounds of red tomatoes and place on baking sheet with 4 or 5 (about 3/4 of a pound) of sweet peppers, seeded and diced, and 5 or 6 unpeeled garlic cloves. Roast in oven for 20 minutes or so until veggies are tender.

-Meanwhile, in a large pot, melt 4 tablespoons of butter and saute 1 white onion until translucent. Stir in 2 heaping tablespoons of tomato paste.

-Pour 4 cups of chicken or veggie stock over onions and bring to boil. Then turn down to a medium-low heat.

-Dump roasted veggies into pot with stock and onions, making sure to remove garlic skins beforehand. Puree with an immersion blender. **If you don’t have one of these you can simply put the mixture into a blender, food processor or food mill.

-Add in 1 cup of whole milk (or half a cup of heavy cream if you prefer) and 2 tablespoons of balsamic vinegar

-Let cook on medium-low heat for 20 minutes to let flavors meld. Stirring occasionally.

-Top with a splash more of balsamic and some fresh, sweet corn. Serve along side your favorite version of grilled cheese. ENJOY!

Recipe and photos by Jana Smart- Blooming Glen Farm employee and frequent creator of creative recipes using farm fresh seasonal ingredients. Check out more of her recipes on her food blog http://www.agrarianeats.blogspot.com/