Posted at 09:28h
in
Recipes
by bloomingglenfarm
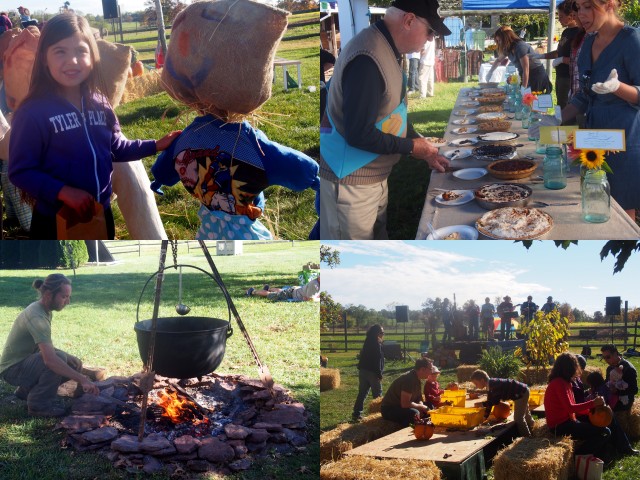
Blooming Glen Farm’s 5th annual pie bake-off contest dished up some real winners- namely the 100 plus people who got the chance to taste the 14 delicious pie entries. Whether your taste ran to classics like apple and blueberry, or standards with a twist like peach cranberry, honey bourbon pecan, or sweet potato with ginger whip cream, or you prefer fridge pies like chocolate mousse with salty peanut caramel or blueberry dream, or maybe you like to be adventurous with the more unusual banoffi pie or spicy mexican hot chocolate, there was something for everyone.
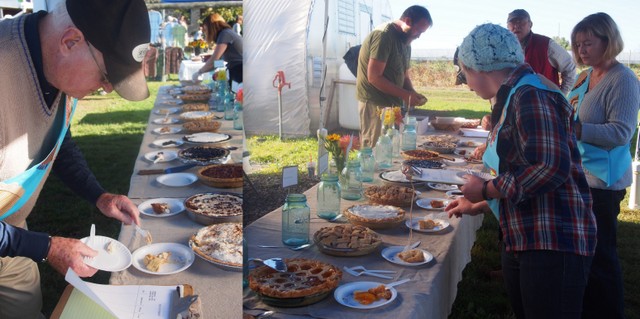
Our judging panel went ahead of the eager crowds and evaluated the pies on taste, appearance, crust and texture and awarded their top three choices (actually top four, since they had a tie for third). Our first judge was Susan Kahn from Bucks County Cookie Co. Susan’s cookies and delectables are a Wrightstown farmers market favorite. Susan will be opening a brick and mortar bakery in just a few months in Doylestown behind Cross Keys Diner, so keep an eye out! New to the judge panel this year was Rosemary Vaerth, a graduate of the Art Institute of Philadelphia Baking and Pastry program, and a veteran of the gluten-free and vegan baking scene in southeastern PA. Lastly, Farmer Tom’s father, also Tom Murtha and affectionately referred to as Pop, came back to judge for a second year, contributing his expertise from over 80 years of pie eating enjoyment.
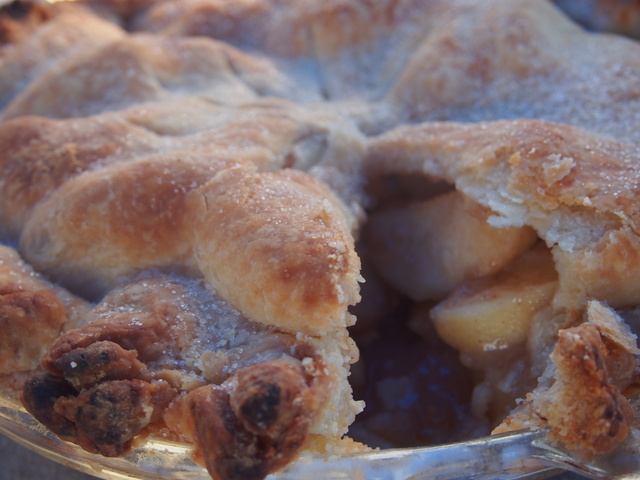
Apple Pie
by Angelina and Adrian Arias with the help of their dad, Angel Arias
Judges Vote: First Place
Angel Arias- “I was a professional chef for over 11 years, but never much of a baker. Usually my wife is the baker at home. I now just enjoy making culinary creations for my family and friends, but most of all for my kids! My daughter Angelina (7) and son Adrian (4) help their mother each week to pick up the vegetables at the farm. Angelina who is starting to have a passion for all things organic and farm related, was super excited about the Harvest Fest, and even more so that there was going to be a pie contest. She told her brother about it and they both asked me to help make a pie to enter -since their Mommy was out town for the weekend.
So we went to the local orchard to pick our apples and made 2 pies on Saturday. The kids were so serious about it –that when their friends came knocking on the door for them to play, they sent them away on their very own, and went right back to working on the pies-very dedicated little chefs –if I must say so myself!”
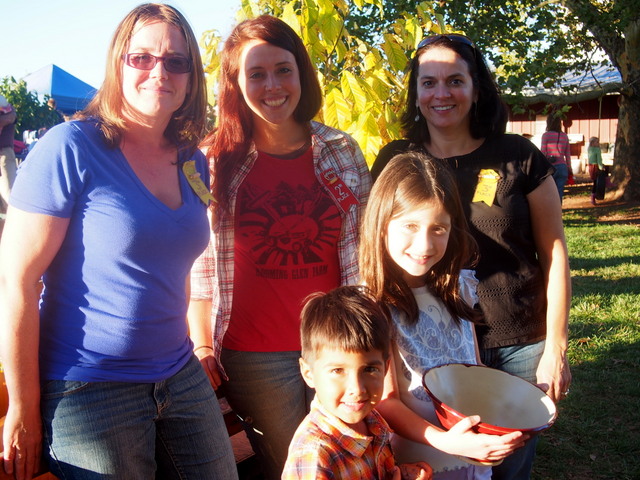
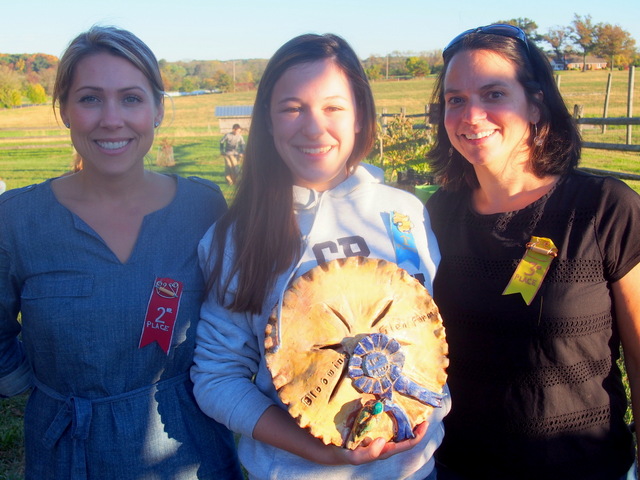
Judges Vote winners, Julie Thomas, Lexi Berko, Bernadette Rodrigo, and Adrian and Angelina Arias.
“When I asked them what their favorite part was when making the pie- ‘My favorite part was putting decorations on the top crust!’ said Angelina. ‘My favorite part was slicing the apples with the apple slicer!’ said Adrian.”
“I also asked them how they felt when they announced that they were the winners. ‘I feeled weird and fast because I was running!’ – Adrian. ‘I felt weird, excited, nervous, surprised and shy all at the same time. I felt wowed-out!’ -Angelina.”
Pie Crust Ingredients
3 cups all-purpose flour
1 ½ teaspoons salt
3 Tablespoons granulated sugar
1 cup Lard
1 egg
1 teaspoon white vinegar
5 tablespoons water
In large bowl combine flour, salt, and sugar- mix it well, add lard cutting it until mixture resembles cornmeal. In a small container mix egg, vinegar, and water. Add it to flour mixture, stirring it with a fork. Cut dough in half, make 2 balls and wrap them with plastic wrap. Keep in the refrigerator while making pie.
Pie Filling Ingredients
8 apples peeled and sliced (I used Empire apples)
½ c. granulated sugar
½ c. brown sugar
zest of 1 lemon chopped fine
juice of 1 lemon
¼ teaspoon nutmeg
¾ teaspoon cinnamon
½ c. coconut oil
3 tablespoons all-purpose flour
¼ c. water
In a large bowl combine apples, white and brown sugar, lemon zest and juice, nutmeg and cinnamon.
In a small sauce pan heat coconut oil at medium temperature- once oil is completely melted, whisk in flour to make a paste then add water, mix it well and add it to apple mixture.
Roll out one of the pie crusts put it on the pie dish. Add apple mixture. Roll out second crust cover pie.
Bake at 425 degrees for 15 minutes and then reduce temperature to 350 degrees and bake it for an additional 35 to 40 min.
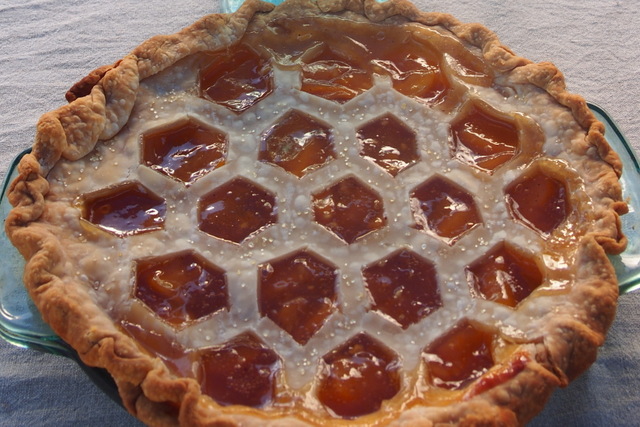
Honey Ginger Peach Pie
by Lexi Berko
Judges Vote: Second Place
Lexi Berko- “I chose to bake this particular pie with ingredients that were very local, both the ginger and honey coming directly from Blooming Glen Farm. My partner and I are the resident beekeepers at BGF and with a surplus of both ginger and honey, I thought they would make a perfect pie pair. This pie was a hit among the yellow jackets and judges buzzing about the pie tasting table and it made me very thankful for the endless labor put forth by our honeybees! (And they inspired my beecomb design of the top crust.)”
Pie Filling Ingredients
5 large, ripe peaches or 7 medium (or 5 to 6 cups of frozen sliced peaches)
1 cup wildflower honey
3 tablespoons peeled and finely chopped fresh ginger
juice of half a lemon (about one tablespoon)
big pinch of powdered ginger
pinch of nutmeg
pinch of cayenne pepper
pinch of salt
Frozen Pillsbury pie crust
Combine honey and fresh chopped ginger in a small saucepan and heat on low for 20 minutes. While the honey is warming up, pit, peel, and slice the peaches so they’re about 1/4 inch thick. Put the slices in a large bowl and squeeze the lemon over them. Add the powdered ginger, nutmeg, cayenne pepper, and salt. Pour the heated honey and fresh ginger over all. Mix gently until the honey and spices are evenly distributed, then taste and adjust sweet, spice, and lemon as needed.
Roll out the top crust. Retrieve the bottom crust from the refrigerator. Pour the filling into your bottom crust. If there is too much liquid to fit in the pan with the peaches, fill the pan not quite to the rim with juice and set the rest of it aside. Smooth the filling into a mound with your hands. Place the top crust over the filling. Trim off any excess dough and fold an upstanding ridge. Cut large steam vents. Bake on 425 degrees for 10 to 15 minutes until the crust is blistered and blond. Rotate the pie 180 degrees to assure even baking, then lower the temperature to 375 degrees and bake for another 50 to 60 minutes until the crust is golden and the juices start to bubble slowly at the edge — possibly longer if you’ve used frozen fruit. Cool on a wire rack for at least an hour before serving.
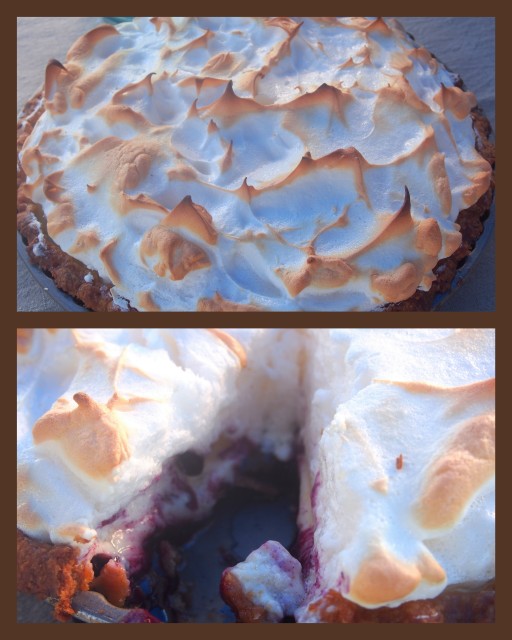
Lemon Blueberry Meringue
by Bernadette Rodrigo (last year’s grand champ in both categories for her Cherry Pistachio Pie and 2012 second place winner with her Almond Pear Pie with a Raspberry Glaze)
Judges Vote: Third place, tie
People’s Choice: Third place
Bernadette Rodrigo- “This pie was inspired by our recent trip to Maine. Lemon seemed like a natural complement to the sweetness of the berries and the meringue adds the wow factor.”
Pie Crust Ingredients (makes 2)
2 ½ cups flour
1/3 cup sugar
½ pound butter cubed (2 sticks)
3 egg yolks
¼ cup ice cold water
Mix flour and sugar in a large bowl. Cut in butter to resemble coarse meal (pea size pieces). In a small bowl beat egg yolks and add water. Add wet ingredients to dry ingredients and stir with a fork until evenly distributed. Dough will be crumbly. Turn out onto counter and press the dough to form a ball, then divide in 2 and form 2 discs. Wrap each disc in plastic wrap and refrigerate.
Pie Filling Ingredients
3 cups of blueberries (wild Maine berries, available frozen in markets)
¼ cup flour
½ cup sugar
1 tablespoon butter
Pre-heat oven to 400 degrees. Mix first 3 ingredients in a bowl then spread evenly in raw pie shell. Break the butter into small pieces and sprinkle over berries.
Roll out one pie crust and prepare pie pan. Bake until fruit bubbles in the middle, about 45 minutes.
While pie bakes mix one 15 ounce can of condensed milk with ½ cup fresh squeezed lemon juice. Reserve in refrigerator.
Meringue Ingredients
5 egg whites
½ teaspoon vanilla
¼ teaspoon cream of tartar
3 tablespoons sugar
pinch of salt
Beat eggs until frothy. Add next two ingredients. Continue to beat adding sugar a little at a time. Stop when stiff peaks form.
When pie is baked and cool, spread reserved lemon mixture over the top. Cover entire pie with meringue and bake at 375 degrees about 10 minutes or until browned. Best served cold.
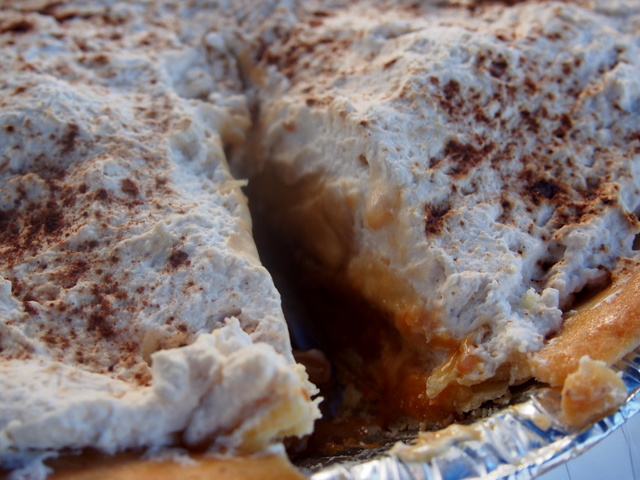
Banoffi Pie
by Julia Thomas
Judges Vote: Third Place, tie
Julia Thomas- “I love baking at home, particularly in my big red Aga stove that stays on all the time in the winter…typical British farmhouse! I’m a bit of a freestyler when it comes to cooking and I love it when I pull ingredients together from my fridge/ freezer and cupboards to create something new and exciting. That’s why I love Blooming Glen farm so much… you never know what you will get and what will inspire you.
However, one recipe I always follow exactly is Banoffi pie! It is hugely popular in the UK, but often varies on its base and the ingredients. I was lucky enough to learn this recipe over 25 years ago from the original creator, as I worked with him at the Hungry Monk restaurant and this version is by far my favorite.”
Sweet Shortcrust Pastry Ingredients
(Bakers Note: my recipe below makes enough for 2. You can leave out sugar for regular pastry and add more flour + a tablespoon of iced water)
350g plain flour
120g powdered sugar
250g butter
1 tablespoon crisco
Pinch of salt
1 egg
Egg white for glazing
In food processor whizz together flour, salt and sugar for a few seconds and then add in the butter and crisco in small pieces. Crack in the 1 whole egg and pulse till it makes a ball. Wrap in plastic and put in freezer to rest for about 20 mins or in the fridge for about 45mins. Roll out on a floured surface and line your pie tins, trim off excess dough. Prick with a fork on bottom of pastry case to make air hole. Chill in fridge again for 10 mins. Line with parchment paper and dried beans or ceramic baking beans to weigh it down and cook at 350F for about 20 mins. Remove parchment paper and brush pastry with egg white. This seals it and stops you getting soggy pie. Return to oven for 5 mins.
Pie Filling Ingredients
1 tin condensed milk – previously boiled for 3 hrs (covered in water unopened) – you can do several tins at once and then keep in your pantry indefinitely. Be careful not to boil dry as they will explode and not to open the cans when hot either – you will get burned! This makes a delicious toffee filling, you can keep it as a standby and then make this dessert in a hurry or emergency.
5 Bananas
1 pint whipping cream
1 teaspoon instant coffee – crush to powder
1 tablespoon powdered sugar
1/4 teaspoon cocoa powder
Whip the the cream with the instant coffee and powdered sugar until thick and smooth.
Spread the toffee over the base. (You can use the back of a spoon dipped in hot water to help spread it or warm the toffee a little first. Cool off once spread in fridge if necessary, so cream won’t melt.
Peel and then cut in half lengthwise the bananas and lay them on the toffee.
Finally spoon and spread the cream over the top and sprinkle over the cocoa powder from about 14″ high so that it is a nice fine covering.
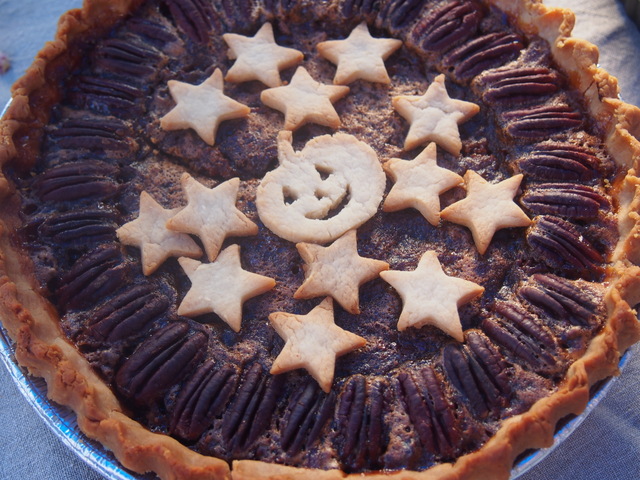
Chocolate Caramel Pecan Pie
by Josie Gilmore
People’s Choice: First Place
Josie Gilmore: “I’m currently a junior at Council Rock High School North and my favorite subject is chemistry. I have never made a pie before, but I have taken some cooking/baking classes and worked at my mom’s cooking camps every summer since I was 9. I chose to make a chocolate caramel pecan pie because I really love pecan pie and wanted to incorporate some more delicious flavors into the recipe. I’m really excited to have won this contest and I can’t wait to try and defend my title next year!”
Prepare your favorite crust for a 9-in pie pan
Pie Filling Ingredients
2 large eggs
2/3 cups sugar
½ cup light corn syrup
4 teaspoons unsalted butter
¾ teaspoons vanilla extract
23 caramel squares
1 cup heavy whipping cream
1 tablespoon butter, unsalted
¼ cup semisweet chocolate chunks
1 cup pecans, chopped small
more pecan halves for decoration on top
Preheat oven to 350 degrees. Roll out pie dough onto a lightly floured surface to about 1/8 inch thick. Wrap dough around rolling pin and place onto center of pie pan (I used a disposable aluminum pan). Press dough up sides and trim extra dough around edges, flute edges.
In a large bowl, whisk eggs, sugar, corn syrup, 4 teaspoons melted butter, and vanilla, set aside. Sprinkle chocolate chunks evenly over bottom of tart shell.
Place caramels, cream and 1 tablespoon butter in a microwave safe bowl and heat until caramel is melted, stirring every 20 seconds. Stir chopped pecans into caramel. Pour caramel mixture over chocolate chunks, spread evenly. Pour egg mixture over caramel filling. Arrange pecans on top however you like.
Place pie on a rimmed baking sheet. Bake 45-60 minutes, until filling is set. If pecans begin to brown too quickly, place a tent of aluminum foil over top. Remove from oven and let cool before serving.
Baker’s Note: I used extra pie dough to cut out pumpkins and stars, baked them separately for 10 minutes and used for decoration.
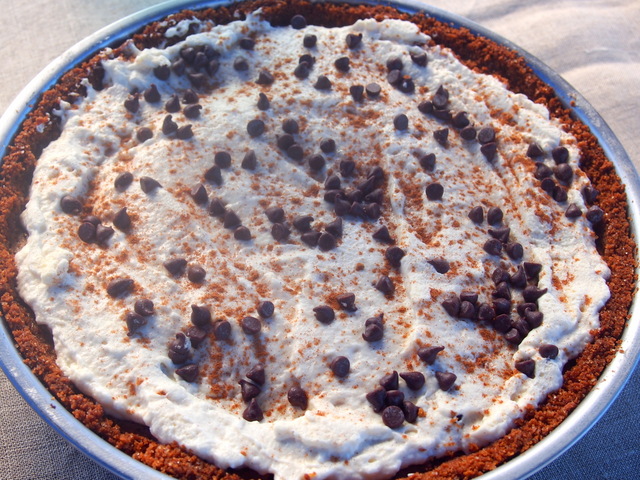
Mexican Hot Chocolate Pie
by Michelle Guerriero (2012 Pie Champ with her Maple Custard Pie with Candied Bacon, and 2011 second place winner with her Orange Marscapone Pumpkin Pie)
People’s Choice: Second Place
Michelle Guerriero- “I recently made some Mexican hot chocolate for my family, which I make by simmering milk with a dried chili pepper, then adding melted chocolate and cinnamon. It’s a lovely treat as the weather turns cool, and anything with cinnamon is a winner in my house. This is what inspired my Mexican Hot Chocolate Pie. My first attempt at the pie was a little spicy, so I had to make a mild version. When steeping the chili pepper, don’t overdo it! It can creep up quickly! Or you could omit the chili pepper altogether.”
Pie Crust Ingredients
12 graham crackers
5 tablespoons melted butter
1 tablespoon cinnamon
4 tablespoons sugar (optional)
In food processor, pulse all ingredients together until crumbly. Press into pie pan and bake for 12 minutes on 350. Remove and wait to fill with filling.
Pie Filling Ingredients (modified from recipe found on cooks.com)
1 stick (1/2 cup) softened butter
2 cups brown sugar
3 whole eggs
1 teaspoon Mexican vanilla (regular is just fine)
1/2 cup half & half
1 tablespoon cinnamon
1 small dried chili pepper
Whipped Cream
1 cup heavy cream
1 teaspoon cinnamon
1/2 teaspoon Mexican vanilla
In a mixer with a whisk, combine softened butter, brown sugar, and cinnamon. Whisk until well combined and fluffy. Add eggs, one at a time, mixing approximately 1 min. between each egg. Mixture should be nice and fluffy. Stop until it is time to add next ingredients.
In a small saucepan, combine half and half, vanilla, and dried chili pepper over medium-high heat. Bring mixture to a simmer (not boil!) and remove from heat. During the simmering is when you can play with the “heat” in your pie. You may only add the chili pepper for a quick minute, you may want to steep it longer. Taste the mixture until it is to your liking, then remove chili pepper.
With the mixer going again, very slowly add the milk mixture to the bowl. Do not add too quickly or it will cook your eggs!
Once combined, pour all ingredients into your pie crust and bake at 350 for 45-50 minutes, or until the middle of the pie jiggles a little, but the edges are firm. Remove and cool pie.
Make whipped cream if desired by whisking heavy cream, cinnamon and vanilla until soft peaks form. Add whipped cream, sprinkle of cinnamon and chocolate chips on top.
 Post and photos by Tricia Borneman, Blooming Glen farmer and co-owner. Tricia and her husband Tom have been growing together since 1996 and farming together since 2000. They started Blooming Glen Farm in 2006. Tricia is passionate about food, community, art and nature and the intersection of all four.