Author: bloomingglenfarm

Fresh herbs are appearing in this week’s share. Sometimes it can be challenging to use all your herbs up while they are still fresh. One method of preservation is to freeze- wrap your hardier fresh herbs (dill, thyme, sage, rosemary) in a paper towel, place in a plastic freezer bag, and squeeze the air out and freeze. This will keep for months in your freezer- just break or chop bits of the frozen herb into whatever recipe you would like. Or spread out on a single layer on a cooking tray and freeze then bag up for less clumping. More tender herbs like cilantro, parsley or basil can be blended and frozen in ice cube trays.

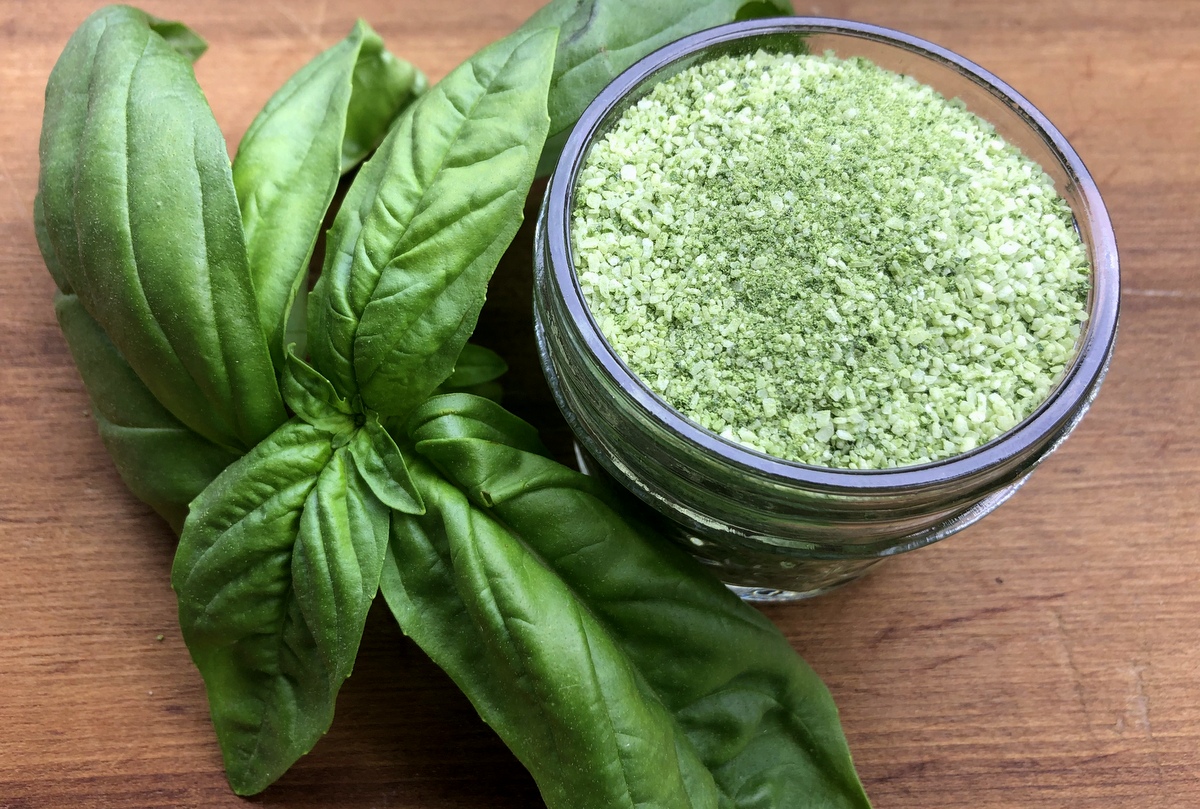
Basil Salt (pictured above)
Making salt blends is a great way to preserve any fresh herb. Basil salt in particular lends itself to many uses: sprinkle on tomato sandwiches, on popcorn, corn-on-the-cob, or tomato soup. Enjoy it on the rim of a refreshing summer cocktail. (Blackberry Basil Margarita with Basil Salt?!)

Ingredients
1 cup packed fresh basil leaves (about 1/2 a bunch)
1/2 cup kosher salt (I used coarse but you could certainly use whatever salt you have on hand)

Preheat oven to 225 degrees, and line a baking sheet with parchment paper. Pulse the basil leaves in your food processor, add the salt and continue to pulse. Spread the mixture on your prepared tray and dry in the oven for 15 min. Remove from oven and stir, breaking up any clumps. Bake for another 15 min. Remove from oven, stir, and add more drying time if mixture appears wet at all.  When drying is complete, using the parchment paper as a sling, transfer back to your clean, dry food processor. Regrind. Store on your counter or in the fridge, in an airtight container, for up to 4 months.

Recipe and photo from Tricia Borneman.
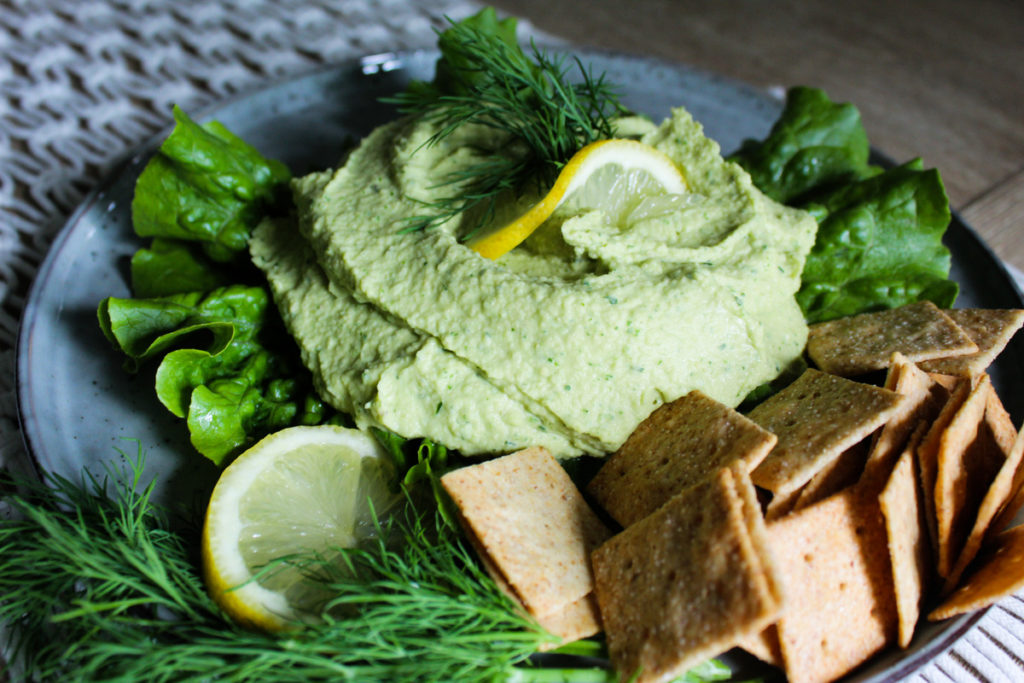
Lemon Dill Hummus
The creamiest, herb hummus that takes five minutes to whip up! Serve on a salad, or enjoy with crackers or veggies (like thinly sliced kohlrabi) for a snack:

Ingredients
2 cans chickpeas
1/2 cup oil (avocado or olive works)
juice of 1 large lemon, about 1/4 cup
1/2 cup dill without stems
1 green garlic
1/4 tsp cumin
salt and pepper

Blend in food processor till smooth!

Recipe and photo from Olivia Edgar.

The CSA season has officially begun and although pickup days look different than they have in the past, we are still getting beautiful organic produce from our favorite farmers.  This week’s recipe started with a focus on the green garlic, but evolved into a full meal that includes the salad greens, radishes, scallions, basil, oats and shitake mushrooms as well.

Salad Ingredients:
½ lb salad greens
Marinated radishes (recipe below)
Creamy garlic dressing (recipe below)
Grilled shitake mushrooms
Chive blossoms (optional)

  • Rinse and dry salad greens. Place in bowl or on platter.
  • Make marinated radishes and allow to set while preparing the rest of the meal.
  • Make dressing and set aside.
  • Remove stems from mushrooms and wash caps. Slice and place in bowl.  Add 2 Tbsp avocado or olive oil to pan.  Place pan on grill to heat.  Once oil is hot, add sliced mushrooms and cook for about 5 minutes.  Add ¼ tsp sea salt, 1/8 tsp black pepper, and 1/8 tsp garlic powder and stir to combine.  Place mushrooms in bowl to serve.
  • Chop scallions and place in bowl.
  • If you have access to chive blossoms, I like to add them as a garnish if available.
  • I served this salad with each item in separate bowls, but feel free to put everything together over the salad greens if you want.


Marinated Radish Ingredients:
½ bunch radishes, greens removed
½ stalk green garlic
½ cup apple cider vinegar
¼ cup avocado or olive oil
1 Tbsp honey
½ tsp sea salt
¼ tsp black pepper

  • Thinly slice radishes using a mandolin.
  • Thinly slice green garlic using both the white and green parts.
  • Place radishes and green garlic in a glass jar.
  • In a small pot, combine apple cider vinegar, oil, honey, salt, and pepper.
  • Heat to boil, mixing well.
  • Remove from heat and carefully pour over the radishes and green garlic. Place lid on jar and allow to cool for at least 30 minutes.

Creamy Garlic Dressing Ingredients:
1 ½ stalks green garlic
6 small scallions
½ cup homemade oat milk **
3 large basil leaves
½ lime, juiced
¼ cup apple cider vinegar
¼ cup + 3 Tbsp olive oil (divided)
½ tsp sea salt
¼ tsp black pepper

  • Rinse green garlic and scallions.
  • Slice green garlic stalks in half lengthwise.
  • Drizzle green garlic and scallions with 1 Tbsp olive oil.
  • Preheat grill and then reduce heat to low.
  • Place green garlic and scallions on grill.
  • Cook scallions for 2-3 minutes and green garlic for 4-5 minutes. Flip halfway through cooking time.
  • Remove from grill and trim roots off, as well as any pieces that are overcooked.
  • Place all dressing ingredients in blender (use the remaining ¼ cup + 2 Tbsp olive oil). Blend until smooth, about 30 seconds.

** Homemade Oat Milk- soak ¼ cup oats in about ½ cup water for 30 minutes.  Drain water and rinse oats.  Blend with ½ cup water for 30-60 seconds.  Strain through a nut bag or cheesecloth.  This makes about ½ cup oat milk, which the recipe calls for.

Recipe and photos by Stephanie Borzio.  Stephanie is a mom of three active boys and is an autoimmune warrior.  After battling her own health for several years, Stephanie found healing through food and lifestyle changes, including joining Blooming Glen Farm CSA of which she is a long time member.  She is a Board Certified Integrative Nutrition Health Coach who is passionate about sharing healthy living tips and real food recipes.
Instagram and Facebook: Tru You Essentials
Website: www.truyouessentials.com

Dear Blooming Glen Farm Community-

“I have great faith in a seed. Convince me that you have a seed there and I am prepared to expect wonders.”-  Henry David Thoreau

I want to assure our community of eaters that we at Blooming Glen Farm are continuing to seed, plant and prepare for the season ahead, with faith that we will all get through this, together.

The CSA is going forward as planned with a renewed energy and commitment to keep our community fed in the months ahead. We believe now more than ever in the importance of strengthening our local foodshed. With the fate (and attendance, if open) at farmers markets uncertain, we believe the CSA is more valuable than ever.

The CSA season begins in late May. As we approach that time, we will continue to evaluate and assess health recommendations and determine whether we will need a different “pick-up protocol” for our shares, even if that means boxing up our onfarm shares, harvesting the pick-your-own crops for you, and having curb side pick-up, or delivering shares to the most vulnerable in our community.

Our day to day operation at the farm continues to be in compliance with the strict Food Safety Modernization Act (FSMA). We are more vigilant than ever about washing hands, sanitizing work spaces, not touching our faces, and keeping personal distance during the work day (not difficult on a 40 acre farm!). Our limited number of employees are continually monitoring their health and not reporting to work if sick or symptomatic in any way.

We will continue to prioritize the safety of our staff and customers, while also understanding the importance of getting fresh nutritious produce into your hands.

As long as the farmers markets do remain open, and so far they have been considered an essential food access point like grocery stores, we will plan to attend, but will implement the recommended safety measurements. We will however be taking March off from our winter farmers markets as our storage crops have ended, and we will be focusing on planting and readying for the main season. Come April our tulips will be blooming, so stay tuned for opportunities to safely purchase those, and bring a bit of sunshine into your house. The main farmers market season begins in May. As health guidelines are changing day to day and week to week, we will communicate with you more as we get closer to that date.

We feel blessed and privileged to already work from home, to be able to work in the fresh air every day, and we know not everyone has the resources to do so. As a small business owner that relies on the purchasing power of their community I would be lying if I didn’t say I was concerned about the well being of our business, as well as other local businesses during this trying time.

CSA Shares are still available. We need your support and commitment now more than ever. Farmers are creative and resilient- we will figure out a way to get the food we grow safely into your hands, following the most up to date health recommendations. Please reach out if you need a special CSA payment plan because of your economic situation due to COVID-19.

CSA membership shortens the distance your food travels from field to plate. Paying for your share ahead of time means no cash register transactions. Supporting a CSA will trickle down to the hundreds of businesses we support through our farm operations as well as through our employees. Purchasing a CSA share guarantees that you will have a source of fresh local organic produce from May through November. Our partnerships with local beef, pork, poultry and fruit growers will strengthen your ties to your local foodshed.

We look forward to the opportunity to grow food for your family in these challenging times.

Look out for one another, do your best to continue to support your local businesses. Stay safe, be smart, be responsible but most crucially be compassionate and kind. The only way through this is together.

With gratitude for your continued support.

Your farmers,

Tricia and Tom

Turmeric is known as a magical golden spice.  We typically find it in powder form, so it is a rare treat to get the young fresh roots.  Unlike the roots you might see at a grocery store, these do not have a tough exterior skin so you can just wash and grate, no need to peel. One of my favorite ways to use turmeric is in golden milk.  Golden milk is a warm, creamy, comforting beverage.  It is known to reduce joint pain, decrease inflammation, help the body fight off infections, boost immunity, improve gut health, support brain health, and so much more.  The pairing of turmeric with black pepper, along with a fat, helps the body better absorb the beneficial curcumins in turmeric.

Ingredients:
3 inches fresh turmeric, freshly grated
1 inch fresh ginger, freshly grated (or 1/4 tsp powdered)
¼ tsp whole black peppercorns
2 cinnamon sticks
2 tsp coconut oil
2 ½ cups milk*
1 Tbsp honey
Ground cinnamon for garnish

*You can use either dairy or non-dairy milk.  I like to use a combination of coconut milk and almond milk.

  • Combine all ingredients except honey in small saucepan.
  • Heat to a gentle simmer for about 5 minutes. Do not boil.  Whisk frequently.
  • Remove from heat. Add honey and mix well.
  • Strain and discard spices.
  • Pour into two mugs and sprinkle with ground cinnamon.
  • Enjoy!

**You may store extra golden milk in the refrigerator and reheat.

***Can also be served over ice.  Follow recipe above and then allow mixture to cool.  Store in refrigerator.  When ready to drink, fill a glass with ice.  Pour golden milk over ice and enjoy.

Recipe and photos by Stephanie Borzio.  Stephanie is a mom of three active boys and is an autoimmune warrior.  After battling her own health for several years, Stephanie found healing through food and lifestyle changes, including joining Blooming Glen Farm CSA of which she is a long time member.  She is a Board Certified Integrative Nutrition Health Coach who is passionate about sharing healthy living tips and real food recipes. Instagram and Facebook: Tru You EssentialsWebsite: www.truyouessentials.com

As the CSA begins to wind down to its last few weeks, we are blessed with lots of fall root vegetables.  There are so many vegetables that you can turn into “chips”, so feel free to play around with this recipe for whatever is in your refrigerator or pantry.

Ingredients:
2-3 carrots
1 watermelon radish
1 black radish
2 beets, peeled
½ daikon radish
1-2 tsp sea salt
4 cups cooking fat (lard, tallow, coconut oil, etc.)

Seasoning Ingredients:
3 tsp sea salt
1 tsp garlic powder
½ tsp cayenne pepper

  • Thinly slice vegetables on mandolin (use the thinnest setting).
  • Lay each vegetable slice on a paper towel or cloth towel. Sprinkle with sea salt and let sit for 10 minutes.

  • Heat cooking oil in Dutch oven on stove top.
  • You can test the temperature of the oil by placing one vegetable slice in the hot oil. It should sizzle and begin cooking right away, but not cook so fast that it burns.  Adjust the temperature of the oil as needed.
  • Wipe the “sweat” off of the vegetables and drop in the hot oil one at a time.
  • Put in several slices so that there is one layer of vegetables cooking in the oil.
  • Allow the vegetables to cook and the edges to lightly brown. When they begin to look crispy, flip them.  Each type of vegetable with take a different amount of time to cook.  Just pay close attention to them.
  • When each vegetable slice is done cooking, remove from oil and place on paper towel lined plate to cool.
  • Mix seasoning ingredients together in a small bowl.
  • Sprinkle hot chips with a little bit of the seasoning mix.
  • Repeat until all slices are cooked, seasoned, and cooled.
  • Serve these chips as a side by themselves or with your favorite dip/sauce.
  • Enjoy!

*These are best served the day they are made.  They do not really store well because they lose their crispiness!

Recipe and photos by Stephanie Borzio.  Stephanie is a mom of three active boys and is an autoimmune warrior.  After battling her own health for several years, Stephanie found healing through food and lifestyle changes, including joining Blooming Glen Farm CSA of which she is a long time member.  She is a Board Certified Integrative Nutrition Health Coach who is passionate about sharing healthy living tips and real food recipes. Instagram and Facebook: Tru You EssentialsWebsite: www.truyouessentials.com

Roasting veggies is probably my favorite way to prepare them because of how sweet and caramelized they become. You can experiment with adding different root veggies like kohlrabi, carrots, turnips and fall radishes.  Enjoy these on their own or toss on top of some lettuce for a delicious salad.

Ingredients
1 bunch beets
1 butterkin squash
1 tbsp avocado oil
1 tbsp coconut aminos
1/8 tsp cayenne pepper
1 tsp honey
Salt and pepper

Preheat your oven to 400. Chop beets and squash (peeling optional for the beets but probably preferable for the butterkin) into inch sized cubes and place on a baking sheet, covered in parchment for an easier clean up. Mix the rest of the ingredients in a bowl and pour over beets and squash, tossing to coat everything. Bake for about 30 minutes or until you can poke a fork through easily.


Recipe and Photos by Olivia Edgar. Olivia’s passion for food and cooking finds focus on recipes using plant based, organic ingredients which make people feel their absolute best. She is a graduate of The Institute for Integrative Nutrition (IIN) and now meal preps for clients and small events. Olivia is newly married, and when she’s not cooking and sharing her recipes and holistic approaches on her Instagram account, you can find her working on their fixer-upper in Telford.

Potatoes can be mashed, baked, fried or roasted.  They can be used in stews, shredded and cooked as a breakfast side, or sliced and grilled.  They are incredibly versatile and are used in a variety of different recipes.  This week I wanted to showcase them in a very different way.  These mashed potato cakes can be a great side dish to any meal.  We served them alongside sautéed greens and grilled pork chops.  I even made a second batch to freeze and use as a quick side for a future meal.

Potato Cake Ingredients:
2 lbs potatoes, peeled and rinsed
2 Tbsp butter (can also use coconut oil)
¾ tsp sea salt (plus a few pinches to season water)
¼ tsp black pepper
½ tsp onion powder
½ tsp garlic powder
¼ tsp paprika (plus a little bit for garnish)
2 eggs
2 Tbsp fresh chives, finely chopped

  • Fill a large pot halfway with water. Add a few pinches of sea salt.
  • Cut potatoes so pieces are about the same size. Place in pot of water.  Bring to a boil.
  • Reduce to a simmer. Cook until potatoes are fork tender.  Cooking time will vary depending on size of potato pieces and type of potato used.
  • Drain potatoes. Place them in a large bowl or a stand mixer.  Mash well.
  • Preheat oven to 375°F.
  • Add in butter, sea salt, black pepper, onion powder, garlic powder, and paprika to mashed potatoes. Mix well.
  • Add in eggs and chives. Mix well to combine all ingredients.
  • Line a baking sheet with parchment paper. Use a ring mold to shape the cakes.  *I used a ring mold that was 3 inches in diameter and 1 ½ inches high. If you don’t have a mold, feel free to shape them by hand or create a mold using aluminum foil.

  • Fill the mold with the potato mixture, pressing down the sides to fill the mold. Use a butter knife to release the cake from the mold. Gently lift the mold away from the cake.
  • Continue to make cakes until all of the potato mixture is gone. This recipe makes about 5-6 cakes depending on size of mold.

  • Sprinkle the tops of the cakes with a little paprika. **You can actually freeze the cakes at this point.  Place the baking sheet in the freezer. Once cakes are frozen, remove from sheet and place in airtight container in freezer. When ready to use, thaw the cakes and bake as directed in recipe.
  • Bake the cakes for 20 minutes or until the outside is crispy. Broil for a minute or two to get the tops golden brown.
  • To serve, place cake on plate. Drizzle with creamy leek sauce (recipe below) and garnish with fresh chives.


Creamy Leek Sauce Ingredients
2-3 leeks, thoroughly washed and thinly sliced (white and light green parts)
1 Tbsp avocado oil or butter
4 cloves garlic, chopped
1 cup almond (or other type) milk
¼ tsp sea salt
Pinch black pepper
¼ cup cashews (soaked for at least 1 hour in hot water)

  • Heat oil or butter in small saucepan. Sauté leeks for 3 minutes on medium to low heat.
  • Add in garlic and cook for 2 more minutes.
  • Add in almond milk, salt, and pepper. Heat until warm.
  • Remove from heat. Blend leek mixture with soaked cashews until a smooth, creamy sauce is formed.

Recipe and photos by Stephanie Borzio.  Stephanie is a mom of three active boys and is an autoimmune warrior.  After battling her own health for several years, Stephanie found healing through food and lifestyle changes, including joining Blooming Glen Farm CSA of which she is a long time member.  She is a Board Certified Integrative Nutrition Health Coach who is passionate about sharing healthy living tips and real food recipes. Instagram and Facebook: Tru You EssentialsWebsite: www.truyouessentials.com

What a difference the weather makes- last year’s soggy wet weather wreaked havoc on our fall roots. This year we’ve been fortunate enough to have a dry fall and with it came some gigantic root vegetables. With our purple top turnips weighing in anywhere from 1-3 pounds each, I wanted to find a recipe to highlight them. Now that they’ve been touched by a frost, their natural bitterness has sweetened up a bit (an advantage to buying your veggies locally, rather than shipped in from warmer climes). This recipe comes from NYT Cooking, by Martha Rose Shulman. It is a very simple French soup, that will only taste as good as your ingredients. Serving size- 8 bowls.

Ingredients
1 Tbs. olive oil
1 medium onion, chopped
2 large leeks (or 3 medium), white and light green part only, halved lengthwise, cleaned and sliced or chopped (save those tops for your next batch of homemade stock!)
Salt to taste
2 garlic cloves, minced
2 pounds turnips, peeled and diced
1 pound potatoes, peeled and diced (the recipe called for Russets, but I think you could use any variety)
2 quarts water, chicken stock or vegetable stock (we had homemade chicken stock in the freezer- the soup gets a lot of its flavor from the stock, so I wouldn’t use water if I could help it)
A bouquet garni made with a bay leaf, a couple sprigs each thyme and parsley
Freshly ground pepper to taste
Fresh tarragon (or chives), chopped for garnish

Heat the olive oil in a large, heavy soup pot over medium heat and add the onion, leeks and a pinch of salt. Cook, stirring, until tender, about 5 min. Add the garlic and cook, stirring, until fragrant, 30 seconds to a minute. Add the turnips, potatoes, stock, salt to taste, and the bouquet garni. Bring to boil, reduce the heat, cover and simmer 45 min, or until the veggies are very tender and the soup is fragrant. Remove and discard the bouquet garni.

Blend the soup in batches in a blender (cover the top with a towel and hold it down to avoid hot splashes), or if you have it, an immersion blender works beautifully. The soup should be very smooth- return to pot if need be. Stir and taste. Adjust salt, add freshly ground pepper, and heat through. Serve garnished with finely chopped tarragon- it adds a lovely sweet anise flavor. We served it with Steph’s Roasted Apple & Arugula Salad for a perfect fall meal on a cold windy night. Enjoy!

Post and photos by Tricia Borneman, Blooming Glen farmer and co-owner. Tricia and her husband Tom have been farming together since 2000. Blooming Glen Farm is celebrating its 14th season bringing high quality certified organic vegetables, herbs, fruits and cut flowers to our local community.

It’s soup season! Soups are the perfect way to use up all those fall veggies in one pot. This healthy chili can be made on the stovetop or in a crockpot or instantpot but for this batch I did it on the stove in under an hour. Hope you love it as much as I do!

Ingredients
1 butternut squash
2 leeks
1 bell pepper
1 head celery
1 small onion
2 cloves grated garlic
5 large carrots
3 diced hot peppers (I used 1 jalapeño and 2 poblano)
4 whole tomatoes
2 cups vegetable broth
2 cans chickpeas, drained and rinsed
2 tsp chili powder
1 tsp each of cumin, Himalayan salt, black pepper, and coriander
dash of cinnamon and cayenne pepper
1 cup finely chopped kale (or other hearty fall green like chard, collards or raab)
Cilantro and sliced jalapeño for toppings

Chop up onion, celery, carrots, leeks and onion and add to a pot with garlic and a teaspoon of oil. Cook for a few minutes and add hot peppers and vegetable broth. Dice two of the tomatoes and purée the other two in the food processor and add to pot. Peel and chop butternut squash and add with the rest of the ingredients besides the kale. Bring to a boil and cook for about 20 minutes or until veggies are soft. Stir in kale and chickpeas and serve with cilantro and some jalapeño slices if you want some extra spice.

Recipe and Photos by Olivia Edgar. Olivia’s passion for food and cooking finds focus on recipes using plant based, organic ingredients which make people feel their absolute best. She is a graduate of The Institute for Integrative Nutrition (IIN) and now meal preps for clients and small events. Olivia is newly married, and when she’s not cooking and sharing her recipes and holistic approaches on her Instagram account, you can find her working on their fixer-upper in Telford.

It is officially October and I’m so excited because this is my favorite month of the year.  I enjoy having the windows open in the house, decorating with pumpkins and cornstalks, and eating all the beautiful fall produce that we get in our CSA shares.  As I looked through this week’s share, I knew that I wanted the arugula to be the star of the recipe.  Pairing it with some apples from North Star Orchard and some maple syrup from Augusta Acres Farm (available for sale at Blooming Glen Farm) makes this dish an amazing blend of some of my favorite farmers’ hard work.

Salad Ingredients
½ lb arugula
½ small red onion, sliced thin
2 medium apples
1 Tbsp olive oil
2 Tbsp maple syrup
½ cup candied walnuts (see recipe below)

Dressing Ingredients
3 tsp maple syrup
4 Tbsp olive oil or avocado oil
2 Tbsp apple cider vinegar
2 tsp Dijon mustard
½ tsp sea salt
Pinch black pepper

  • Rinse arugula and dry. If pieces are large, you may want to cut them into smaller pieces.  Place in a large serving bowl or on a platter.
  • Place thinly sliced onions on top of arugula.
  • Preheat oven to 375°F.
  • Core apples and slice into matchsticks. Place in medium bowl.  Toss with olive oil and maple syrup.  Spread apples in a single layer on baking sheet.  Roast for 7 minutes.  Mix and roast for 2-3 more minutes.  Remove and let cool a few minutes.
  • Place dressing ingredients in a small mason jar. Cover with lid and shake well to combine.
  • Top salad with roasted apples, garnish with candied walnuts, and drizzle dressing on.
  • Enjoy!

Candied Walnuts
1 cup walnuts
2 Tbsp maple syrup
½ tsp cinnamon
¼ tsp vanilla extract

  • Line baking sheet with silicone baking mat or parchment paper.
  • Preheat oven to 375°F.
  • Combine maple syrup, cinnamon, and vanilla in a small bowl.
  • Place pecans in a medium bowl. Pour maple syrup mixture over top and toss to coat.
  • Spread coated pecans onto baking sheet.
  • Bake for 5 minutes. Mix and bake for 3 more minutes.
  • Allow to cool for 20-30 minutes and then break apart. Store in an airtight container.

Recipe and photos by Stephanie Borzio.  Stephanie is a mom of three active boys and is an autoimmune warrior.  After battling her own health for several years, Stephanie found healing through food and lifestyle changes, including joining Blooming Glen Farm CSA of which she is a long time member.  She is a Board Certified Integrative Nutrition Health Coach who is passionate about sharing healthy living tips and real food recipes. Instagram and Facebook: Tru You EssentialsWebsite: www.truyouessentials.com